Pages

Wednesday, November 15, 2023

One Last Fall Pumpkin Project And Some Extra Crocheted Bandanas

 I fell in love with the picot and popcorn stitch this fall.  


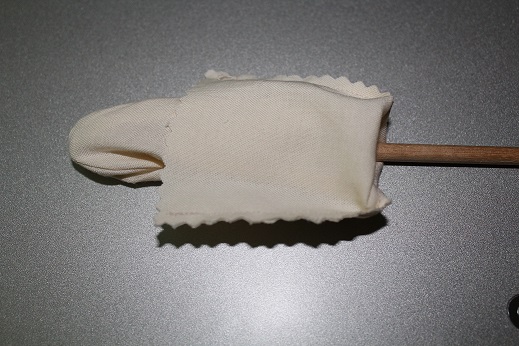
The popcorn stitch pumpkin tutorial is on youtube right here,  It's a tutorial by This Southern Girl Can and I enjoyed making this pumpkin.  I made two, one for me and one for dear daughter.  I also included a crocheted green leaf and vine (you can use any pattern you find, both are easy) and a crocheted brown stem (another pattern I found on youtube that was very easy).


I made three additional picot stitch bandanas.  That tutorial is here.  The Turtle Trunk is gracious enough to do a youtube tutorial and provide the pattern.  It's a really good one.  I made one in July for my daughter and I had to have one or two.  So I made three more, two for me and one for a friend.  It's a fun make and doesn't take more than four hours to complete.  Each bandana stitched up quicker than the last because I had memorized the row repeats.  The little picots remind me of baby bobbles/popcorn stitches.  You can see them in the second picture, so cute.


We took a another trip to Disney World at the end of last month.  It was a 5 night stay at the Polynesian, including dinner at Ohana, breakfast at Ohana, with two park days at Epcot (the food and wine festival was going on and we saw Billy Ocean do 6 songs at the Garden Theater in the American pavilion) and one park day Magic Kingdom including breakfast at Cinderella's Royal Table, dinner at Tony's Town Square Restaurant, and tickets to Mickey's Not So Scary Halloween Party.  We spent one day relaxing at the resort and exploring Grand Floridian resort.  We had a wonderful time and we did everything we wanted to.  We rode Guardians of the Galaxy (love that franchise) and dear daughter rode Tron.  It was so much fun.  Love staying at the monorail resorts.


Monday, August 28, 2023

A Few Small Projects

     I've been working on my Halloween embroidered pillows this past week.  I got the embroidery pieces trimmed and I put a border on each of them.  I just have to make the backs and inserts.  

      I made 16 of these pinwheels for fall and Halloween.  I kept half and my daughter got half.  I had fun picking fabrics for the Halloween pinwheels.  So many choices.


    I finally covered three books that I couldn't part with.  I decided to use them as decor in my bedroom and covered them with this lovely green velvet I found in the clearance section of Joann's.   I used the youtube tutorial at this link.  It worked great.  They suggest you use a woven fabric but I didn't have any trouble using the velvet I bought.  These were easy to make.  I just wish I didn't buy so much fabric.  I should have done some measuring before I bought my fabric.  


   I did crochet another bobble kerchief for myself but I'm not thrilled with the results.  I used Coboo by Lion Brand and the yarn did not do the pattern any favors.  The kerchief finished all curled up and its not supposed to curl up.  Ugh.  I'm keeping it, but I want to make more with the Dishie yarn from Knitpicks.  The one kerchief I made with the Dishie yarn was perfect.

Tuesday, August 8, 2023

Garden Art, Another Project That I Have Been Wanting To Make For Awhile

     I finally did all my research for supplies, and adhesives and started gathering them up last month.  I needed bottles and my daughter provided empty wine bottles for this project.  I ended up buying large and small clear plates on Amazon and painting them with stained glass paint (also purchased on Amazon) because our plate selection in thrift stores is sorely lacking.  Painting the clear plates was fun.  I got to make what I wanted.  These flowers were easy to make.  I only had to wait for the paint to dry, the glue to dry, and the mod podge to dry.  I made three of these over the course of Sunday night and Monday night.  They were ready to install today.  Of course I made duplicates for my dear daughter.  

   I painted the large dinner plates and the smaller plates, when the paint was dry I added the glass beads to the smaller plate with Gorilla Glue Indoor/Outdoor adhesive.   Once that glue was dry I glued the smaller plate to the larger plate and let that dry.  Then I glued the wine bottle to the back of the large plate holding it in place with shoes.  Then I applied two coats of mod podge to the painted areas of the plates.  The flower is now done.  I used a 48 inch 3/8" rebar post to place the bottle on it.  I put a piece of felt on the tip of the rebar and a piece of felt at the bottle neck.  Love these flowers.


Thursday, August 3, 2023

Two Small Quilt Blocks and Two Wood Plaque Projects

     I have had this postcard from Biltmore House since we went in April 2022 and I have always wanted to decoupage it onto a wood plaque.  I painted the plaque and added the postcard with Mod Podge.  All done. 


  This riser was a spur of the moment project.  I've been wanting a riser and I've made some from plates but I didn't like them.  I was looking at different youtube channels talking about how to make simple risers and I had to try to make something I would like.  This is a wood plaque with wood beads for the legs put together with e6000, and painted navy blue.  Now I have something that was pretty simple to make that I absolutely love.  I've got my hand crocheted doilies and large white teapot on it.


  I also made two small seasonal quilt blocks for my little quilt block frame.  I made the patriotic star and the primitive pumpkin.  So simple and made from stash.


   I'm gathering materials to make garden art next week.  Glass plates, stained glass paint, with extra pretties that should look like flowers and all put together with gorilla glue onto wine bottles and placed on rebar posts.  I can't wait to see how they turn out.


Saturday, July 29, 2023

Crochet Bandana And A Wood Shim Wreath

     I fell into a rabbit hole of looking at patterns for crochet bandanas.  I remember them from the 70's and I thought it would be fun to make a few.  I found a couple with some bobble textures in the patterns and I settled on a pattern with small bobbles made with picot stitches.  Here is the youtube video with the full pattern including a beautiful border which I modified.  


   I finished my wood shim wreath with stain.  I used Rustoleum dark walnut stain with polyurethane included.  It took a couple of days to finish the staining of 30 shims, but I love the look.


  Next projects are the fall and Halloween pinwheels and I have to finish making the embroidered Halloween pillows.  Those will be the only fall projects I'm making this year.

Friday, July 21, 2023

Wood Shim Wreath Project Done

     I have been wanting to make a wood shim wreath for almost three years.  I bought the wreath forms back in 2020.  I wanted this to be a joint project doing it with my daughter but that never happened so I made one by myself.  I found the instructions on pinterest.  Here is a link to the website that pops up for me that was the most helpful with list of materials and step by step instructions.  

     The pictures of pinterest show the wood shims stained a dark color and that's how I wanted to make both of my wreaths, but when I asked dear daughter if she wanted her shims stained she said no.  She wanted a white wash on the shims.  The shims are a very yellow wood and I told her that a white wash might not look that great on the yellow wood so we decided to paint them completely white.  I painted the back, front and sides of each of the 27 shims I used and the wreath form with white acrylic paint.  You can  use any acrylic paint.  

   Then I glued the shims to the wreath form with E6000.  It took me several days to finish this because I had to wait for the paint to dry and on the last day when I was gluing the shims to the wreath form I had to wait for the glue to dry on the first set of shims before I could add more.  It was a process.  I can't remember how much I paid for my wreath forms in 2020 but I bought 6 packs of shims for the two wreaths at $1.58 a pack at home depot.  I bought extra shims and I'm glad I did because some had knot holes in them and some were very rough and I didn't want to use them so I weeded them out of the project shims.  The acrylic paint cost me $2.00 at walmart.   I'm glad this wreath is done.  I'm making one more for me with stained shims.  I will start that project next week.


   I finished knitting my gray earwarmer and I'm working on a dark blue one now.  

   One other thing that I have been wanting to make is a trivet using half wooden beads and felt.  I saw this on a youtube video.  Here is a link to the entire video:  Liz Fenwick DIY  The instructions for this trivet start at minute 35:10 of the video.  The trivet I made used 66 half wood beads and I glued them with E6000.  I made three of these for dear daughter.  A pack of 300 half wooden beads cost me $12.99 on Amazon and I bought a yard of thick dark gray felt at Hobby Lobby for $6.99.  The felt I bought was very wide.  It's a lot of felt.  This is a very easy project and you can glue 3 of these in about an hour.  Wait for them to dry and trim the felt.  

    Here is a picture of one I glued before I trimed the felt.


Monday, July 3, 2023

More Crochet. Lavender Flowers.

    There are loads of tutorials for the lavender flowers.  You won't go wrong with any of them.  I did use one tutorial for the flowers and one tutorial for the leaves because I thought the small leaves worked better with the flower.  These were fun to make.  It takes about 45 minutes to make the flowers and another 20 minutes to make one leaf.  I painted each skewer/dowel stick green that I glued the flowers to.  That was the easiest way for me to get color on it.  I didn't want to wrap it with yarn like one tutorial did.  I thought that was a waste of yarn.  Here is a picture of the small (using a 6 inch skewer) and large (using a 12 inch - quarter inch dowel stick) lavender flowers I made.  These are going to dear daughter.  I'm going to make some for me in the next few days.  


Sunday, July 2, 2023

Crocheted Snowflakes

     It's never too early to crochet Christmas ornaments.  I found a lovely snowflake pattern on youtube by Jonna Martinez, the link to her youtube video is here.  

     I made the snowflakes with a size 3 white crochet thread and a size D crochet hook.  Each snowflake took about 40 minutes to make.  The video is very well done and easy to follow.  

    I made a total of 13 snowflakes.  Ten for dear daughter and three for me.  Here is a picture of them blocking them with glue to make them stiff.  

    I mixed 2 parts Mod Podge with 1 part water, stirred it up and I dipped each snowflake in the glue mixture until is was soaked, squeezed all the excess glue/water out then I pinned each snowflake out on an old pillow I bought at Goodwill just for this project.  They took about 8 hours to dry.


   I've been wanting to make some snowflakes for a while now.  I never made any before.  I enjoyed making these and I would have made more but my daughter has enough handmade decorations for her tree now.  

Friday, June 23, 2023

Air Dry Clay Success With Some Machine Embroidery Done

   A couple of years ago I bought some white air dry clay so dear daughter and I could make ornaments for her Christmas tree.  We used cookie cutters to cut out gingerbread men and stars.  We didn't get real crazy with it.  We left all the ornaments unpainted. 

   Dear daughter wants to make some of those big cement mushrooms for the garden and I have to say I want some in my garden as well.  They look easy to make.  While I wait for dear daughter to get in the mood to make the big ones, I crafted some small mushrooms from air dry clay.  These are easy to make and fun to mold.  I got the basics of working with air dry clay from several different Youtube videos, there are tons of air dry clay tutorials.  I love that organic shapes doesn't have to be perfect and my mushrooms are not perfect.  I made 5 of the mushrooms but only had room for 3 on my little tray I made. I let all my pieces dry for at least 72 hours before painting.  


   I'll be making more of these for my fairy garden that I want to construct in the future.


   I also took out my embroidery machines to finish up making some embroidered quotes for small decorative pillows for fall.  All I have to do is make up the little pillow forms, put a cute border on the quotes and put them together.  

If you got it, haunt it.


I'd turn back if I were you!


Home sweet haunted home


Let's boo this!  (for our fall Disney trip).


Happy Fall-i-days


   I've got about 12 of these little quotes/sayings to make for Christmas and I'll start those a little later in the year.

Sunday, June 11, 2023

Fun With Beads And Wire

   I found a tutorial on how to make a wire wrap dragonfly sun catcher on Youtube on Jesse James Beads channel.  Link is here.  I haven't done a lot of beading except to make simple bead necklaces with multi colored seed beads.  My favorite.  This looked like it was too much fun not to try.  I bought beads (on sale at Joann's) and 20 gauge and 26 gauge silver wire.  The instructions call for a jig to shape the wings, but I shaped my wings without a jig and didn't have any trouble making them.  This sun catcher took me about 4 hours make.

   I bought clear beads, silver glitter beads and some larger white shaded beads to use for the head/tail.  I changed my mind about the large white beads for the head/tail and wanted a green bead instead. I was thinking about buying more beads when coloring the white bead was all I could think about.  Instead of painting the bead (so messy), I pulled out my Sharpie magic markers and found a greenish blue that wasn't dried up and just colored the white bead with it.  Love the look of the custom bead.  I did add a hanging wire to this after I too this picture that I attached to the top of the left and right wing.  You can always hang it directly from a wing for a wonky look.

   Here is the suncatcher I made for dear daughter.


Thursday, June 8, 2023

Christmas Gingerbread Ornaments

   I just got back from a week in South Carolina spending time with my daughter, her doggie and her friends.  We made our home base in Greer, SC and were close enough to make a couple of day trips to North Carolina to visit the Arboretum and Biltmore Gardens since they are doggie friendly.  Anything not doggie friendly and I was there to stay at the VRBO rental to be stay with the doggie.  While dogsitting I would work on these little guys.

  These were easy and fun to make.  I made 6 of these but you can easily make enough for a gingerbread man army.  I used brown craft felt, tiny rick rack, ribbon for hanging, brown and white embroidery floss, black beads for eyes, tiny white buttons, fiberfill, and Alene's glue to attach the rick rack, and a little hot glue to attach the buttons.  You can also sew the buttons on.  Here is the link to the instructions I used:  link here.


Friday, May 19, 2023

Patriotic Pinwheels

     I found this project on youtube.  I was watching some patriotic DIY videos last week looking for something new.  I found this fun pinwheel project and I knew I had everything in my stash to make a few of these.   The person who did the video is Rebecca Virginia DIY.  The link to the video is here.  This video has 20 projects in it.  I want to say this is about the 2nd or 3rd project she shows in that video.  I will put some written instructions here just in case you don't feel like finding the actual video instructions.

    These are the pinwheels I made.  


    Cut two 4" squares from patriotic or solid fabric.  I used a combination.  Cut 2 -  4" squares of Heat & Bond Iron On Adhesive.  Iron the heat and bond to the wrong side of each 4" square.  Remove the paper from the Heat and Bond and place the two pieces of fabric wrong side together and iron together so you now have a 2 sided piece of stiff fabric.  Trim the edges of each square with your pinking shears just enough to give it a pinked edge.  I think I took about 1/8" of fabric off each edge.  Find the center of your square and mark it, measure out 1" from the center and mark that in each corner, cut the corner of each square toward the center with the pinking shears up to the 1" mark.  Turn down alternate corners and hot glue to the center.  Hot glue an appropriate button or charm in the center.  You can glue these to skewers, chop sticks or quarter inch 12" dowels.  

    I made two modification to these instructions.  I only used 1 square of Heat and Bond for each pinwheel since it's two sided, you really don't need the heat and bond on the back of both squares.  I also didn't measure and mark the places to cut the corners, I just eyeballed it, it worked fine.  I didn't want to make any marks on my fabric. 

    I can see me making these for other holidays and also making them into a banner.  Pinwheels aren't just for summer.

Wednesday, May 17, 2023

Easy and Quick Crochet Beret

      Last week my daughter asked about making a beret for a party she was going to.  She had to dress like she was in the 1960's so she decided on the beatnik style.  I looked up how to make a quick beret and lo and behold, there was a youtube video on how to make a no sew beret from a t-shirt.  So I had to try it with a goodwill t-shirt dear daughter bought.  The instructions were not great and I didn't do a very good job with the beret but if you took some time making your pattern you could make a decent hat with the youtube video.  


    After that experience I started looking at berets I could crochet.  I love the look of a beret and I've never tried to wear one.  This will be a hat for winter wear.  I didn't look up knit berets because I didn't want to spend weeks working on it.  I knit too slow.  I found a pattern on Ravelry called the Incredibly Simple Slouchy Hat which was a free pattern with a webpage link.  The link is here.  This hat took me about 3.5 hours to make.  The instructions were very clear and easy to understand.  I enjoyed making this.  I didn't have any chunky yarn so I used two strands of Knit Picks Brava Worsted in Celestial colorway with a size M crochet hook to make this hat.  Dear daughter likes the color of this one so I'm giving this one to her.  I will be making another for me in the Navy colorway.  I'm getting a chance to use up some of that big yarn stash I organized last week.


Monday, May 15, 2023

Scrappy Quilt is finished.

    I bought 5 yards of Kona Pool (it was on sale at Joann's) for the backing and binding fabric and at the last minute decided to put a couple of rows of scrappy squares in the middle since I had to piece the back anyway.  I did simple cross hatch quilting lines.   This finished at 56 inches x 66 inches.


   With this finished quilt, I'm feeling better about my projects that are in line to be worked on and I have quite a few of them.  I decided to take inventory of a bunch of acrylic yarn I purchased in 2017/2018 from Knit Picks.  I love Knit Picke's Brava Worsted yarn for hats, ear warmers, scarves, and afghans.  I started two afghans back in June/July 2018 with these yarns but I quickly put them up.  I started a stripey ripple afghan and a granny square afghan.  I fully intend to finish each one so one night last week I pulled the large tubs of yarn out and sorted the yarns for each project.  I made a list of all the colors (there are so many colors) and how many skeins I have of each.  Now each afghan project has it's own box and I have a plan to get these afghans started up again later this summer.  Small granny squares would be a nice crochet project for the summer months since they are easy to make and won't be sitting on my lap until I put them together and I can join them together in the winter.

Sunday, April 16, 2023

Scrappy Quilt Top Is Finished

    I started this quilt top in 2020 during the pandemic when I was working from home.  I got it 1/3 done and I put it away to finish later.  I worked on it for two days last week and I finally got it to lap quilt size.  Its about 53 inches by 72 inches.  I'm trying to decide on my backing fabric and I'll get it quilted in the next few weeks.  I'll be doing a simple cross hatch quilting on it.


   I'll post the finished quilt with correct dimensions after I finish it.

   I'm currently working on making some magnetic threaders for cross stitch project bags as well as for hand sewing/hand embroidery projects.  I found these threaders and saw where some folks were glueing magnets to one side and charms on the top to use them as threaders and needle minders for cross stitch/hand sewing/hand embroidery projects.   I bought a bunch of the threaders on Amazon and had a bunch of magnets and charms.  Took some E6000 tonight and had some fun making about 25 to put in various spots for my use.


Tuesday, April 4, 2023

More Tilda Bunnies And Techniques To Make Them Quicker

 I decided to make two more Tilda Easter Bunnies.  I had done some additional research on how to make them quicker and easier.   The first thing I want to say is that I used a blue pen to trace my pattern pieces on the first bunny.  That was a mistake.  The blue color did show through on my fabric.  Darn it.  For the second and third bunnies I used a Pigma Mircon Pen in a brown color.  It worked well and wasn't visible after I sewed my pieces.  This is a picture of the pieces traced and sewn with 1.5mm stitch.  


   Another technique that made these bunnies easier to make was that I cut out these pieces with my pinking shears with a narrow seam allowance.  This eliminated the need for clipping curves.  The pieces turned easily and had nice curves doing this.  


    I had some trouble turning my pieces the first time I made this bunny and after doing some additional research I figured out how to do it easier.  I have some 1/4"  round 12 inch long dowel sticks and I thought I could use these dowel sticks to turn these small pieces.   Here are some pictures of that process.  I put one stick on the inside of the piece to turn and one stick on the outside of the piece to turn.  Lining them up  at each end.  Pull on the fabric over the stick on the outside and using both sticks you can maneuver the fabric to be right side out.  It worked really well and was a quick way to turn my pieces.  It worked for the ears, arms, legs and body.  And that process did not take as long as it did last time I made this pattern.


   Here is a picture of the pieces stuffed and pinned to the body.


  After hand sewing the pieces to the bodies I made them each a funky long dress and finished them.


Friday, March 31, 2023

I Made A Tilda Bunny

     I have been wanting to make a Tilda doll for a while.  The skinny arms and legs make me swoon.  I just love the look of the Tilda dolls.  I found a free bunny pattern on her website.  The link to the page where you can find the pattern is here.   Scroll down the page to the Easter bunny pattern, it's at the bottom.  Click on the Easter bunny pattern and it will open a .pdf page you can print and save.  Then I found a video tutorial on how to make the same Easter bunny on youtube, that link is here.

   All the material for this bunny came from my stash.  I even had the embroidery floss for the nose and the black acrylic paint for the eyes.

   This project took me about 5 hours.  It took me a long time to turn the long thin tubes for the ears, arms and legs.  It was fun to make.  I'm giving this little bunny to my daughter for Easter.  I will probably make one for me next week.

   I made a couple of changes.  I made a long dress to cover the legs.  The first dress I made was much too short, so I made her a long maxie dress with a ruffle on the bottom.   To make the maxie dress I doubled the length of the dress and added a two inch piece of ruffle on the bottom.  I also made her eyes a little larger.  I used the end of a small paint brush to make my eyes.  I like the larger eyes.  I did not put any blush on my bunny because I did not have anything I could use for the blush. 


Thursday, March 30, 2023

Knitted Ear Warmer Finished.

    I finished knitting the ear warmer with the Caron Simply Soft in black.  It knitted up very quickly and it's ready to give to my daughter.  These are a picture of the tube at 7 inches before bind off and the tube sewn up and made into a double thick ear warmer.   I'm in the process of knitting one of these with gray yarn for me.


     I found another small project I want to make and I just printed the free pattern for it.  I'll share it next week when it's finished.  I have also pulled out my half finished quilt top to get more blocks added to it.  I surprised myself and found three more rows of four patches to add to the top that were already made in the fabric box.  I just need to make another three rows to finish the top.  I might have that done by the end of next week.

Friday, March 24, 2023

Sun Hat To Support My Favorite Baseball Team

    I grew up in New Jersey and I was NY Mets fans.   My NY cousin told me about the team and I was hooked until I moved away.  I haven't followed baseball much since moving away but I'll always be a NY Mets fan.  Last year I started following the games more and talking baseball with my brother, who is a NY Yankees fan.  

   I love a good sun hat.  I use them in the yard and at the beach.  And they are super easy to make.  I started thinking about making myself a sun hat with Mets fabric and I got it made in January of this year.   The hardest part about making this hat was finding fabric.  


  I can't remember what pattern I used.  There was a free bucket hat pattern on the Mood Fabrics website that I printed off and I also bought a pattern from etsy that I printed off.  There are a lot of bucket hat patterns out there.  there are three pattern pieces and they are they are super easy to make.  I bought two yards of fabric for this and I used almost every last inch. I added the chin strap to mine for windy days at the beach.  This took me about 5 hours to make from cutting it out to finishing it.


Another Crochet Finish

    I know its spring and it winter is supposed to be officially over but I got the crochet bug and had to make this neck warmer.  I just love the shape of this thing and its going to be perfect for those few cold days we get in winter, next year.  It's hard to see the ribbing detail in this picture, but the ribbing is there and the texture is wonderful.


     I finished this in black red heart super saver yarn because I had it leftover from the ear warmers I crocheted earlier.  Its a little stiff.  I'm going to wash it next week to see if it softens up some.  It fits well and the pattern was spot on.  I made a few more than 71 rows because I was trying to use up a skein of black yarn and it still fits good.  This took me a little while to finish because of the black yarn.  It was hard to see.  I had to have a bright light right next to my chair to work on this.  I think it took me about 9 hours to finish.  My daughter does not want one.  She hates turtleneck anything so this was a no go for her.  I did offer to make her one in a softer yarn but she said she wouldn't wear it. 

    My daughter did ask for another black ear warmer so I bought some Caron Simply Soft and I'm making her ear warmer with the knit hat pattern I converted to an ear warmer.  I cast on 100 stitches on size 7, 16 inch circular needles, join in the round, knit 3, purl 2, around until the piece measures at least 7 inches.  I bind off and fold it in half and sew the two ends together with a whip stitch. It's an easy double layered ear warmer and I know she will use it because she has used the others I have made for her.

   I also finished doing some sewing.  I made the hanger for my hats and its in the closet.  Love that I can get to my hats easily for those dirty hair days or when I'm going to be out in the sun.  I made a hair bows, some hair bow ties, and quilted zipper pouches for a friend that I will see in May to celebrate her future trip to Disney.  I used black and white polka dot cotton and red and white polka dot cotton fabric on all of those projects, I had most of that in my stash.

   I have my unfished scrappy quilt top ready to finish.  I just haven't started sewing on it yet.  I also have fabric for another quilt top that I haven't even cut yet.  I have to go through the projects box I created for all the other things I have materials for and haven't even started.  Then I can update my project list and get it in order.  I won't follow the list by number, but I may get a few things off of it this year.  

    Right now I'm just having fun.  Making what I want, when I want to.  

Tuesday, March 14, 2023

Designing A Way To Store My Disney Ears, Baseball Hats, and Sun Hats

     After my November trip to Disney I had accumulated 3 pair of Mickey Mouse ears, one headband version and two made with visors.  The headband is my Snow White ears, I bought the Tigger visor ears for the November trip and my dear daughter gave me a paid of Tinkerbell visor ears for my birthday.  I needed a way to store the ears so they wouldn't get crushed.  I made a fabric strip to hang from a hanger with fabric loops that button close.  The fabric loops slip through the visor and button to secure the ears.  The whole thing hangs from a hanger in my closet.  


    I acquired another pair of Mickey Mouse ears with a red polka dot Minnie bow.

    I'm currently making a similar item to store my sun hats and baseball hats so they are easier to access and they stay neat.  It's easy to make and works perfectly.


Wednesday, March 8, 2023

Crochet


I've been playing with my crochet hook since having more time on my hands.  I haven't done any crochet in a long time and it feels good.  I may even pick up my knitting needles someday soon

I made several of this twisted headband/earwarmer that I found.  It's super easy to make and fits well.

The link to the directions is here.


I'm starting a neck warmer that I found on youtube.  It's a simple crochet project that should be perfect for my needs.  

Link to the youtube tutorial is here.