Pages

Thursday, December 28, 2017

Christmas Fabric Collection

     I’m starting a collection of Christmas fabric.  I’ve never had a really big Christmas fabric collection because when I needed Christmas fabric I would buy just enough and use it up.  But now that I’m expanding my Christmas sewing to include pillow covers, napkins, and potholders, it’s time to have a collection for Christmas sewing.   I found some really cute fabrics this year and I’m also including the pieces of pretty homespun that I bought to make the tree and wreath ornaments this year. 


     This collection will be stored in its very own container so I can find them during the year when I get an urge to work on Christmas 2018 ornaments, pillow covers, hanging kitchen towels, napkins, or potholders for the holiday. 

    And I'll definitely be shopping for more Christmas fabric throughout the year to add to my collection.


Saturday, December 23, 2017

Review - Mini Hi-Temp Glue Gun

I bought this glue gun from Amazon.com.  I couldn't resist the colorful plastic cover on this gun, it's awesome. 

I've used this glue gun three times in the last couple of weeks.  It gets hot very quickly (within 8 minutes) and the glue flows very nicely when the trigger is pressed.  I noticed that the glue gun does not drip when I'm not using it which is nice because that will save a little bit of glue.  The stand is actually molded from the plastic (not one of those wire stands) and it works very well.  This tiny glue gun fits in a plastic pencil box along with the 30 mini glue sticks.


Easy Christmas Tree Decorations

    I found these cute Christmas tree ornaments on Facebook and made three to give to my dear daughter.  Here is the link to a similar tutorial made with scrap ribbon.  Link to fabric Christmas trees. 

     I made mine a little different.  I used a dowel that I cut up into three different sizes.  I filed the ends of each piece to round off the edges caused by the cutting.  I painted the dowel stick, then I cut up 1.5" wide strips of fabric into 8" long pieces and I also used some green ribbon I had.  I tied the fabric to the dowel and trimmed it into a triangle.  I found the wooden stars at Michaels and painted them with some silver glitter paint I had.  I glued the star to the top and added a piece of twine for hanging. 

    These were easy and fun to make.


Friday, December 15, 2017

Another Christmas Decoration DIY

   A few weeks ago I was checking out the gift bag selection in all the stores and I saw some cute gift bags, like the scenes with the red truck and cute trees.  I don't need any Christmas gift bags because I don't give gifts at Christmas anymore, so I didn't buy any. 

    By the time I had the idea to buy a bag and put it in a frame for a decoration in the house, I had missed out on the red truck gift bags but I did find this sweet bag at WalMart to cut up and frame.  I would call this a medium sized bag and I cut it in half, removed the handles (carefully) and put it in an 8" x 10" frame that I also found at WalMart.  I think this cost me $7.00 to make.

    I love this.  I will definitely be doing this again next year. 


Wednesday, December 13, 2017

Rustic Christmas Tree Ornaments And A Quick Product Review

   I made tree ornament with the mason jar band and strips of fabric.  They turn out like little wreaths and they are super cute. I love rustic bows and buttons.  Here is a link to the video tutorial (it's the first ornament she makes in the video) homespun tree ornaments link.   The person in the video uses only homespun fabric for her ornaments but I used a mixture of homespun and Christmas patterned quilting cotton.  I think this will work with any fabric.  Have fun with it.

    I found out while making these ornaments that I desperately need a new glue gun.  I've had my Aleene's Glue Gun for twelve years and I dread taking it out to use because it takes so long to heat up and the glue just doesn't flow very well.  It's time for a newer model.  I went shopping on Amazon tonight and picked out two glue guns, one that takes full size glue sticks and has two temperature settings and a mini glue gun that is high temperature only.  I'm looking forward to upgrading my equipment.  I hope to do a review of my glue guns after I have had a chance to try them out.

    Here are the ornaments I made tonight.  I will definitely be making more of these.


    I want to mention that when I made my pleated/textured Christmas tree I used a product called Craft-Fuse by Pellon (Style 808) Iron-On Backing For Crisp Hand & Added Body.  It's a heavy duty fusible interfacing, and I used it to stabilize my tree piece while adding the sides to it.  It worked great.  It fused easily to the fabric and stayed put once it was ironed.  So if you are looking for a heavier weight interfacing to stabilize that is fusible, try Craft-Fuse.  It really works.  I bought two packs of this from Amazon about a year ago and I forgot I had it until I was looking for interfacing to do this project.  I'm glad I had it.

Monday, December 11, 2017

Pleated Christmas Tree - Framed

   I'm loving the Christmas sales the last few weeks.  I'm finding a lot of items for my crafting on sale.  I found this sweet 8 x 10 frame at Joann's Fabrics yesterday and it was 50% off, so I paid $4.99.   It's got an easel in the back so I don't have to hang it up I just put it up on my kitchen counter to decorate.  I'm going to experiment making these trees a little bigger.  This would make a great pillow cover.  I'm having fun with my Christmas crafting.


Friday, December 8, 2017

Pleated Christmas Tree - Finished.

  The sewing is done on the Christmas Tree.  I just have to put it in a frame.  I love this.  I just ordered some fun green fabrics to make more of these over the next year.  I also ordered a pretty gray with small pin dots that I think will look like a snow covered tree at night.  Fun.  Included in that order was some white fabric for the borders because I am completely out of white fabric.  Weird.

    Here is my finished pleated Christmas Tree. 


Thursday, December 7, 2017

Pleated Christmas Tree Project and More

    I found this pleated Christmas tree tutorial a few years ago and I made one that I gave away to my daughter.   Here is a link to the tutorial:  pleated tree skirt tutorial.  I've been wanting to make one for  myself and I'm doing it now.  This is easy to make and you can have fun with colors for the tree and the tree skirt.  I stayed with Christmas colors for this one, but I will definitely be experimenting with colors for the next one I make.

    I will add the tree skirt on this one and it will be ready to frame.


      I've been watching Youtube videos on how to make easy and cheap Christmas decorations.  I love the snowflakes made with clothes pins.  I bought very small clothes pins from an etsy seller to make a few of these to add to my decorations.  I need to buy some silver spray paint and silver glitter to make them sparkle.  Here is a link to a Youtube video: Clothes Pin Snowflakes.

     I also like to the decorations I've seen made with the mason jar lid band.  I saw a lady tie a bunch of homespun strips around the band and it turned out extra cute.   Here's a link to her tutorial, she makes four different ornaments in this one.  Homespun Christmas Ornaments Youtube tutorial.  And yes, I have some mason jar lid bands for this project as well. 

    I also found a paper star tutorial on Youtube.  Here's a link:  Paper Stars.  I haven't done a lot of paper crafts, but this one looks doable.  I'm going to give it a try in the next few weeks.  I'll let you know how I get on.

No progress to report on my Grandmother's Flower Garden Quilt top.  I'm still stuck on the third row.


Friday, November 17, 2017

More Kitchen Accessories

    I took some time out this week to make some hanging dish towels.  I bought the brown towel to make hanging towels for my hostess on Thanksgiving.  The chicken towels will be mine.  I found the chicken towel in my stash and I love the colors in it, so I had to make some hanging towels for me. 


    These lovely potholders were made on my Harrisville 7" loom with Harrisville cotton loops for my daughter.  She told me that she loves these potholders because they fit her smaller hands better than the bigger ones I make with big squares of cotton and batting.  I made some of these potholders a few years ago for her and since she loves them so much I thought it was time I made her a few more.  I will definitely be teaching her how to make these for herself sometime in the future,   Each one only takes about an hour and fifteen minutes to make.  They are easy and fun to do.  I love picking the colors and putting crazy colors together.


    You guessed it, no progress on my Grandmother's Flower Garden quilt top.  I'm still working on row three.  I've been having too much fun finding other things to make. 

Monday, November 6, 2017

Halloween May Be Over But You Can Still Make Pumpkins

               I'm still celebrating fall with pumpkins.  This may be my favorite pumpkin.  While I was researching how to make fabric pumpkins I found a video tutorial on how to make a pom pom pumpkin with tulle.   This pumpkin was was easier and cheaper to make than the fabric pumpkin and it turned out extra cute.  Here is the link to the youtube video:  tulle pom pom pumpkin tutorial.

                Here is a picture of my effort. 


                While I'm taking time out to make little projects, I'm still working on my grandmother's flower garden quilt top.  I have all the flowers for the third row made and I'm starting to add them to the bottom of the second row.  It's slow going, but it's coming along.  I promise to post a picture as soon as I have the third row finished.

Sunday, October 29, 2017

Making A Fabric Pumpkin

   I got a wild hair a couple of weeks ago to make fabric pumpkins.  I found several videos on Youtube.   There were quite a few videos and some of them were easier then others.  I made mine with just a little bit of hand sewing. 

   I made my pumpkin by cutting a 19" inch circle of fabric.  I did a running stitch 1/2" from the edge with embroidery thread (using all six strands) to gather up the top, stuffed it with fiberfill and closed up the top leaving a little opening to put my stem in it.  I made the stem by cutting a 2 1/2" strip of acrylic felt.  I cut one long edge of the strip making it rough, rolled it up and stuck it in the pumpkin.  You can hot glue the stem in the pumpkin, but I didn't need to.  I made the leaves with the same felt.  I cut a hole in a square of felt and slipped the hole over the stem and cut the leaves in the felt square.   The tendrils are twine treated with fabric stiffener. 

   This was a fun easy project and it would be so cute with some fun Halloween fabric or plain orange.  I will be making more of these to decorate next year.


Wednesday, October 18, 2017

The Best Gift Bag Tutorial


     I was wondering how to wrap my daughter's little birthday presents the other night and I realized I could make something really cute with my fabric.

     A few years ago I found this tutorial for a gift bag that is so easy to make.  The directions are great and even if you have never made a bag before, I'm sure you can make this one.

      The little bag that is made from the tutorial is wonderful for small gifts but the best part about this pattern is that you can make the bag any size you want and it turns out great.  I know, because I just did it.  The bag I made the other night is extra scrappy and not very pretty, so I won't be showing a picture here, but you can use coordinated fabrics and make a beautiful bag any size you want.

      I will show you this little bag I made a couple of years ago using this tutorial.  I use this as a purse sometimes.  I even added some batting to the straps to pad them a little bit.  If I lay this bag flat is measures 14" wide by 10" deep. 


      The trick to making the bag any size is to make the lining the same size as the outside of the bag.  So if you made the outside of your bag 14" x 18" then cut a piece of fabric 14" x 18" for the lining and follow the directions.  It works great. 

     You can also adjust the straps on the bag.  You can make them as wide and as long or short as you want. 

    If you are making the bag bigger, you will want to make your boxed corners a little deeper.  When I made my scrappy bag the other night, I sewed and cut my boxed corners at 2". 

    You can also change up how you place your fabric.  Just because they have a solid bottom and scrappy sides doesn't mean that's the way you have to make yours.  I made my scrappy bag with a scrappy bottom and solid sides.  You can make the entire outside from one piece of fabric as well.  It's really easy and I like to say if I can do it, anyone can. 

Sunday, October 8, 2017

Woo Hoo! The Second Row Is Done, Well Almost.

    I finally finished the second row of the Grandmother's Flower Garden Quilt top.  Actually, it's not totally finished.  I need to add three green hexies to the bottom of the each of the half flowers on the end, but I was so happy to get all these pieces put together that I rushed taking my picture.  It won't take long to add the extra hexies.  Now it's time to cut more fabric to make flowers for the third row.


    I made a decision last month about how I'm going to finish this top when I get all seven rows finished.  I will applique a silver/gray border to all four sides of the top.  I don't know how wide the borders will be yet.  I will use the same silver/gray fabric for the backing.  I have decided to piece the back with a row of flowers, as well.  I bought eight yards of the Mirage line of fabric in the silver lining colorway at Connecting Threads on line store (Link to Fabric).  I'm glad I finally picked a border and backing fabric.  Now all I will need is a batting and I don't have to buy that until I actually finish the top and at the rate I'm sewing now, it may not be done until next fall. 

     I took a day trip to Jacksonville, Florida on September 23rd to see the quilts in the Quilt Fest 2017 show.  This show is held each year and this was the first time I had ever been.  The show was fun and there were a lot of great vendors there.  Since it was fall, the vendors had a lot of fall and Halloween patterns.  I was on the hunt for a nice quilt pattern and the gray fabric for my current quilt project.  I did not find anything I couldn't live without, but I had a blast looking.  Dear daughter found a backpack pattern that she had to have.  There were lots of local quilts and quilters.  It made a nice change from all the international quilts I saw in Paducah last year. 

Tuesday, September 12, 2017

Sewing Skirts Before Evacuating

   I had to leave my mobile home before the Hurricane Irma came calling on Sunday and Monday.  So I spent part of my Saturday sewing up two more skirts with the fabric I ordered.  It was a great way to be creative and relieve a some of the stress.  I couldn't tell how bad the storm was going to be or whether I would have a home to return to so I packed the kitties and the essentials (including my Janome 7700 because I had to save at least one sewing machine) and I went to stay at my daughter's house which is not a mobile home.  We got through the storm without losing power and I came home this morning to find my house the same as I left it.  A few sticks and small branches fell out of the trees but nothing more.  I was really lucky and really happy. 

   Here are my new skirts.


   While I was away I did get to spend some some time making flowers and half flowers for the second row of the Grandmother's Flower Garden quilt.  Row two is not even half done but I'm working on it.  I should be able to show something soon.

Sunday, September 3, 2017

Found Two More Fabrics To Make Skirts

I went to the Thousands of Bolts website this afternoon and found two more fun fabrics to make two more skirts for myself.

This is Serengeti.  I love animal prints.  This reminds me of my cats bellies.  I have two bengal cats and they have lovely spots in their belly fur.


This is Feather Your Nest.  This is just fun.


Both these fabrics were $4.95 a yard, I bought two yards of each and the shipping is about $6.95 for all four yards.

Saturday, September 2, 2017

Fun Quick Skirt Project

   I made the skirt with the two yards of pretty plum sixteenth century selfie fabric.  It was easy and fun.

Two yards was a the perfect length of fabric for this skirt.

Here's how I made my skirt:

I washed the fabric, gave it a light press, and I removed the selvedges.

I cut about 5" off one end of the fabric to use for the pocket.

I sewed the ends together to make the skirt.

I ironed the elastic casing at the top, and ironed the hem at the bottom.

I sewed the the casing up leaving an 2" opening to insert the elastic.

I sewed the hem at the bottom.

I added a nice deep pocket, you can see it on the left side of the picture, the two faces that are closer together are the outside of the pocket.

I inserted the elastic in the casing and sewed up the ends of the elastic, then I sewed up the opening in the casing.

It was finished.

Now I'm looking for more fun fabrics to make a few more stay at home skirts.

Wednesday, August 30, 2017

I'm Making Simple Skirts

A few years ago I made an elastic waist skirt from a bed sheet I bought at Goodwill.  It was a pretty blue floral sheet and I wore that skirt a lot around the house.  I found some holes in the fabric a few weeks ago and I knew it was time to say goodbye to that garment.

I cut the skirt up and kept all the good pieces to put in my stash.

Then I got on the computer to buy some fabric for a new skirt.  I decided to make a gathered skirt with doubled fabric.  I thought it would be great for the winter.

I bought 5 yards of cotton fabric for this project.  I ended up ordering the fabric from Thousands of Bolts website.  The fabric was $4.99 a yard, which was a price I loved.  I also had to buy more 1" elastic for this project so I ordered 12 yards from Amazon, because I'm going to make a few more skirts.

I washed the fabric, gave it a light iron, cut off the selvedges, and folded it in half lengthwise right sides together and sewed it up on all sides leaving an opening for turning it right side out.  I turned it right side out and sewed up the opening and I had my skirt.  I sewed up the side seam, made an elastic casing at the top, inserted my elastic, sewed up the casing, added a patch pocket, and my skirt was done.  It's super heavy and it will be perfect for curling up in the winter.

Here's a picture of the finished skirt.  It doesn't look like much, but I think I will get a lot of wear out of it.


While I was looking for more fabric to make skirts, I found some of the 16th Century Selfie in Plum.  I love this fabric, it's designed by Tula Pink in her Elizabeth collection for Free Spirit.  I found this on etsy.  I had a yard of this fabric a couple of years ago when it first came out and I used most of that to make a bag.  I cut up what was left into strips for my string quilt blocks.


The seller only had two yards of this but I had to have it and I think it will be perfect for an elastic waist skirt.  This skirt will not be doubled.

In between making skirts and fabric shopping I'm still working on my Grandmother's Flower Garden quilt top.  I've gotten the first two flowers of row 2 sewn to row 1 and now I'm back to cutting fabric and making hexie papers to make the next three flowers for this row.  I'll post another picture when I get some more done.  It's a very slow project but I'm loving every stitch of it.


Tuesday, August 15, 2017

Still Hand Sewing

    I don't sew everyday, but I try to sew a few days a week.  I get a lot more accomplished on the weekend.  Here is an update on the Grandmother's Flower Garden quilt top.

    I have started the second row.  The second row flowers still have to be attached.


Sunday, July 30, 2017

Grandmother's Flower Garden Quilt Update

   The first row is almost done.  I have five full flowers in my first row.  I still have to make a half flower to put at the end of the row so when I add the second row the edges are pretty even.  I will be appliquing this finished quilt top to straight edge borders and I think half flowers on the end of rows will make the quilt look more even.


Christmas Hanging Dish Towels Are Finally Done

   I finally sewed the buttons on the Christmas hanging dish towels that I have been making for a couple of months.  I ended up with six of them and I'm giving away five.  Dear daughter gets three of them, she will keep one and give two away.  I'm keeping one and giving two of mine away.  I'm so glad I started early making these because they took way longer than I expected them to.

    I wanted to put green buttons on the top, but I couldn't find a button in a good green color for these, so I ended up using some of the red buttons I have.

    Here is a picture of four of them hanging on my oven door.


Sunday, July 9, 2017

More Sewing, No Crocheting

   I have two more flowers done on my Grandmother's Flower Garden Quilt.  I love the way this is turning out.   I should have taken this picture when the sun was out so you can see the colors clearer,  but the weather was not cooperating today and I wanted to get this posted.


    Here is a picture of my yarn for the Hotel of Bees Shawl that I will start soon.  The yarn is Knit Picks Comfy Sport, the dark pink is Peony, the beige is Parchment, and the light pink is Flamingo.  I'm looking forward to starting this project soon since I did manage to finish the Christmas towel embroideries and that project is half done now.


Sunday, June 25, 2017

Hexagon Quilt Update

   I have finished another block in my Grandmother's Flower Garden quilt.  I have two done now.  Only 33 more to make.  ðŸ˜Ž  I have been taking my sweet time with this project.  No rush.  I have plenty of quilts to keep my warm when the weather turns cold.


   I received the yarn for my Hotel of Bees Shawl on Friday and I wound all nine skeins into yarn balls so they are ready to use.  I should take a picture of my yarn.  I also took some time to read through some of the pattern last night.  I don't know when I will start this project, but I want to finish my Christmas hanging dishtowels before I start this.  I still have two dishtowels to embroider.  Once they get the embroidery done I have to make the top part.  I didn't get a chance to finish the embroideries on the last two towels this past weekend because . . . 

   I spent a lot of the weekend buying mulch for my large flower bed in the front of the house.  I have a small car so I can only buy 4 bags of mulch at a time.  I made four trips to the home improvement store buying mulch Friday night and Saturday morning to get enough mulch to cover this space.  I used 15 bags of mulch in this space.  I swear my roses look happier since I put the mulch down. 


Wednesday, June 21, 2017

Christmas Is Coming, Believe It Or Not

    I thought I would get an early start this year.  I hate giving Christmas gifts, I have a hard time deciding what to give anyone.  I do know that my daughter and my brothers like the hanging dish towels that I make, so that's what I will make to give to them.   I will make five of these pretty dish towels and I should have them all finished by next week.

    I bought the fabric and the towels for this project last month.  I bought two huge white tea towels and cut them into quarters.  I hemmed the one cut side on my sewing machine and then I put the towel into the hoop to add the embroidery to it.  I only got one embroidery made tonight but I love it.  I will embroider the rest over the weekend then I can start adding the fabric toppers to each one.

    Here's the embroidery design I'm using on the towels.


     This makes a nice break from hand sewing hexies.  I really miss my sewing machine when I'm doing a hand sewing project.  I love pressing down on the foot pedal of the machine and sewing at full speed.

Friday, June 16, 2017

Hotel Of Bees Crochet Shawl Project

   The Hotel of Bees shawl pattern was making the rounds earlier in the year.  I heard really good reviews of how well written the pattern was and I saw some beautiful finished shawls in youtube videos and on Ravelry.

   I ordered my copy of the pattern about a month ago.  I spent some time trying to find the yarn I wanted to use.  The designer made her sample with a cotton/acrylic blend yarn and I was trying to find a similar yarn  I found Knit Picks Comfy in Sport weight and ordered it this morning in three different colorways.  Three skeins of Peony (dusty pink), three skeins of Parchment (a natural color), and one skein of flaming0 (light pink).

   While I'm waiting for my yarn, I have printed the pattern (14 pages)  and I'm going to give it a good read.


Thursday, June 15, 2017

Making Paper And Fabric Pieces For My Hexagon Quilt

I'm making my own hexagon paper pieces to use in my current quilt project.  In my last project I used old greeting cards and some junk mail and my Fiskars paper punch to make my hexagon paper pieces.  I also made some of my papers out of a heavy 110 lb. 8.5" x 11" white cardstock and those papers lasted the best and I was able to reuse them much longer than the others.  So I'm using the cardstock in this project.  The Fiskars paper punch is labeled an extra large, (I bought it on Amazon a couple of years ago) the sides measure 1" and the longest measurement from one point to another is 2".   I can punch out 20 hexies of this size from one sheet of this size cardstock.  I like to have lots of the papers available so I can baste enough hexies to make more than one flower at a time.

At this stage I cut the edges off leaving a piece big enough to punch out an additional 6 hexies.


All of my yellow centers are basted and ready to have flowers created around them.  This is all the fabric hexies basted.  


Time to cut more fabric.  To cut the fabric, I use a paper hexie with a 1/4" seam allowance added to it and I trace the shape onto the back of the fabric and I cut out each one with my trusty Gingher scissors. 

Here is a picture of the back of my hexies in my first block of this quilt.  I basted the hexies with blue thread so it's easy to find and remove when I take the papers out.  This block is ready to have the paper removed from the yellow, orange and pink pieces.  I leave the papers in the green ones until I have another block added to it.


Here are some hexies I made and put together.  I want to use these as a decoration on a bag in the future.


I

Tuesday, June 13, 2017

A Slow Start To My Slow Stitching Project

   I finally started my Grandmother's Flower Garden quilt.  I started this on a day I spent at the beach with dear daughter and friends.  I knew I wasn't going to be swimming in the Gulf and that I wanted to spend my time on the beautiful deck with a sea breeze and some hand stitching.  I finished my first flower for my new Grandmother's Flower Garden quilt during that beach trip.  I have since added the green path.  I am totally in love with this project.  I can't wait to see more of these lovely flowers appear.


  The green fabric almost looks minty or blueish, it's not. I tried to get a good picture using my faux Ott Light.    I will try to get a picture where the colors are more life like on a day with more sun.  We have had some rain the last couple of days and it's hard to get a good picture indoors.

    I was kind of worried about the pink and orange clashing but it looks stunning in this picture.  I originally bought a very pale yellow for the center, but I changed that to a bright yellow when I saw how dark the orange and pink are and I'm so glad I did.

   So there you have it, the beginning of a another quilt top.  


Tuesday, May 30, 2017

I Decided On My Next Quilt Project

   I finally decided on my next long term quilt project.  It will be a slow hand sewing project making little hexagons with English paper piecing.  I'm going to make another Grandmother's Flower Garden ("GFG"), but this time I want to make the quilt more traditional.  I will be using three fabrics for my flowers.  The center will be yellow, of course, and the two rows of petals will be orange and pink.  Here are the fabrics I purchased from Fabric.com this week for this project.


     Here is the green I found for path which I think is perfect.  It's a Kona cotton in the colorway Pond.  I can't wait to get started.


    Here's a link to the scrappy GFG I made last year.  It was totally different from a traditional GFG.  I don't know what I was thinking of when I bought the dark green and greyish fabric for this.  I should have made the flowers with two rows of petals and then used a lighter green for the path, but I made only one row of petals then I used that concrete color before the dark green path.  It it unusual to say the least.


Sunday, May 28, 2017

String Blocks Make A Great Big Dog Bed for McPherson

    I had to make a dog bed for my daughter's little Cairn Terrier, McPherson.  She rescued him in January and he has been a great addition to her life.

     I made him a scrappy bed a couple of months ago with some 3" scraps I needed to get rid of and he loves that bed.  No picture of that effort, sorry, but here's a picture of McPherson.  Isn't he the cutest?  He is 17 pounds of squirrel hunting craziness.


   Since his first scrappy bed lives in the great room area, McPherson needs another bed for the bedroom.  I had some string blocks all ready for this project.  I put 9 of my 10" square string blocks together, sewed that top onto a stabilizing piece of fabric, added a backing pieced together from three fat quarters, stuffed it with three bags of fiberfill and hand sewed the open end.  Done.


Friday, May 12, 2017

Embroidery Machine Fun

   I almost forgot to tell about the machine embroidery adventure I had last weekend.  I have a Brother PE770 Embroidery Machine that my daughter gave me as a birthday present in 2014.  It was supposed to be a machine we both would use but it lives at my house so I use it more.  I set it up and use it about 3 or 4 times a year for making hanging dishtowels, embroideries to add to tote bags or to frame, and monogrammed linen napkins, I would love to play with a multi-needle machine someday.
   Back in January I had an idea for dear daughter to make her Father some embroidered toilet paper for Father's Day.  Dear daughter picked the design and I purchased it.  We got together last Saturday to embroider toilet paper.

    I did a sample stitch out of the design on Friday night on a plain piece of white cotton fabric with stabilizer.  It worked great and took me about 40 minutes from set up to final stitch.

     On Saturday we had a few problems and the project took a lot longer than anticipated.  I don't think my machine is built to embroider toilet paper because when we tried to embroider on the toilet paper the machine jammed up and it would eat the toilet paper and the stabilizer.  

     We ended up with three designs stitched out on regular white muslin which dear daughter will wrap around toilet paper rolls.  The three designs took us almost 5 hours including an hour of that time taken to go to Walmart to get the fabric.

       It was a fun project and a real learning experience.  Dear daughter got a chance to really work with the machine up close for the first time since we have had it.

    Here is a picture of the design we stitched out.


Thursday, May 11, 2017

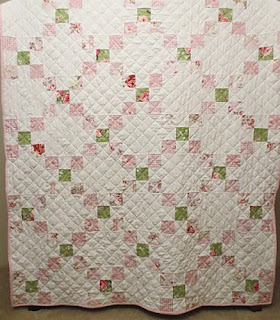
Replacement Irish Chain

    I had to make a replacement Irish Chain for myself.  I invited a friend to come over and shop my quilts last month.  She fell in love with my favorite Irish Chain that I made with Tanya Whelan rose fabrics.

     This is the front of the original Irish Chain that I made for myself a few years ago.


This is the back.


  The original quilt was a little small but I loved the fabrics I used in it.  My friend took it home with my love and I tried to forget the quilt, but I knew I wouldn't be happy until I made a replacement.  Not a carbon copy but an Irish Chain using fabrics I love.  I used a green and pink floral for my nine patch blocks and the backing/binding fabric is a lovely light green with tiny bees all over it.  The fabrics are great and I even made the quilt a little larger than the original.  So my replacement Irish Chain is finished.


        I don't have any more quilts that I want to make, so I'm going to continue making string quilt blocks for more string quilts.  I have two big boxes with lots of scrap strips from my stash.   I make my tops with 49 blocks which I think make a good size top.  I make an additional 7 blocks to piece the backing.  So each quilts needs 56 string blocks.  I've been using full size paper towels which measure 10.4" x 11" which I cut down to 10" after I sew my strips on.  Using 10" blocks is so much fun for me.  I love the 7 block rows x 7 rows and this layout makes it easy to line up my backing fabric with the row of blocks in the center.  I line that row up with the fourth row of the top and that centers my back with my top really nicely.   The paper towel rolls have 96 sheets in them so I can  make almost two tops with one roll of paper towels.  While I'm making my string quilts, I'll be on the hunt for a great quilt pattern with some great fabric.