I like to sew, quilt, crochet and knit in my free time and this blog is all about my projects, past and present.
Showing posts with label stash. Show all posts
Saturday, August 1, 2020
Twinkle Twinkle Scrappy Stars by Lori Holt
I found this tutorial by Lori Holt for scrappy stars and I fell in love. I made a star with her tutorial today and I'm planning to start cutting some stash fabrics for this quilt top. I usually don't work on more than one quilt at a time but since my current quilt project is just putting scrappy 2.5" squares together which is extremely easy, it won't be hard to fit in a few scrappy stars in between rows of the squares. These stars are really easy and fun to make and I think they are incredibly cute.
Wednesday, January 8, 2020
Scrappy Valentine Day Hearts
I'm supposed to be working on Christmas decorations but I found a picture of a scrappy heart quilt and since it's almost Valentine's Day, I had to make a couple. This is a pattern on etsy that popped up when I did a Google search for heart quilts. The picture that popped up had a nice grid and you could just count how many of square and half square triangle you need in each row. Since it was so easy to look at and copy I did not want to pay $4.00 for the pattern. So I guesstimated what sizes I would make the half square triangles (I used 3" squares) and regular squares (2.75" squares) and just started cutting and sewing. The seams don't all line up but that's okay, I like it like that. I found all this fabric in my stash of scraps and pieces and I even got a chance to use some scrap batting in them. It sure was nice to be able to use material I already had and not have to go shopping.
I did simple cross hatch quilting and I put two triangles on the back to slip a dowel stick in for hanging. I'll be making more of these for other holidays as well as just decorating around the house. I want to make a blue and yellow one for the kitchen to keep up all year round and a green and pink one for my bedroom. I may have to make an animal print one for the cat's room as well.
Thursday, September 6, 2018
More Pumpkins, This Time It's Fabric
I need a fall table runner, nothing fancy, just a little something on the table that says fall. I was hoping I could find fabric for the entire thing in my stash and I did. I have at least a couple of yards of the orange fabric, perfect for the pumpkins, backing and binding. The purple and green are the canvas I have leftover from making bags with my souvenir fabric from Hawaii.
There are loads of free pumpkin block patterns out there. Here's how I made the pumpkin. The orange fabric is cut 10" square, the snowball corners are 3" squares, the stem is a 1.5" wide by 3" piece and the purple sashing is 3" wide by however long each side needs to be. The bottom sashing was trimmed down to a narrower width to accommodate the length of a side piece. Easy.
Here's a picture of my first pumpkin block. I know my piecing could be neater and more uniform, but I don't care. I will make two more of these to finish this table runner. I love this project.
There are loads of free pumpkin block patterns out there. Here's how I made the pumpkin. The orange fabric is cut 10" square, the snowball corners are 3" squares, the stem is a 1.5" wide by 3" piece and the purple sashing is 3" wide by however long each side needs to be. The bottom sashing was trimmed down to a narrower width to accommodate the length of a side piece. Easy.
Here's a picture of my first pumpkin block. I know my piecing could be neater and more uniform, but I don't care. I will make two more of these to finish this table runner. I love this project.
Thursday, May 11, 2017
Replacement Irish Chain
I had to make a replacement Irish Chain for myself. I invited a friend to come over and shop my quilts last month. She fell in love with my favorite Irish Chain that I made with Tanya Whelan rose fabrics.
This is the front of the original Irish Chain that I made for myself a few years ago.
I don't have any more quilts that I want to make, so I'm going to continue making string quilt blocks for more string quilts. I have two big boxes with lots of scrap strips from my stash. I make my tops with 49 blocks which I think make a good size top. I make an additional 7 blocks to piece the backing. So each quilts needs 56 string blocks. I've been using full size paper towels which measure 10.4" x 11" which I cut down to 10" after I sew my strips on. Using 10" blocks is so much fun for me. I love the 7 block rows x 7 rows and this layout makes it easy to line up my backing fabric with the row of blocks in the center. I line that row up with the fourth row of the top and that centers my back with my top really nicely. The paper towel rolls have 96 sheets in them so I can make almost two tops with one roll of paper towels. While I'm making my string quilts, I'll be on the hunt for a great quilt pattern with some great fabric.
This is the front of the original Irish Chain that I made for myself a few years ago.
This is the back.
The original quilt was a little small but I loved the fabrics I used in it. My friend took it home with my love and I tried to forget the quilt, but I knew I wouldn't be happy until I made a replacement. Not a carbon copy but an Irish Chain using fabrics I love. I used a green and pink floral for my nine patch blocks and the backing/binding fabric is a lovely light green with tiny bees all over it. The fabrics are great and I even made the quilt a little larger than the original. So my replacement Irish Chain is finished.
Saturday, February 27, 2016
Cutting Out Fabric to Make Lots of Bags and Crocheted Embroidery Hoops
I'm making a bunch of Two Kates Project bags. I love this beautiful bag pattern and I thought this would be a great project to use up some of my fabric stash and I need some new project bags for my knitting and crochet projects. This bag is perfect to store my yarn projects because it doesn't use a zipper or a drawstring and it's a nice size. The link to the .pdf pattern is here.
Tonight I cut out fabric to make thirteen of these bags. The picture of the bright green lady bug fabric at the end is a bag that will be given to dear daughter. She loves lady bugs. Most of these bags have the same fabric for the lining as the outside but a few of them have different lining fabric because I didn't have enough fabric for both.
I'll be sewing on these bags for the next few days.
I finished crocheting the borders on the rest of my 3" embroidery hoops for my Christmas tree project. I did all of these crocheted borders with embroidery thread. It was a lot of fun to do. To finish these hoops I still have to add some embroidered trees.
Tonight I cut out fabric to make thirteen of these bags. The picture of the bright green lady bug fabric at the end is a bag that will be given to dear daughter. She loves lady bugs. Most of these bags have the same fabric for the lining as the outside but a few of them have different lining fabric because I didn't have enough fabric for both.
I'll be sewing on these bags for the next few days.
I finished crocheting the borders on the rest of my 3" embroidery hoops for my Christmas tree project. I did all of these crocheted borders with embroidery thread. It was a lot of fun to do. To finish these hoops I still have to add some embroidered trees.
Tuesday, November 17, 2015
You Can Never Have Too Much Blue Fabric
I just organized my fabric stash. It was a real mess after the last few projects I did from stash. I do this about twice a year to organize my fabric by color and weed out little scraps I know I will never use. I couldn't make myself take a "before" photo of the mess. It was a complete disaster.
I have a boatload of blue and blue print fabric. See the pile in this photo. It's more than double the amount of any other color I have in my stash.
Not much red, one piece of Christmas fabric, but look at that stack of pink and green.
I think I have just the right amount of purple and white.
I have a boatload of blue and blue print fabric. See the pile in this photo. It's more than double the amount of any other color I have in my stash.
Not much red, one piece of Christmas fabric, but look at that stack of pink and green.
I think I have just the right amount of purple and white.
Here it is organized and put away in its container.
Monday, November 16, 2015
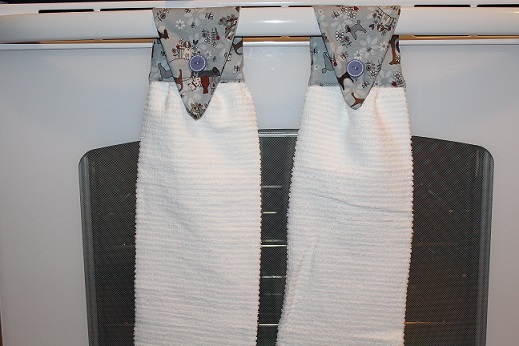
Super Cool Hanging Dishtowels
I was going to make these tomorrow, but I couldn't wait and started them tonight after dinner. The tutorial is perfect in its instruction and I had no trouble getting these handy hanging dishtowels made for my dear daughter. The only item I bought to make these towels were the bar mop towels. I paid $5.48 for 6 towels at Walmart. I had the top fabric, interfacing, thread, and buttons in my stash.
One note I will make about this tutorial is that bar mop dishtowels should not be cut in half because they are shorter than a regular dishtowel. Cutting the bar mop dishtowels in half make sections that are too short to make a good drying towel (ask me how I know, hehehehe). Cutting 2" off each towel works much better and gives you just enough length for a nice hanging dishtowel. So instead of using one towel to make two hanging dishtowels, you would use one bar mop towel for each hanging dishtowel.
I love having hanging dishtowels in my kitchen and I'm really happy that I tried this tutorial. I use my hanging dishtowels to dry my hands when they are wet and I like using bar mop towels for this kind of project because they are pretty cheap.
I did take the pieces of the one towel I cut in half and made two little hanging dishtowels for me, but the terry sections on those two hanging dishtowels are really small, but I couldn't waste those two pieces of towel.
Just in case you missed the previous post talking about these hanging dishtowels, I used the tutorial at Our Secondhand House blog, link here.
I no longer hate making buttonholes. Buttonholes always seemed so complicated and I would try to avoid them, but after making 10 buttonholes on my shower curtain the other day with my new Janome Horizon 7700, I feel like I could make buttonholes all day long. I won't be avoiding buttonholes anymore.
I have three more dishtowels left and I'll be using those to make three more hanging dishtowels.
One note I will make about this tutorial is that bar mop dishtowels should not be cut in half because they are shorter than a regular dishtowel. Cutting the bar mop dishtowels in half make sections that are too short to make a good drying towel (ask me how I know, hehehehe). Cutting 2" off each towel works much better and gives you just enough length for a nice hanging dishtowel. So instead of using one towel to make two hanging dishtowels, you would use one bar mop towel for each hanging dishtowel.
I love having hanging dishtowels in my kitchen and I'm really happy that I tried this tutorial. I use my hanging dishtowels to dry my hands when they are wet and I like using bar mop towels for this kind of project because they are pretty cheap.
I did take the pieces of the one towel I cut in half and made two little hanging dishtowels for me, but the terry sections on those two hanging dishtowels are really small, but I couldn't waste those two pieces of towel.
Just in case you missed the previous post talking about these hanging dishtowels, I used the tutorial at Our Secondhand House blog, link here.
I no longer hate making buttonholes. Buttonholes always seemed so complicated and I would try to avoid them, but after making 10 buttonholes on my shower curtain the other day with my new Janome Horizon 7700, I feel like I could make buttonholes all day long. I won't be avoiding buttonholes anymore.
I have three more dishtowels left and I'll be using those to make three more hanging dishtowels.
Labels:
buttonholes,
dishtowels,
easy,
hanging,
link,
stash,
tutorial
Friday, November 13, 2015
I Finally Finished My Scrappy Big Star Shower Curtain
I had a hard time getting a good picture because the bathroom is so small with no window and I have to keep the door shut to keep the kitties away from the toilet paper. But here is a picture of my shower curtain that I made from my stash. I made the first border strips 6" long and how ever wide I wanted and the second border strips were 7" long and how ever wide I wanted. The entire shower curtain is about 77" square. It turned out better than I thought it would. I'd like to make another to cover the shower doors in my master bath, but with different fabrics.
Saturday, October 31, 2015
Found A Quick Way To Make My Shower Curtain Quilt
So I'm sewing along on my tote bag projects and watching videos on the computer and I found a great way to make quilty shower curtain. I love the Big Star quilt pattern and last year I made a quilt using the pattern. I made the stars with 10" and 5" squares. So easy and so much fun to make. This is a picture of the quilt top before I sandwiched it.
So I went stash diving yesterday to find big pieces of fabrics to cut 20" squares for my shower curtain star. My star measures 52" x 52". I'm going to add borders to make it bigger. I want it to measure at least 68 x 68". To finish it I will add a backing fabric, do some straight line quilting, and put 12 buttonholes at the top to hang it. Not a good picture, but it's not finished yet.
I finished all my tote bags. I made four of them. Super fun and really useful. It was kind of hard for me to get a picture of all of them together. Now I have some tote bags that match my bedroom curtains. Fun stuff.
I also finished my potholders that will be my hostess gift for Thanksgiving dinner.
Thursday, September 24, 2015
Fun Project: Scrappy Christmas Stocking
I found a tutorial on how to make a Christmas stocking and I decided I want to make one as a gift for a Secret Santa partner. The tutorial is here and the page includes a link to a printable pattern for the stocking. The pattern is a nice shape and the perfect size. I made up a scrappy fabric for the front of my stocking with 36 - 3" squares of fabric from my stash. There is some flannel included and a couple of pieces of Christmas fabric. I thought a scrappy stocking would be more fun that the usual Christmas fabric.
Thursday, August 20, 2015
Missing Colors
I was thinking about my fabric stash a couple of days ago and I realized that I do not have a lot of orange fabric in my collection. I think I have one or two small pieces of orange fabric. The same thing goes for purple fabric. I'm fixing that little problem this week with some fabric purchases.
I just bought 4 yards of this fabric from an etsy seller.
Pairing the orange with this fabric I just found at Joann's on sale for $5.99 a yard. Yippee!
I'll be using these in my next quilt project with plain white as my background fabric. I'll be using my new Quick Curve Ruler by Sew Kind Of Wonderful to make the Metro Twist Pattern.
I'm currently working on my sunflower door decoration. That should be done soon.
Subscribe to:
Posts (Atom)