Pages

Thursday, December 31, 2020

Homemade Potholders and A Birthday

I was putting my Christmas decorations away the other night and I realized that I do not have any homemade Christmas potholders and if I don't have any, that means my daughter does not have any.  That made me sad.  That's a situation I had to fix.  Pulling out my stack of cute Christmas fabric, some cotton batting scraps, and insul-brite I started making potholders.

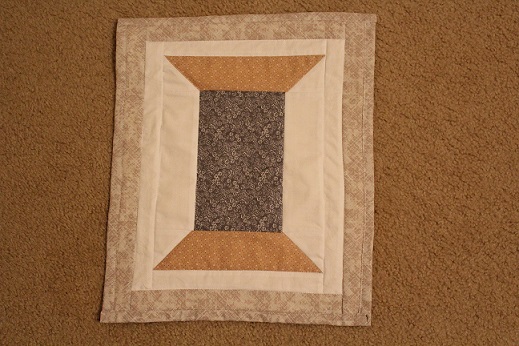
I made these with just a solid piece of fabric on the front (one of them is scrappy) and the back to show off the cute fabric.  To made a decent potholder I add three layers in between the fabric.  I use one layer of cotton batting, then  a layer of insul-brite and then another layer of cotton batting.  That makes a pretty thick sturdy potholder.  I do a simple cross hatch quilting through all layers to get it ready to bind.


This weekend I'll be piecing Christmas tree mug rugs to make more potholders.  Of course, I am sharing all of these with dear daughter.  

Here is a link to the youtube video on how I bind my potholders:  Youtube video on how to bind potholders.  


I had a birthday yesterday.  Another year older.  I made myself a rum cake to celebrate.  Dear daughter came to the house after work to have cake with me and give me fun gifts.  She did a good job with gifts this year.  So clever.  

I splurged and bought myself a quilting gift.  I bought  "Vintage Christmas Book" by Lori Holt of Bee in My Bonnet for It's Sew Emma.  This past fall this book was very popular because everyone was making the quilt Bringing Home the Christmas Tree (a car/SUV with a tree on the roof) that is in the book.  I fell in love with that pattern after seeing it all over.  I won't be making a full size quilt from the pattern just yet.  Right now I just want to make a car block and the standing tree blocks for a wallhanging/table runner.  It's too cute.  

The End of 2020 And My Favorite Project

 My life felt a little out of control this year.  I have to say I was one of the lucky folks.  I kept my job and was very lucky to be able to work from home during the beginning of the pandemic.  My daughter also works at home so I could see her every week and socialize.  I spent time counting my blessing and keeping up with the latest information on how to stay alive.  I also tuned into some of the political talk so I could stay informed on that front.  This year was not easy and it was not fun.  I'm looking forward to better year in 2021.   

At the end of each year I like to pick out my favorite project that I finished during the year and this year my favorite project will be the one quilt I finished.  The quilt was my hand stitched grandmother's flower garden quilt in orange and pink.  The first flower block was finished on June 13, 2017 and it took me a little over three years to hand stitch the other 34 flowers, put a border on it, hand quilt it, and bind it.  I officially finished it on  July 17, 2020.  Not too bad for a girl who works full time and has a bunch of other crafts and sewing she likes to do.  


HAPPY NEW YEAR EVERYONE!


Friday, December 25, 2020

I Finished My Last Christmas Craft For 2020

I made my garland with the music sheets today.  It was the last Christmas craft that I had on my list to make this year.  I didn't take a picture because I haven't hung it up.  I have to find a place to hang it and I'll do that next year.  For now I'm just going to pack up the garland.  

I finished the last two tinsel trees turning them into drop cloth trees the other night.  Here are the three I made all together.


One more thing I made today was clothesline bowls.  I had this clothesline for a few years.  I had tried to make one of these bowls with part of this clothesline but I didn't like it.  I covered the entire clothesline with fabric it was too much color.   I recently saw the clothesline bowls with just blips of fabric to color the bowl and I liked that much better.  I used the open toe foot on my machine and that makes it easier to see what you are doing.  

Here are the two bowls I made today.  I made these with red and green fabric for Christmas.  I will give these to dear daughter tomorrow.  I'm planning on getting another clothesline to make some more for me.


Tuesday, December 22, 2020

I'm Still Making Christmas Crafts

I have had the materials to make this craft for a year.  I kept putting off making this one.  I thought it would be so time consuming but it wasn't.  This one is pretty easy and it only took about 2 hours to make from looking for all the materials, including the trees, the drop cloth, the twine, the glue, the glue gun and the wooden star to gluing the star to the top.


This tree


started out like this


I took the tinsel off, and added extra rings with the twine.


I clipped the drop cloth and ripped strips about 2" wide.  The ripping of the fabric gives it a nice ragged edge, I glued the material to each twine ring and each green plastic ring with hot glue putting pleats in the fabric every couple of inches.  I started adding the strips of material at the bottom on the twine ring, making sure to keep the material straight enough so it covers the bottom green ring that is the stand of the tree.  I added six strips to the tree.  It was a pretty quick make once everything was ready to glue together.  It took about 25 minutes to glue.  I did use quite a few glue sticks doing this one.  I think I used about 6 or 7 regular size glue sticks.

I have another tree this size, which is 10.5 inches tall, and an 18" tall tree to make like this.  I do need more glue sticks before I start them, but this turned out really cute.  This tree is going to dear daughter.  I will keep the other two I make.

P.S.  I found this craft on a Christmas craft video by Heidi Sonboul on youtube.  I don't have a link because I don't have it handy but this craft was embedded in a video with lots of other crafts.


Sunday, December 20, 2020

Christmas Baking

 I made my second batch of gingerbread men this holiday season.  I made the first batch a couple of weeks ago.  Those 14 cookies were gone in a week.  I took a picture of the six prettiest men that came out of the oven today.


Thursday, December 17, 2020

More Christmas Trees

      I had these little tins sitting empty on my display cabinet.  They needed some homemade fabric trees.


Tuesday, December 1, 2020

I LOVE Christmas Trees

             This is the first Christmas decoration I made using my quilting and applique skills.  I believe I made this back in 2012 when I first started quilting.  I drew the tree myself, appliqued it to the background, then I put beads on each tree for decoration.   After I added the beads, I sandwiched the top with a pieced back and stipple quilted it.   I originally put star buttons on the top of each tree, but I didn't like them so the next year I embroidered some easy lines to make small stars at the top of each tree.   I still love this and put it up every year.  I never put a hanging sleeve on it (I originally just sewed some loops on the back for hanging), so I put the hanging sleeve on it tonight and I'm getting it ready to hang.


          This is the up close picture of the beading.


              I went through all my decorations tonight and counted the number of different projects that I have made with fabric to decorate my home for Christmas.  I counted more than 7 different projects that I have created to celebrate Christmas.  I have another Christmas tree applique hanging decoration, a lap quilt, a table runner, small wreath and trees made with scraps, snowmen I made with wool and embroidery, pillow covers, and hanging dish towels, pleated trees to frame, and stuffed trees. 

Monday, November 23, 2020

A Different Take

       I made another candy pouch using two candy bags put together on the vinyl.  It worked really well and it looks kind of cute.  Here is the front and the back.  It makes a bigger pouch and it was a little easier to turn right side out.  I still used the instructions on the Missouri Star - Jeanny Doan video.    


     And I found a different video to make these pouches that has different instructions and does not quilt the candy bag vinyl to the lining that was put out by Sew Yeah Quilting.  The link to that video is here.  I may try this instruction in a future bag.

Friday, November 20, 2020

Fun Quick Sewing

 Made a zipper pouch from a candy bag using Missouri Star's Tutorial here.  This is a nice quick project and they are really fun to give.  I made one a couple of years ago for dear daughter and she thought that I was giving her a bag of candy.  It was so funny.  Here is the one I made tonight.  It took me about an hour to sew up after I gathered all my supplies and cut up the candy bag.  The one I made tonight is kind of on the small side.  I might frankenstein two bags together next time to get a bigger pouch.  I hope it works.


I've been saving candy bags for a while and I have a whole bunch.  I also have a load of zippers to use up so I think I'll be making some more of these.  

Monday, November 16, 2020

Finally Found A Use For Something I Wasn't Using By Painting It

 Last December I bought this very small two tiered tray from Amazon.  I thought I could decorate it for various holidays, but when I got it and it was so small (about 12" high all together) I couldn't decide what to do with it and I put it away.  Last week I was baking and painting some pine cones to use in my Christmas decorating and I thought the pine cones would look nice in a red bowl but I don't have a red bowl, so I went looking around the house for something to put the pine cones in or on and found the tied tray.


I thought I might paint it red for the holidays but painting it navy blue to go with my kitchen curtains would be better and I could still decorate it for all the holidays.  I sanded and painted the trays navy blue and put a blue gingham bow on it.  It's a great place for small holiday decorations.


Thursday, November 5, 2020

Revealing Secret Birthday Presents I Made

My baby turns 44 today.  Here are two of the secret birthday presents I made for dear daughter.  I had to give her the pillow early so she could use it before Halloween.  The main fabric was the fabric I used to wrap her gifts last year and I had a little left.  I made a 14" pillow cover for her and for myself with the leftovers.  


The large tote bag was made with some fabric I found in my stash.  DD loves maps so I thought it would be a nice idea to make her a tote bag.  The bag measures about 18" by 18".  I even quilted it with some batting.  


I'm also considering the embroidered pillows I made last week as part of her birthday present.  She is also getting two shirts, a pair of earring, and a cookie spatula that will be put in the large tote bag.  I made her a rum cake, gingerbread cookies and brownies for her sweets on her birthday.   

Friday, October 30, 2020

Little Halloween Pillows

 I turned all the embroideries into little pillows.  These were fun and easy to make.   They didn't take very long.  The hardest part was trying to figure out what fabric to use for the borders and backing.  I made my own pillow forms with some fiberfill and white cotton fabric.  So easy.


Friday, October 23, 2020

Fun With The Embroidery Machine

Dear daughter saw something in the store and I re-created it for her with the embroidery machine.   I added the Wizard of Oz and the Raven quotes for some extra fun.  DD has a cairn terrier so that one is especially appropriate.


Thursday, October 15, 2020

Little Doggie Quilt

 I took some blue scraps and made a little quilt for my granddog, MacPherson.  He's a little cairn terrier and loves it when I make him bedding.  This is the first quilt I have made for him.  The other items were large pillows that he uses to lay on.  This quilt has the same scraps on the front and the back.  I used the excess edges of the back to bind the quilt.  The quilt measures about 26 x 33.  This was a fun and quick make.  It took me about 7 hours from cutting to binding.  

The front.


The back.


Friday, October 9, 2020

Hand Embroidered Pumpkin Decorations

          I am still trying to teach myself to do counted cross stitch.  For some reason I'm having a hard time learning that craft.  So instead of making a cute pumpkin cross stitch, I settled on finding a coloring book picture of a pumpkin on line and tracing it for hand embroidery.


        I found the image on the left and drew the image on the right in order to make it bigger.  I took the leaf off and added the tendrils.


      This is what it looked like done.


     I will be giving this one to dear daughter.  I'm making a second one for me.


Thursday, September 24, 2020

Of Pillows And Pillow Forms

     I love to make pillows with leftover fabric and quilt blocks.  When I make a pillow I don't always have a block or piece of fabric the right size for a standard square or rectangular pillow form. 

     I realized a few weeks ago that I can make my own pillow forms any darn size I want with fabric and fiberfill.  I did that today. 

     I had these leftover pieces from a Irish chain quilt I made years ago for dear daughter (2013) and decided to make a pillow with them.  I pieced the blocks, and stabilized them with a piece of fabric and few rows of stitching.  Then I made my pillow form just a little bit smaller than the front piece to allow for seam  allowances.  I stuffed the pillow form with fiberfill and made the envelope backing of my pillow cover and sewed the pillow front and back together.  So easy and fun.  Here is a picture of the original quilt and the pillow.  


Sunday, September 20, 2020

One More Pumpkin Block Decoration

 This was made from scraps of fabric I had.  It's nice to have some new pumpkin decorations for the fall season.  This block has two corner triangles in the top corners for slipping a dowel in there for hanging.


And I finished the applique pumpkins.  Here is mine all finished.  I echo quilted around the pumpkin and I bound it in the same muslin as the background fabric.  I also put a hanging sleeve on each one for hanging.  


Sunday, September 13, 2020

Making Projects From My Stash

 I found some fabrics in my stash for a three holiday projects.  

I made this tree block with fabric left over from a project last Christmas.  I made it into a pillow cover for a 14" pillow form.


I found this leftover Halloween fabric that I bought last year to wrap daughter's birthday present and I turned this fabric into a pillow cover for a 14" pillow form.  The costumes on the dogs and cats crack me up.


I used scraps to make these cute pumpkin blocks that I will turn into wall hangings.  I found the templates at this link:  Scrappy Pumpkin Tablerunner.  The navy blue one is mine and the turquoise one is for dear daughter.  I place the applique pieces on a 13" square piece of muslin.  I still have to sew down the applique pieces, quilt and bind them.


I used a new tool while making my pillow covers.  I used the Lori Holt Seam Roller.  I like it a lot and I think I will get a lot of use out of it.


After I finish my pumpkins I continue with my scrappy quilt top.  After I finish that quilt top I will start on one of the three quilt tops I have planned.  After I make those four tops, I will start making string blocks again.  I have two big storage boxes of strings that I need to use up.

Wednesday, August 26, 2020

Making Little Things and Changing My Scrap Quilt

 I made one secret birthday sewing project and I think I will make two more.  They are quick projects that take about 2.5 hours each from first cut of fabric to last stitch so I can get them sewn up in an afternoon or evening.  No pictures until after the birthday girl opens her pressies.

I cleaned my office and organized it a little bit.  I found this piece that I did several years ago.  I took this Laurel Burch picture (I love Laurel Burch's artwork) off the internet and printed it on an 8.5" x 11" piece of fabric that is designed to be fed through the printer.  I put a gold border on it and a backing and sewed beads where all the dots are on the picture.  I framed it in a simple clip frame and put it in the window of my office.  The gold fabric faded so I replaced it with this pretty gray.  I just have to find a frame for it now.  


Dear daughter has requested some fall hanging dishtowels.  I'm making them with this ugly orange turkey dishtowel I bought a couple of years ago and this pretty orange and brown homespun.


I took my scrap quilt apart.  I had originally sewed four patches together, alternating white, beige and print fabrics and I planned to put them together with seams matching, but I'm not doing a real good job keeping my seams even so I'm going to offset the seams on each row of four patches.  To do this I had to take the six rows I had already sewn apart and re-sew them.  I got that done last night.  Now I can move on to make more rows.


Here are some current pictures of my cats.  They turned 15 in May and I think they still look like kittens.

This is Merlin, the older brother.  He is a great boy cat.  So loving.  He keeps me and his sister in line.  He is the security office and the nosiest animal I ever saw.


This is Taffy Morgana, his sister.  She was born last in the litter of three.  She is a sweet little snuggle bug (took her five years to figure out that the lap is the place to be).  Loves to sit on my lap whenever and even sleeps in the bed with me.


Monday, August 10, 2020

Shhhh! Time For Secret Birthday Present Sewing.

 I have an idea for a birthday present.  I was cleaning up my fabric stash and I found the perfect piece of fabric for my secret sewing gift.  So no peeking and no telling.  I'm making another fun birthday present for daughter's November birthday.

Saturday, August 1, 2020

Twinkle Twinkle Scrappy Stars by Lori Holt

      I found this tutorial by Lori Holt for scrappy stars and I fell in love.  I made a star with her tutorial today and I'm planning to start cutting some stash fabrics for this quilt top.  I usually don't work on more than one quilt at a time but since my current quilt project is just putting scrappy 2.5" squares together which is extremely easy, it won't be hard to fit in a few scrappy stars in between rows of the squares.   These stars are really easy and fun to make and I think they are incredibly cute.

    These two scrappy quilt top projects will help me whittle down my scraps and stash.


Thursday, July 30, 2020

Working On A Scrappy Quilt

I found a bag of 2.5" squares I cut last year in the colors of green, blue, gray, and yellow that I cut from fabric that I found in my stash.  I also cut some white and beige neutrals to alternate the colors with.   I made my first stand mixer cover with these fabrics last year and I enjoyed the soft colors together.  

I'm sewing these pieces together and I should have more than enough for 68" square quilt.  It's a nice easy sewing project.  Here's a sample of the first two rows put together.


Tuesday, July 28, 2020

Some Little Projects

I took time on Sunday morning to make a spool block to decorate my sewing space.  I used the MSQC youtube tutorial to make the block.  It was fun and I would love to make a full quilt with spools.


I also got my embroidery done that I wanted.  It was much easier the fourth time.  These were made with white thread on navy blue fabric.


Friday, July 24, 2020

Christmas In July

I love Christmas tree quilt blocks.  I found this tutorial on a blog, The Spruce Crafts,  Christmas Tree Block  and I had to make one.  I thought the original size was a little too small so I increased the size of the strips to 3.5" and I increased the length of the tree pieces about 2 to 4 inches each so they would be substantial.  The final size is about 15.5" x 17.5 inches.  Perfect for a pillow cover.