
Showing posts with label tree. Show all posts
Showing posts with label tree. Show all posts
Friday, July 24, 2020
Christmas In July
I love Christmas tree quilt blocks. I found this tutorial on a blog, The Spruce Crafts, Christmas Tree Block and I had to make one. I thought the original size was a little too small so I increased the size of the strips to 3.5" and I increased the length of the tree pieces about 2 to 4 inches each so they would be substantial. The final size is about 15.5" x 17.5 inches. Perfect for a pillow cover.


Friday, December 27, 2019
Christmas Has Come And Gone But I'm Not Done Making Decorations
I can't believe how many cute ideas I found to distract me this year. I'm still working on several projects that are Christmas related. I'm afraid that I will be Christmas crafting into the New Year.
I did manage to finish dear daughter's table runner, some small tree ornaments, and her star garland, but I'm still working on the decoupaged cookie plates, my table runner, some fabric covered Christmas tree forms, and a star garland for me. My star garland may go up after I finish it and stay up all year. Here is a picture of dear daughter's garland on her China cabinet. She added fairy lights and it looks pretty. I love the way this turned out and the stars are so easy to make.

Other things I want to make are felt tree ornaments. I found this picture on the internet and thought these felt ornaments were adorable.

I saw this picture a bunch of times for different ads. The day I took this picture they were advertising Hobby Lobby craft store. I have not been able to find this picture on Pinterest with a link to instructions or patterns, so dear daughter I made our own ornaments with green felt in the shape of a Christmas tree and we beaded them for her co-workers.
I also want to make some string art. I found a string art star with instructions here.
As usual, I spent too much time watching YouTube videos showing items made from thrift store finds and I saw some interesting wood burning ornaments being made by using 4" wood rounds that you can get at Amazon.
One person was walking through a Antique store or 2nd hand shop and I also saw something I have to make. It's a paper garland made from hymnal pages. It's super simple, fan folding the pages and gluing a bunch together to make a long piece that you wind around a piece of twine. I don't have a good picture of it but I took this screen shot from the video where I saw it.

I have looked on Pinterest and all over the Internet for a better picture or even instructions but could not find anything similar. I fell in love with this garland, so much so that I bought a Baptist hymnal on Christmas day for this project. I have the glue and twine.
I don't know when I'll finish Christmas decorations, I just hope I finish before next Christmas.
I did manage to finish dear daughter's table runner, some small tree ornaments, and her star garland, but I'm still working on the decoupaged cookie plates, my table runner, some fabric covered Christmas tree forms, and a star garland for me. My star garland may go up after I finish it and stay up all year. Here is a picture of dear daughter's garland on her China cabinet. She added fairy lights and it looks pretty. I love the way this turned out and the stars are so easy to make.

Other things I want to make are felt tree ornaments. I found this picture on the internet and thought these felt ornaments were adorable.

I saw this picture a bunch of times for different ads. The day I took this picture they were advertising Hobby Lobby craft store. I have not been able to find this picture on Pinterest with a link to instructions or patterns, so dear daughter I made our own ornaments with green felt in the shape of a Christmas tree and we beaded them for her co-workers.
I also want to make some string art. I found a string art star with instructions here.
As usual, I spent too much time watching YouTube videos showing items made from thrift store finds and I saw some interesting wood burning ornaments being made by using 4" wood rounds that you can get at Amazon.
One person was walking through a Antique store or 2nd hand shop and I also saw something I have to make. It's a paper garland made from hymnal pages. It's super simple, fan folding the pages and gluing a bunch together to make a long piece that you wind around a piece of twine. I don't have a good picture of it but I took this screen shot from the video where I saw it.

I have looked on Pinterest and all over the Internet for a better picture or even instructions but could not find anything similar. I fell in love with this garland, so much so that I bought a Baptist hymnal on Christmas day for this project. I have the glue and twine.
I don't know when I'll finish Christmas decorations, I just hope I finish before next Christmas.
Friday, December 13, 2019
Breaking Out My Crochet Hook
Saw a crocheted star that I had to have. Used my size H hook and some Peaches and Cream white cotton yarn. Used the tutorial here. Each star took about 15 to 18 minutes. This was a fun easy project. I'm going to make more. Of course these will go to dear daughter for her Christmas tree.


Tuesday, November 26, 2019
Another Christmas Craft
I've been watching Christmas DIYs on YouTube and I saw a couple of ladies cover Styrofoam cones with fabric or scarves to make Christmas trees and I decided to try it.
I bought my Styrofoam cone at Hobby Lobby last Saturday using my 40% coupon and I saved a three dollars on it. I found the cute fabric in my Christmas fabric stash, I bought the silver star at Michael's on Sunday and saved a couple of dollars on that with my frequent buyer membership, I had the piece of round board (I bought it for a decoupage project, but it was perfect for this tree), and I bought some sliver metallic paint to paint the board. I had a chance to use my glue gun and I used up two regular stick of glue putting this together. Fun.
I'm loving this tree.

I bought my Styrofoam cone at Hobby Lobby last Saturday using my 40% coupon and I saved a three dollars on it. I found the cute fabric in my Christmas fabric stash, I bought the silver star at Michael's on Sunday and saved a couple of dollars on that with my frequent buyer membership, I had the piece of round board (I bought it for a decoupage project, but it was perfect for this tree), and I bought some sliver metallic paint to paint the board. I had a chance to use my glue gun and I used up two regular stick of glue putting this together. Fun.
I'm loving this tree.

Monday, December 24, 2018
Pleated Christmas Trees
I made some pleated Christmas trees with a different background fabric. The pattern is here: Pleated Christmas Tree. The original model in the pattern was made with white background fabric, and I have made two of these with white background fabric. I wanted to do something different with the background and I found this gray fabric with white dots. I think this looks like snow falling at night. I still want to enlarge this pattern and make this tree bigger, so I can make it into a pillow cover or something, but I haven't tried that yet.
Here are the two I made last night with the darker background fabric. The first tree is a little lopsided because I was sloppy with my trimming. The second tree came out much nicer. I love that green plaid fabric. I'm giving the second one to my daughter. I put it in a dark wood 8" x 10" frame.


Here are the two I made last night with the darker background fabric. The first tree is a little lopsided because I was sloppy with my trimming. The second tree came out much nicer. I love that green plaid fabric. I'm giving the second one to my daughter. I put it in a dark wood 8" x 10" frame.


Saturday, December 15, 2018
Christmas Cookies and A Christmas Decoration Fail
I made gingerbread men today. I used the Ree Drummond (Pioneer Woman) recipe I found on line.
This is the first time I have ever made gingerbread cookies and it will probably be the last. It was tough mixing all that flour into the liquid mixture because I did it manually. The recipe calls for a stand mixer, but I don't have a stand mixer and I didn't want to borrow my daughter's mixer just for these cookies, because I wanted them to be a surprise.
These took a long time for me to make, between mixing the dough and letting it rest for two hours or more, then rolling it and cutting it out, I spent a good 3 hours hands on making these cookies and I didn't really enjoy it.
I didn't decorate my men. I'm not supposed to eat a lot of sugar and these will be sweet enough without any extra icing or candies on them.
In the future, I'll stick with sugar cookies or butter cookies put in a cookie press..

I don't have a picture of my Christmas Tree decoration fail, but I will describe it for you. I drew a Christmas tree shape and I cut out two pieces of fabric. The idea being that I would sew the two pieces together and stuff them lightly with some polyfil, put a dowel stick in the bottom and put it in a small tin pail with some floral foam to keep it up right. My pattern for my Christmas tree was not right and the finished tree looked awful. I scrapped this project. I'm looking for other Christmas decorations to sew.
Here's a picture of some of my Christmas decorations.

This is the first time I have ever made gingerbread cookies and it will probably be the last. It was tough mixing all that flour into the liquid mixture because I did it manually. The recipe calls for a stand mixer, but I don't have a stand mixer and I didn't want to borrow my daughter's mixer just for these cookies, because I wanted them to be a surprise.
These took a long time for me to make, between mixing the dough and letting it rest for two hours or more, then rolling it and cutting it out, I spent a good 3 hours hands on making these cookies and I didn't really enjoy it.
I didn't decorate my men. I'm not supposed to eat a lot of sugar and these will be sweet enough without any extra icing or candies on them.
In the future, I'll stick with sugar cookies or butter cookies put in a cookie press..

I don't have a picture of my Christmas Tree decoration fail, but I will describe it for you. I drew a Christmas tree shape and I cut out two pieces of fabric. The idea being that I would sew the two pieces together and stuff them lightly with some polyfil, put a dowel stick in the bottom and put it in a small tin pail with some floral foam to keep it up right. My pattern for my Christmas tree was not right and the finished tree looked awful. I scrapped this project. I'm looking for other Christmas decorations to sew.
Here's a picture of some of my Christmas decorations.

Saturday, December 23, 2017
Easy Christmas Tree Decorations
I found these cute Christmas tree ornaments on Facebook and made three to give to my dear daughter. Here is the link to a similar tutorial made with scrap ribbon. Link to fabric Christmas trees.
I made mine a little different. I used a dowel that I cut up into three different sizes. I filed the ends of each piece to round off the edges caused by the cutting. I painted the dowel stick, then I cut up 1.5" wide strips of fabric into 8" long pieces and I also used some green ribbon I had. I tied the fabric to the dowel and trimmed it into a triangle. I found the wooden stars at Michaels and painted them with some silver glitter paint I had. I glued the star to the top and added a piece of twine for hanging.
These were easy and fun to make.

I made mine a little different. I used a dowel that I cut up into three different sizes. I filed the ends of each piece to round off the edges caused by the cutting. I painted the dowel stick, then I cut up 1.5" wide strips of fabric into 8" long pieces and I also used some green ribbon I had. I tied the fabric to the dowel and trimmed it into a triangle. I found the wooden stars at Michaels and painted them with some silver glitter paint I had. I glued the star to the top and added a piece of twine for hanging.
These were easy and fun to make.

Wednesday, December 13, 2017
Rustic Christmas Tree Ornaments And A Quick Product Review
I made tree ornament with the mason jar band and strips of fabric. They turn out like little wreaths and they are super cute. I love rustic bows and buttons. Here is a link to the video tutorial (it's the first ornament she makes in the video) homespun tree ornaments link. The person in the video uses only homespun fabric for her ornaments but I used a mixture of homespun and Christmas patterned quilting cotton. I think this will work with any fabric. Have fun with it.
I found out while making these ornaments that I desperately need a new glue gun. I've had my Aleene's Glue Gun for twelve years and I dread taking it out to use because it takes so long to heat up and the glue just doesn't flow very well. It's time for a newer model. I went shopping on Amazon tonight and picked out two glue guns, one that takes full size glue sticks and has two temperature settings and a mini glue gun that is high temperature only. I'm looking forward to upgrading my equipment. I hope to do a review of my glue guns after I have had a chance to try them out.
Here are the ornaments I made tonight. I will definitely be making more of these.

I found out while making these ornaments that I desperately need a new glue gun. I've had my Aleene's Glue Gun for twelve years and I dread taking it out to use because it takes so long to heat up and the glue just doesn't flow very well. It's time for a newer model. I went shopping on Amazon tonight and picked out two glue guns, one that takes full size glue sticks and has two temperature settings and a mini glue gun that is high temperature only. I'm looking forward to upgrading my equipment. I hope to do a review of my glue guns after I have had a chance to try them out.
Here are the ornaments I made tonight. I will definitely be making more of these.

I want to mention that when I made my pleated/textured Christmas tree I used a product called Craft-Fuse by Pellon (Style 808) Iron-On Backing For Crisp Hand & Added Body. It's a heavy duty fusible interfacing, and I used it to stabilize my tree piece while adding the sides to it. It worked great. It fused easily to the fabric and stayed put once it was ironed. So if you are looking for a heavier weight interfacing to stabilize that is fusible, try Craft-Fuse. It really works. I bought two packs of this from Amazon about a year ago and I forgot I had it until I was looking for interfacing to do this project. I'm glad I had it.
Monday, December 11, 2017
Pleated Christmas Tree - Framed
I'm loving the Christmas sales the last few weeks. I'm finding a lot of items for my crafting on sale. I found this sweet 8 x 10 frame at Joann's Fabrics yesterday and it was 50% off, so I paid $4.99. It's got an easel in the back so I don't have to hang it up I just put it up on my kitchen counter to decorate. I'm going to experiment making these trees a little bigger. This would make a great pillow cover. I'm having fun with my Christmas crafting.


Friday, December 8, 2017
Pleated Christmas Tree - Finished.
The sewing is done on the Christmas Tree. I just have to put it in a frame. I love this. I just ordered some fun green fabrics to make more of these over the next year. I also ordered a pretty gray with small pin dots that I think will look like a snow covered tree at night. Fun. Included in that order was some white fabric for the borders because I am completely out of white fabric. Weird.
Here is my finished pleated Christmas Tree.

Here is my finished pleated Christmas Tree.

Thursday, December 7, 2017
Pleated Christmas Tree Project and More
I found this pleated Christmas tree tutorial a few years ago and I made one that I gave away to my daughter. Here is a link to the tutorial: pleated tree skirt tutorial. I've been wanting to make one for myself and I'm doing it now. This is easy to make and you can have fun with colors for the tree and the tree skirt. I stayed with Christmas colors for this one, but I will definitely be experimenting with colors for the next one I make.
I will add the tree skirt on this one and it will be ready to frame.

I've been watching Youtube videos on how to make easy and cheap Christmas decorations. I love the snowflakes made with clothes pins. I bought very small clothes pins from an etsy seller to make a few of these to add to my decorations. I need to buy some silver spray paint and silver glitter to make them sparkle. Here is a link to a Youtube video: Clothes Pin Snowflakes.
I also like to the decorations I've seen made with the mason jar lid band. I saw a lady tie a bunch of homespun strips around the band and it turned out extra cute. Here's a link to her tutorial, she makes four different ornaments in this one. Homespun Christmas Ornaments Youtube tutorial. And yes, I have some mason jar lid bands for this project as well.
I also found a paper star tutorial on Youtube. Here's a link: Paper Stars. I haven't done a lot of paper crafts, but this one looks doable. I'm going to give it a try in the next few weeks. I'll let you know how I get on.
No progress to report on my Grandmother's Flower Garden Quilt top. I'm still stuck on the third row.
I will add the tree skirt on this one and it will be ready to frame.

I've been watching Youtube videos on how to make easy and cheap Christmas decorations. I love the snowflakes made with clothes pins. I bought very small clothes pins from an etsy seller to make a few of these to add to my decorations. I need to buy some silver spray paint and silver glitter to make them sparkle. Here is a link to a Youtube video: Clothes Pin Snowflakes.
I also like to the decorations I've seen made with the mason jar lid band. I saw a lady tie a bunch of homespun strips around the band and it turned out extra cute. Here's a link to her tutorial, she makes four different ornaments in this one. Homespun Christmas Ornaments Youtube tutorial. And yes, I have some mason jar lid bands for this project as well.
I also found a paper star tutorial on Youtube. Here's a link: Paper Stars. I haven't done a lot of paper crafts, but this one looks doable. I'm going to give it a try in the next few weeks. I'll let you know how I get on.
No progress to report on my Grandmother's Flower Garden Quilt top. I'm still stuck on the third row.
Friday, April 29, 2016
Christmas Tree Wall Hanging Project Moving Forward
I finally put the binding on the two Christmas tree wall hangings that I started in March. I did simple quilting around the trees and I'm really happy these are done


This week I've been working on making hexies for my Grandmother's Flower Garden quilt. I have all the scrappy flowers hexies ready (210) and all the flower centers (35) ready to be sewn together. Those are the first two rounds of my hexie blocks. I still have to make a lot more hexies for the next two rounds of my blocks. I should have a couple of blocks to show in the next week. This is definitely a long term quilt project.
I'm starting a new knitting project. There is a free pattern on Ravelry called 198 Yards of Heaven that is a pretty lace shawl. I tried to make this shawl a couple of years ago but it did not go well. I finished the shawl but it didn't look anything like it should have. I'm trying again with a skein of my current favorite acrylic yarn (Red Heart Boutique Unforgettable in Cappucino) and a pair of size 8 knitting needles.

Sunday, April 3, 2016
Weekend Sewing Fun
I had some fun with my new hexie obsession the last couple of days. I made some hexies to turn into a flower decoration for my purse. I couldn't stop making hexies so I also made the same type of decoration for DD for her use. I used yellow centers for my flower decoration and ladybug fabric for DD's decoration because her friends call her ladybug. These are double sided and hand sewn except for the machine stitching on the strap.

This morning I finally created the Christmas tree forest. I decided that each tree needed a different fabric for the trunk and I only had 3 brown fabrics in my stash, so I placed a request on the Quilting Board for 4" squares of 9 different brown scrap fabrics so I could get the trunks done. Several lovely people responded to my request. I took the offer of the first person that had 9 fabrics. I received them last Monday and got my tree trunks cut out. My Christmas Tree applique wall hanging is now ready to sew. I had to stand on a chair to get all the trees in the one shot. I placed 11 of these trees in this wall hanging and I'm putting the last tree in a square all by itself.


This morning I finally created the Christmas tree forest. I decided that each tree needed a different fabric for the trunk and I only had 3 brown fabrics in my stash, so I placed a request on the Quilting Board for 4" squares of 9 different brown scrap fabrics so I could get the trunks done. Several lovely people responded to my request. I took the offer of the first person that had 9 fabrics. I received them last Monday and got my tree trunks cut out. My Christmas Tree applique wall hanging is now ready to sew. I had to stand on a chair to get all the trees in the one shot. I placed 11 of these trees in this wall hanging and I'm putting the last tree in a square all by itself.


I did send my brown scrap fabric angel an appropriate thank you gift by return mail last Thursday and she should get it tomorrow. I made her a lovely quilted wristlet in a black fabric with royal blue polka dots. I hope she gets a lot of use from it.
Tuesday, March 22, 2016
Cutting Christmas Tree Appliques
I have cut twelve Christmas tree appliques for my Christmas tree decoration wall hanging. I drew the wonky Christmas tree pattern myself. I was going to put a couple of trees on several wall hangings so I could put them all over the house, but I have decided to put all twelve trees together on one wall hanging. I'm going to give each a brown fabric trunk, and I want each trunk to be a different fabric. I need 9 more pieces of brown fabric to finish the trunks and it will be ready to assemble and sew up.
Here are the twelve trees.


Here are the twelve trees.


Saturday, February 27, 2016
Cutting Out Fabric to Make Lots of Bags and Crocheted Embroidery Hoops
I'm making a bunch of Two Kates Project bags. I love this beautiful bag pattern and I thought this would be a great project to use up some of my fabric stash and I need some new project bags for my knitting and crochet projects. This bag is perfect to store my yarn projects because it doesn't use a zipper or a drawstring and it's a nice size. The link to the .pdf pattern is here.
Tonight I cut out fabric to make thirteen of these bags. The picture of the bright green lady bug fabric at the end is a bag that will be given to dear daughter. She loves lady bugs. Most of these bags have the same fabric for the lining as the outside but a few of them have different lining fabric because I didn't have enough fabric for both.


I'll be sewing on these bags for the next few days.
I finished crocheting the borders on the rest of my 3" embroidery hoops for my Christmas tree project. I did all of these crocheted borders with embroidery thread. It was a lot of fun to do. To finish these hoops I still have to add some embroidered trees.

Tonight I cut out fabric to make thirteen of these bags. The picture of the bright green lady bug fabric at the end is a bag that will be given to dear daughter. She loves lady bugs. Most of these bags have the same fabric for the lining as the outside but a few of them have different lining fabric because I didn't have enough fabric for both.


I'll be sewing on these bags for the next few days.
I finished crocheting the borders on the rest of my 3" embroidery hoops for my Christmas tree project. I did all of these crocheted borders with embroidery thread. It was a lot of fun to do. To finish these hoops I still have to add some embroidered trees.

Thursday, February 25, 2016
The Start of My 2016 Christmas Tree Project
I made two crazy little Christmas tree decorations to start off this project that I will be working on all year. These are going to be my substitute for a regular Christmas tree during the holiday season. I don't put up a regular tree because of my kitties and I miss a Christmas tree, so I decided to make some trees that they can't destroy and put them around the house during the holidays.
This is the first one I made a a couple of weeks ago. This idea looked prettier in my mind than it actually does made up, but I like it. My idea was to crochet a long piece and shape it into a tree and secure it on fabric. To make the crocheted piece, I used embroidery thread with a 1.7 mm steel hook, crocheted a chain of about 64 stitches, crocheted a round of half double crochet around the chain and then added a picot edge. I attached it to the fabric, added sequins, and bound it.

This is the second tree I made. I crocheted a border around this 3" embroidery hoop using embroidery thread then I added the small embroidery. I found the border idea here. I have five more of these embroidery hoops, so I'll be using those up and crocheting different borders in different colors.
I used a skein and a half of embroidery thread with a 1.7 mm steel hook. I put the border around the outside hoop so I could add the embroidery. The designer uses the inside hoop for her borders because she is using them as picture frames and doesn't need the outside hoop.

The third Christmas tree will be a larger appliqued piece.
This is the first one I made a a couple of weeks ago. This idea looked prettier in my mind than it actually does made up, but I like it. My idea was to crochet a long piece and shape it into a tree and secure it on fabric. To make the crocheted piece, I used embroidery thread with a 1.7 mm steel hook, crocheted a chain of about 64 stitches, crocheted a round of half double crochet around the chain and then added a picot edge. I attached it to the fabric, added sequins, and bound it.

This is the second tree I made. I crocheted a border around this 3" embroidery hoop using embroidery thread then I added the small embroidery. I found the border idea here. I have five more of these embroidery hoops, so I'll be using those up and crocheting different borders in different colors.
I used a skein and a half of embroidery thread with a 1.7 mm steel hook. I put the border around the outside hoop so I could add the embroidery. The designer uses the inside hoop for her borders because she is using them as picture frames and doesn't need the outside hoop.

The third Christmas tree will be a larger appliqued piece.
Tuesday, December 15, 2015
2016 - The Year Of The Christmas Tree Wall Hanging
I just went through pinterest and found nine applique designs for Christmas tree wall hangings that I want to make to decorate my home next Christmas.
I don't put up a Christmas tree anymore. I love Christmas trees, the lights and the decorations, but ever since I got the cats 10 years ago I gave up Christmas trees. I never wanted to find out just what they would do to one.
So next year I will spend some time making small wall hangings featuring appliqued Christmas trees. I'll be shopping for lots different shades of green fabric, some red fabric for bindings and decorations, muslin for background and backing, small beads, sequins, and maybe some green yarn because I have an idea for a tree that involves crochet.
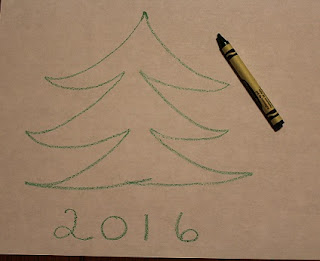
I don't put up a Christmas tree anymore. I love Christmas trees, the lights and the decorations, but ever since I got the cats 10 years ago I gave up Christmas trees. I never wanted to find out just what they would do to one.
So next year I will spend some time making small wall hangings featuring appliqued Christmas trees. I'll be shopping for lots different shades of green fabric, some red fabric for bindings and decorations, muslin for background and backing, small beads, sequins, and maybe some green yarn because I have an idea for a tree that involves crochet.

Monday, December 14, 2015
My Favorite Wonky Christmas Tree Wall Hanging
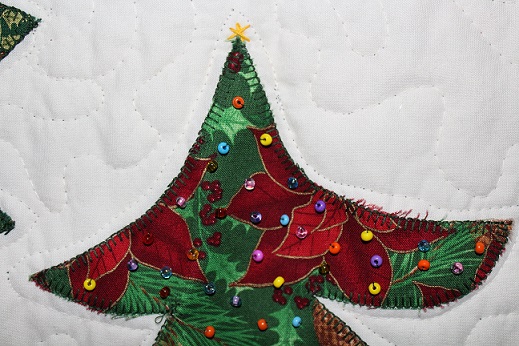
This was one of the first raw edge applique projects I ever did. I hand drew the Christmas tree pattern (love the wonky branches) and cut the trees out from three different fabrics. Each tree has a bunch of little colored beads on it. I wanted sequins but could not find any so I settled for beads. I made this originally to hang on my front door for the Christmas season. It has been replaced on the front door with a cardinal decoration and the trees now hang on the inside of the door.


Monday, November 16, 2015
An Ohio Star Block Decoration And More
I made this Ohio Star Block to hang somewhere. This block was a lot of fun to make and I enjoyed stash diving to find the fabrics for it. I used the instructions in a video by Amanda of 3and3quarters blog. The link to her video is right here.

This is a nice big block. It finishes at 14" x 14". Later I'll be making a door decoration using three of these blocks and some stash fabrics. I would love to make a quilt using this block, but I have several quilt projects on my list already, so that will have to wait.
I have a pile of fabrics on my cutting table waiting to be cut for fabric trees, two will be made with cute Arctic Antics fabric I made my rag quilt from. See a picture at this post here. Another tree will be pink for my bedroom made with fat quarters from the Far, Far Away fabric line (see picture below), and one will be made with some miscellaneous blue fat quarters I found (picture below) to make a sewing table decoration.


Today I picked up some bar mop kitchen towels to make some new hanging dishtowels for DD's kitchen. I will be using some of my precious Time With Friends by Lynette Anderson fabric (see below) to make the fabric section to create the button holes. DD asked for gray, maroon, and white fabrics and this is the perfect combination plus she loves dogs and cats.

There are tons of tutorials on line and the last time I made some I used a tutorial that had me make bias binding for ties. I want to make one with a buttonhole this time, because I just learned how to make buttonholes on my Janome machine and I'd like to get some more experience used that cool foot, plus you don't need all that extra fabric for buttonholes. Let's face it when I make bias binding, I waste some fabric and I'm not going to waste any of the only yard of this lovely Time With Friends fabric. Here is the hanging dishtowel tutorial that I will be using for this project.
Tuesday, November 10, 2015
Small Fabric Christmas Trees - Fun Sewing
I love to watch Debbie Shore sewing tutorials on youtube and in one of her videos she makes these ultra cute stuffed Christmas or any holiday or season trees. Here is a link to her video: fabric Christmas tree tutorial.
They are super simple to make. I just drew a big triangle on a piece of card stock and used that as my template for my tree pieces. I used fabrics I found in my stash and you can decorate them with thread, beads, bells, buttons or even some of those miniature ornaments you find at the craft store. I just tied some ribbon to the top to get the pictures done. I can also see these as a sweet decoration in rooms with color coordinating fabrics and this would so make a cool big pin cushion near the sewing machine in a pinch.


They are super simple to make. I just drew a big triangle on a piece of card stock and used that as my template for my tree pieces. I used fabrics I found in my stash and you can decorate them with thread, beads, bells, buttons or even some of those miniature ornaments you find at the craft store. I just tied some ribbon to the top to get the pictures done. I can also see these as a sweet decoration in rooms with color coordinating fabrics and this would so make a cool big pin cushion near the sewing machine in a pinch.


I did take some time off from working on my quilted shower curtain to make these trees because I needed a little break, but the shower curtain is coming along. I have the top done and I also added the backing. I'm in the middle of doing the quilting. Once I finish the quilting, I will add the buttonholes for hanging and it will be done. I should have it done in a couple of days and I will share pictures then.
Subscribe to:
Posts (Atom)