Pages

Showing posts with label easy. Show all posts

Wednesday, August 11, 2021

Farm Aprons , Patriotic Pennants, Vinyl Front Cross Stitch Project Bags, and Secret Sewing


            I finished the farm aprons that I have been wanting to make since I found this duck fabric in my stash.  The instructions from Cosmopolitan Cornbread blog were very good and I was able to get two aprons cut out in less than an hour.  The ironing, hemming and sewing for each apron took about an hour.  These aprons are perfect for going out into the yard to do a messy job or even in the house for a messy job.  I love the big pockets.  


       It's that time of year when I do a little secret sewing for dear daughter's birthday.  I found some lovely colorful fabric that is being turned into something useful for her.  I will show the finished product after they are gifted in November.


       I have some old curtain panels from my bedroom that will be made into tote bags for me and dear daughter.  These curtain panels make lovely tote bags.  Here is a picture of the fabric I'm using.  I have a couple of these already and I gave about 4 of the tote bags to dear daughter a few months ago.  


I've decided to make a patriotic pennant banner with some red, white, and blue fabrics in my stash.  I drew up a triangle to use as a pattern and I made a fabric string from some red, white, and blue fabric I used in my patriotic wall hanging earlier this year.  I cut the fabric for the string like a narrow binding and folded in the edges and sewed it down.  It's perfect for a banner.  I just have to make the pennants.   I want to make one for me and one for dear daughter.  I don't know if I have enough fabric to make two, but a quick trip to Joann's will fix that.  Here is a picture of the fabrics I'm using for the pennants.


        I never posted any pictures of all the clear vinyl front cross stitch project bags I made a few months ago.  These bags are not perfect  and I did not really enjoy making them, but I have to say that the instructions are super easy and they went together very quickly.  They are so much cheaper for me to make then to buy from an etsy seller.  It's a very good use of stray pieces of fabric and batting.  Each bag has a little mini vinyl front pouch to match and all have zipper pulls either made with charms by me or purchased.


Wednesday, February 17, 2021

New Living Room Wallhanging

 I had to replace my living room wall hanging.  I recently washed the old one and it shrunk up on the corners.  I should not have put that darn thing in the dryer.  Doing dumb things.  That's me.  

The replacement is a big star.  I used Missouri Star Quilt Company's video tutorial found here.  It a super easy block and it a lovely large size.  One block makes a gorgeous wall hanging.  The cool thing about this pattern is that if you adjust the size of your squares to any size you can make the block the size you need.  Using 10" squares of fabric for my block, I have a star that is 24" square.  


I love stars and this big star is easy to make.  The light blue fabric is the fabric I used to cover my ironing board, so my wall hanging matches it.  I made this in about 5 hours from fabric cutting to adding the hanging sleeve on the back.  


Friday, July 3, 2020

My Blue Jean Purse

  So I finally sewed up the blue jeans purse that I cut out from the legs of the blue jeans I bought to make my garden apron.  I found lots of youtube video tutorials on how to make a blue jeans purse.  I needed one that I could use my leg fabric and the one I found was perfect.  I love the shape of this one.

  Here is the link to the tutorial:  blue jeans purse.  The maker does not speak English so I watched it through to see if I could follow it.  The maker placed written notes in strategic places when they were making the pattern and after that it was easy to follow the video showing the cutting of the pieces and sewing up of the bag.  It's a 13 minutes video but it's really done very well.  It took me 3 hours to make the purse from making the pattern to the last stitch.  

   Here is my purse.  Blue jeans with navy blue gingham lining.  I love it.


  Next up I have to finish quilting my Grandmother Flower Garden quilt.

  I pulled out the fabric for my next quilt (purchased over a year ago) that I want to start.  I do that to give myself incentive to finish my current project.  I an incapable of working on more than one quilt at a time.  I will work on smaller projects while working on a quilt but I won't have more than one quilt on the go at one time.  I don't have the brain capacity for lots of quilt projects.

Monday, June 29, 2020

Garden Apron - Repurposing Old Blue Jeans

About a month ago my dear daughter asked me for some advice on making a garden apron from some old jeans she had cut up.  She wanted to gift the apron and she had cut the piece with the back pockets for the apron.  I told her I would use quilting cotton to make a lining with a pocket on the inside, bind the two pieces together and make a nice long tie threaded through the belt loops and securely fastened.

We made her garden apron using the piece of the pants she had cut and raiding my quilting cotton stash.  It turned out really cute and when I left her house that day I knew I wanted to make one for me. 

I had to go to Goodwill and buy a pair of jeans for this project.  I bought a big pair of men's jeans because I wanted my apron to be a nice size.  The jeans I found had some lovely embroidered omega symbols on the pockets and I couldn't resist the colors.  The back pockets originally had buttons or rivets but they had been ripped out, so instead of replacing the buttons, I layered two buttons on the flap and glued them on so it looks like the pockets button but the pockets will be easy to get in and out of.  I lined it with some fabric I had leftover, added a colorful pocket and made my binding and tie from fabric my daughter bought me to replace the fabric she used on her garden apron.

Here is my garden apron all done.  It took me about 3 and a half hours to make.  The jeans cost me $7.00.  This was a fun project and I love the result.


I'm making a purse from the legs of the jeans.  I have it cut out and all I have to do is sew it up.  I'll show that next time.  

Still haven't done much in the way of quilting my hexie quilt.  I'll probably start working on that over the holiday weekend.

Saturday, April 11, 2020

Making Kitchen Curtains Makes Me Happy

I have to admit that I have had a hard time adjusting the last 4 weeks since my work world changed with half of the staff in the office were sent home to work remotely.  Since then I have been sent home to work remotely on the order of the Governor.

It was time to do something that would make me happy and that I have been dreaming of since December.  I have been wanting to buy a bolt of navy blue gingham to make kitchen curtains and a back door curtain.  I was waiting until I had enough money to buy the bolt, and that happened at the end of last month.

I bought my fabric from Fabric.com and I got the navy gingham that is a 60" wide cotton/poly blend.  I think I paid about $4.50 a yard for it. The more yardage you buy on Fabric.com the cheaper the price.

I'm hoping the cotton/poly blend with keep the curtains from fading too bad in the hot sun.

I make my kitchen curtains double sided with the right side of the fabric on the inside and outside.  I sew two pieces together leaving an opening at the top on each side for the casing and an opening at the top for turning the curtain right side out.  I turn the curtain right side out, sew up the opening that I used for turning, then I sew two seams across the top to create the casing.  So simple.  I also make a tie for each curtain and position it about half way down in the center.  I made six panels for my wide kitchen window.


I also made a curtain for my back door using the same method so I can have the right side of the fabric on both sides of the curtain.


I didn't use the entire bold for the curtains.   The rest of the fabric will keep me busy while I make some items to decorate in my kitchen.  Some hanging dishtowels, a new stand mixer cover, some decoupage projects, and a plastic bag holder. 

Tuesday, January 14, 2020

Flower Doily

Using the video tutorial here, I crocheted this cute doily in about 40 minutes.  It was fun and I love how simple it is.  I used cotton yarn in a navy blue color with a size H or 5.0 mm hook.


Sunday, January 12, 2020

One More Valentine Decoration

   I like to hang garlands from two set of spotlights in my ceiling for holidays and seasons.  It's a great way to keep decorations from prying kitty noses and paws.  I found some ultra cute red gingham hearts at Hobby Lobby yesterday and I had to have them to make a garland for Valentine's Day (even though they were not on sale).

   These hearts needed loops and I know the easy way would be to get some red ribbon and glue that to the hearts, but I don't have any pretty red ribbon, so today at 5:00 a.m. I was rooting around in my fabric stash looking for some red fabric to make loops.  I wasn't sure I would find any because I don't have a lot of red fabric because of the dye running issues it has, so I usually stay away from red. 

   I was lucky I found a piece of red with tiny white polka dots on it in and that became the fabric for my loops.  I cut the fabric into 2" x 4" pieces and folded it up, ironed them, and sewed the folded edge closed..  I plugged in the glue gun and glued the ends together to make the loops and glued the loops onto the back of the hearts.  This project took about an hour and a half from fabric finding to finish.  So easy, fun and adorable.  I'll be stringing these up with some jute twine.


Monday, December 16, 2019

Jute Twine Crocheted Stars

   So I made seven of the white cotton stars (that's all I could get from one 120 yard skein of Peaches and Crème Cotton) and I took them to dear daughter's home and we ended up making a garland to put on her china cabinet in her dining room.  She added some battery operated fairy lights to it and  loves it.

   I am now making seven more stars in jute twine to make another garland to layer with the white star garland.

    This is what they look like in jute twine.


Friday, December 13, 2019

Breaking Out My Crochet Hook

Saw a crocheted star that I had to have.  Used my size H hook and some Peaches and Cream white cotton yarn.  Used the tutorial here.  Each star took about 15 to 18 minutes.  This was a fun easy project.  I'm going to make more.  Of course these will go to dear daughter for her Christmas tree.


Tuesday, December 10, 2019

Easy Christmas Ornaments Made And Ready To Gift

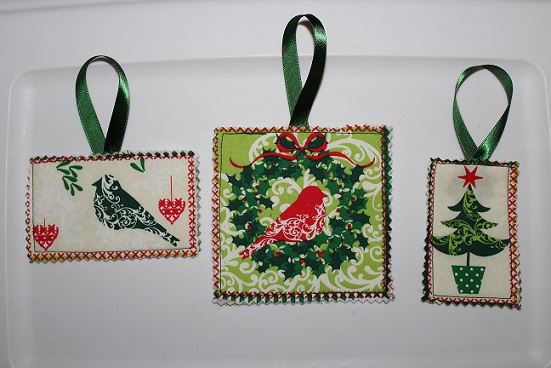
Dear daughter is getting these.  I used the tutorial at Patchwork Posse.  She had a fussy cut ornament tutorial and the link is here.  These took me about an hour and half to make from first cut to last stitch.  These ornaments are double-sided.  I put the same picture on the back of each of these.


Wednesday, November 13, 2019

Easy Christmas Ornaments

I found a very cute tutorial to make some easy Christmas ornaments with fabric and fusible fleece (link below).  I didn't have anything specific in my Christmas fabric stash to use for these, so I went on etsy and found a fabric that will be fun to use.  This is Susan Wingate's Snowman Stitches.  I have to check my ribbon stash to see if I have some pretty ribbon to make hangers.

Link to Easy Christmas Ornaments.

Here is the fabric I want to use.


I think these square pieces will be lovely as ornaments with ribbon.  Can't wait to get this fabric.

Monday, October 21, 2019

Make With Leftover Red Yarn

  I found some leftover red yarn.  It was leftover from my Christmas knitted stocking cap that I made last year.  I made two knitted ribbed ear warmers with some of the leftover yarn.  These ear warmers are knitting up very quickly now.  I'm loving this accessory.

   Here is a picture of one of the red ear warmers that I made in the last 7 days.


Saturday, October 5, 2019

Three More Ear Warmers Done

   I knitted up three more ear warmers in the last couple of weeks along with the turquoise one from the last post.  I picked out yarn for two more and I'm halfway through the first of those two.    I knitted a white one, a mulberry one and a dark blue one.  I'm really loving how I made these.


Sunday, August 26, 2018

The Making Of A Banner (Without Buying An Expensive Cutting Machine)

    I thought about buying a Cricut or a Brother Scan and Cut last week.  I felt the need to make myself a banner saying "Happy Fall Y'all" to hang in my living room.  I thought that the only way I could make a beautiful banner would be to use a fancy expensive cutting machine and the machines I was looking at cost over $200.00 each.  The letters on the banner are in the wrong order.  They have to be fixed.  I misspelled Y'all.  It's easy to fix and I will do it after I take it down before I put it away. 

    I was in Hobby Lobby yesterday and I figured out a different way.  The best part is that I only spent about $10.00 for stencils and burlap ribbon.  I had the fabric, the stabilizer, the thread, the twine, and the magic marker.  This was fun to make and I love it.


    Here is a close up of the flags.


    I cut the flags from the fabric, then ironed them to stabilizer,and I sewed around the edges of each flag to hold them together.  I doubled up the burlap, and sewed the two layers together along the long edges.  I drew circles using a small plastic cup and a black Sharpie.  I sewed around each circle to keep the two pieces together, cut them out, then I used a stencil and a magic marker to make each letter.  I sewed each letter to a flag.  I attached the flags to a two pieces of twine using the sewing machine and it's done.  It took me about five hours to make from first cut to last stitch.  

Monday, August 13, 2018

Modifying Another Free Pattern From A Blog

  I love the internet.  I don't know how I did any sewing or crafting before the internet.  I admire the super smart folks that post sewing tutorials with written instructions and pictures on their blogs so we all can make lovely items to use.  When I find a pattern I really like but need to modify, I don't mind taking those clever instructions and adjusting them to meet my needs.  It seems like I have been doing this a lot lately.

    I spent part of last Sunday modifying a water bottle carrier pattern that I found on one of those super smart blogs to accommodate a larger than 16.9 oz. bottle of water.  This carrier will swallow my largest water bottle and it's perfect.

    I had already used these instructions back in 2016 to make a regular size water bottle carrier for a normal 16.9 oz. plastic bottle like a Zephyrhills bottle.  That water bottle carrier is still in use, but sometimes I want to carry more than 16.9 oz. of water and for that I need a bigger carrier.

    When I made that regular size water bottle carrier in 2016, my daughter made one for herself, but she was thinking ahead and she modified the size so hers would be big enough for her big water bottle.  I helped her make that water bottle carrier, but unfortunately I didn't take any notes on the modifications she made, so I had to start from scratch.  That's one of the reasons I have been blogging about how I make my changes so I can just look them up in my blog.

    I started with the instructions at this blog post:   Instruction for water bottle carrier.  

   I didn't bother to measure my bottle because I have two big bottles, a 21 oz Camelbak and a 32 oz. Contigo and I wanted this carrier to be big enough for either bottle.  I figured whatever I ended up with would work fine for what I needed.  Here are my modifications.

  1.   I didn't bother to piece the outside of the carrier with coordinating fabric like the blogger did.  I hardly ever have coordinating fabric and I wanted to use my souvenir Hawaii fabric for these so I cut two pieces of fabric for the body of the carrier (the outside and the lining) 14" (width/around the bottle) x 12" (height/deep)  or you could cut one long rectangle that is 28" x 12" and just fold it where the two pieces would be seamed.  I also cut one piece of Insul-Brite 13" x 11" for the body of the carrier according to the instructions.

   2.   Since I didn't measure and I couldn't determine how big the circle bottom (2 pieces of fabric and one piece of Insul-Brite) had to be I cut mine at 8" in diameter which was way too big.  I ended up trimming this down to about 4.5" in diameter after the body of the carrier was put together.

   3.  I followed the instructions for sandwiching and quilting the body of the carrier and the circle bottom.  I sewed the body up to make a tube and I sewed a French seam here to enclose the edges.  I measured the circle bottom and trimmed my large circle down so it would fit and I attached it according to the instructions.

   4.  This water bottle holder will be holding heavier weight with the larger bottles, so I made my strap from the fabric I used for the rest of the project.  I think fabric straps are more comfortable than webbing and definitely stronger than ribbon.  I cut two  3" strips the width of the fabric.  I sew the short ends together to get one long strip, then I make the strap like the one in this tutorial:  Friendship Gift Bag Tutorial.   This is how I make the straps for most of my bags, wristlets and totes.  They are really sturdy.  One other thing I did was to hem the two short ends of the strap that are being attached to the body of the carrier by turning them up before I topstitched each end.  These straps are not enclosed and hemming keeps them neat.  I trim this strap to be about 56" long, which measures about 26" from your shoulder (taking into account that I used an inch on each end to attach the strap to the carrier).  You can make the strap as long or as short as you wish.  If you find that after you attach the strap that it is too long, you can just tie a knot in it to shorten the length.

   Those are my modifications and here is the final product  Pictures of the bottles in the carrier and pictures of the bottles next to the carrier.  I will definitely be making more of these.


   This took me about 2 hours to make from cutting fabric (not my favorite part of sewing) to final stitch.  That time includes finding the right color of thread to use, filling a bobbin, and moving kitties off my ironing board every time I had to use it. (LOL).

Saturday, August 11, 2018

Okay, This Is One Quick Project

  I made this purse from more of my souvenir fabric last night after work.  It took me about an hour and 45 minutes.  Love this.


   And I made this one this morning.  More souvenir fabric.


Wednesday, May 30, 2018

I Made A Serger Cover

    I needed a nice cloth cover for my serger. The serger came with one of those plastic covers but I don't like plastic on plastic.  I wanted to have something so I wouldn't have to unthread the machine or take off the overhead thread guide.  So I designed my own take on a very simple serger cover.

   The front


The back


     I sewed this up in about 3 hours.  It was easy to make and I loved that I got just exactly what I needed.  Here's how I did it.  I took a rectangle of fabric about 20" x WOF and hemmed up the two long sides and one short side.  The unhemmed short side would be the back.  I cut a slit up the back for the thread guide rod to slide in.   I hemmed up the slit to the curved U part at the top and covered that portion with binding, it's not pretty, but it works.  I fit the cover on the machine and hemmed the last side so it wasn't too long.  Then I made six ties (they took the longest to make because I only cut the fabric 1 1/4" wide and they were fiddly to get folded and sewn up, but they look great because they are so thin).  The ties are a little two long, but I didn't want to take the time to make the perfect length so I left them at WOF and just cut the selvedges off.  The sides and the back are secured with the ties.  I love the cover.  It's pretty and functional.

Sunday, March 25, 2018

Everyone Needs A Simple Knitted Lacy Scarf

    I definitely need one.

     I have made myself a few crocheted scarfs over the last few years, but I really like this scarf and the pattern is so easy.  I found this free pattern on Ravelry several years ago and I've made two of these for gifts.  The pattern is called the One Row Lace Scarf by Turvid.  It's very pretty and very easy to knit, which is good for me because I'm not the most accomplished knitter.  You don't have to be a Ravelry member to get the pattern.  Here is the link to the blog with the pattern.   Link here.

    This would make an awesome travel knitting project because it's a simple pattern to memorize and it makes such a pretty fabric.  It's almost as small to carry as a sock.

   I'm making my scarf with size ten Sunstruck (by Knit Picks) circular needles (larger size needles are suggested to show off the lacy stitches and I think the 10 is perfect) with a 24 inch cord.  I tried a 16 inch cord would but it was too short for me.  I would rather have too much cord than not enough.   This is a back and forth project so you can certainly knit this on straight needles but I like the circulars for keeping my project secure. 

    I'm using Knit Picks Brava worsted in the silver colorway.  This yarn is acrylic, which I like.  It's soft and indestructible.  I like that I don't have to worry about bugs eating it and it's washable.  The pattern writer used alpaca yarn to make hers, so feel free to use a natural fiber.  There was also the perfect amount of yardage in a skein of this yarn.  The pattern calls for 175 yards of yarn and this yarn comes with 218 yards.  I'm using two skeins on this scarf because I want this one to be extra long, but one skein of this yarn would be enough for a scarf according to the pattern.

  Here's a picture of my pretty progress so far.


      I bought a lot of Knit Picks Brava in different colors (there are lots of beautiful colors) earlier this year and I think all of it would be great in this pattern.  I picked the grey because, well, it's grey.  I like grey.  I will probably make more of these in some of the other colors, like currant (burgundy) Dublin (dark green), solstice heather (bright navy blue), and white.     

    Knit Picks also has a worsted weight yarn called Mighty Stitch which is a 80% acrylic and 20% super wash wool.  I bought a few skeins of this as well in January to try it out.  I like a good acrylic/natural fiber blend.   The Mighty Stitch comes lots of colors and is a 208 yard skein.

   This blog post turned into a complete Knit Picks commercial.  Sorry about that.  I just like Knit Picks.  I buy a lot of their products and I use them.  

Thursday, January 25, 2018

Crocheted Poncho

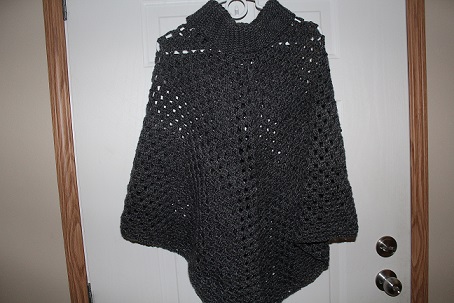
     I started this poncho last November after I bought a poncho pattern.  I did not make the pattern that I bought, but I ended up getting an easier pattern from a youtube video.  It was super easy to make.  I made the poncho then I added the ribbed collar.  This is the first poncho I have every made and I will not hesitate to make another when I have some time.

    I used acrylic yarn for this poncho and it's really soft.  I like to work with acrylic yarn.  I don't have to worry about bugs eating my project if I use acrylic.  I used Lion Brand Heartland in Great Smoky Mountains colorway that I bought from Michael's.  I bought ten skeins to make this poncho and I have three skeins left.  It's a beautiful dark grey color.


Sunday, January 7, 2018

Crochet Hearts for Valentine's Day.

   I found a crochet tutorial on youtube that I really like to make pretty hearts.  The tutorial is easy to follow as well.  It takes about 22 minutes to make a heart using the tutorial.  Here's a link to the tutorial I used:  Crochet Heart Video Tutorial

     You can use any weight yarn or thread and a hook size to match the material.  I used some pink Red Heart Acrylic yarn that I had leftover from a previous project (worsted weight) with a size G crochet hook.


    I think these hearts would be pretty with a picot edge.