
Showing posts with label print. Show all posts
Showing posts with label print. Show all posts
Saturday, May 19, 2018
Fat Quarter Time
I did some fabric shopping on Etsy. I finally found a fat quarter bundle that I couldn't live without. I bought two fat quarter sets of Bake Sale by Lori Holt of Bee in My Bonnet for Riley Blake. Those colors and prints are perfect. I'm planning lovely napkins and hanging dish towel toppers with these fun kitchen prints.

Saturday, September 2, 2017
Fun Quick Skirt Project
I made the skirt with the two yards of pretty plum sixteenth century selfie fabric. It was easy and fun.
Two yards was a the perfect length of fabric for this skirt.
Here's how I made my skirt:
I washed the fabric, gave it a light press, and I removed the selvedges.
I cut about 5" off one end of the fabric to use for the pocket.
I sewed the ends together to make the skirt.
I ironed the elastic casing at the top, and ironed the hem at the bottom.
I sewed the the casing up leaving an 2" opening to insert the elastic.
I sewed the hem at the bottom.
I added a nice deep pocket, you can see it on the left side of the picture, the two faces that are closer together are the outside of the pocket.
I inserted the elastic in the casing and sewed up the ends of the elastic, then I sewed up the opening in the casing.
It was finished.
Now I'm looking for more fun fabrics to make a few more stay at home skirts.

Thursday, January 7, 2016
Animal Print Chiffon Scarf
I bought a beautiful half yard of animal print chiffon today at Joann Fabrics to make myself a scarf. I was planning to use the rolled hem foot on my Janome 7700 to hem the edges.
I checked tutorials on youtube on how to use the rolled hem foot and I found a tutorial on making a rolled hem without using the rolled hem foot, meaning I could hem the scarf with any of my machines and I didn't have to set up the Janome. The tutorial I used is here. I used a pretty copper polyester thread to finish the hem.
My scarf is finished and I love it. I tried to take a picture of the hem, but it's hard to see in the second picture.


Saturday, May 2, 2015
Bead/Sewing Cat Picture Project
I found this pretty picture on the internet. This is an art drawing by Laurel Burch. It's called "Flowering Felines."

Ms. Burch drew colorful pictures of cats, dogs, horses, sea life and plant life. Unfortunately, Ms. Burch passed away several years ago. I found her work after I bought my bengal kittens, Taffy Morgana and Merlin almost 10 years ago. I was all into cat everything and I knew I had to have some Laurel Burch cat stuff. I bought a few pieces of jewelry, two pair of socks and three bags, but I never had anything by her to hang on my wall. This picture is going on my wall with a few enhancements.
Here are the two pair of enamel earrings that I cherish.


Back to the picture. After looking at Flowering Felines for a while I decided that beads were the way to go. I wanted this picture to shimmer when the light hit it. I printed the picture onto a fabric sheet made for my ink jet printer. I used Avery 3384, 8 1/2" x 11" printable fabric sheets. It worked very well in my HP ink jet printer and it printed right the first time. When you use this type of product you have to make sure you put the fabric sheet in paper tray right so the picture prints on the fabric side. The other side is glossy and has the adhesive to make the sheet an iron on. I did a quick print test to make sure I put the fabric sheet in the paper tray the right way. I mark a piece of paper indicating which way the paper was set in the paper tray so after I print I can figure out which way my fabric sheet should go in. It only takes a minute to do and is worth the trouble to get the picture printed right on the fabric sheet.
After printing my picture, I ironed it to a piece of muslin to stabilize it before I started adding beads. The piece was stiff and I could not put it in an embroidery hoop. I also had a hard time finding the exact spots I wanted to put my beads from the back side of the work, but I used a flashlight to pin point the exact spot I wanted to put my needle in from the back and that helped a lot.
I did all the beads in the cats first, then I added the orange borders and finished beading the dots outside of the cats. By the way, I thought sewing the orange borders on through the fabric sheet would leave an adhesive residue on my sewing machine needle, but it did not and it was really easy to sew through. That was a nice surprise. I used gold metallic embroidery thread to put the beads on and it was a real pain to work with. I had a hard time separating my threads and keeping them from shredding while I sewed, but I wanted shimmer and I thought cotton embroidery thread would dull the shine of the beads. I used multi colored 6/0 glass beads by Craft Designer that I found at Joann's Fabrics.
The beading was done and it was time to frame this. I bought the frame at Walmart for $5.00. It was a 10" x 13" floating frame and the black part of the frame is actually clips that secure the piece to the glass. Super easy.
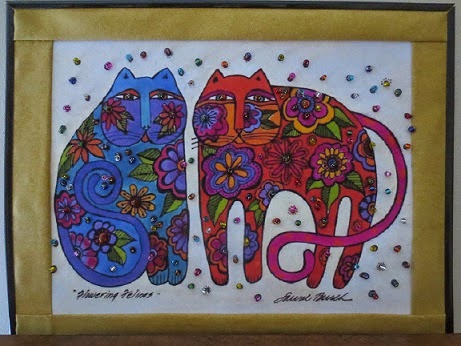
Up close of the beads.


Cost for my picture was about $15.75.
Done.
Sunday, December 14, 2014
Pretty In Pink Quilt Update
All the 9 patch blocks are made. I made 34 nine patch blocks using 3 inch strips for this quilt top. They will be alternated with solid blocks of the white on white rose print fabric. I love, love, love the green center on these. I'm really glad I did that. I still have to iron and cut the blocks for the solid blocks. The 9 patch blocks have been ironed and trimmed.

Subscribe to:
Posts (Atom)