Pages

Showing posts with label paper. Show all posts

Thursday, June 11, 2020

Row 6 is done! Quick review of small tool.

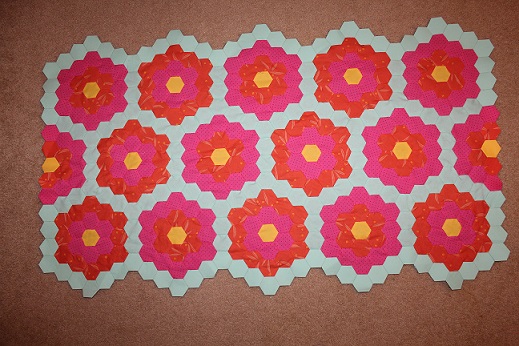
I finished row 6 on my quilt top.  I have one more row to go.  Then I will applique this top to a grey border fabric.  I bought the border fabric almost 2 years ago so it's been very patiently waiting to be used.  Here is a picture of the 6 rows.  I'll be using the grey fabric for the backing fabric as well.


My quick review is of the cute flower threaders I bought last year.  I have been using the same threader for the last two rows of the quilt and it has held up very well.  The wire is sturdy but its not too big to fit in a small needle eye.  I bought the threaders from Amazon.  The link is here:   Flower threaders for sewing needles

Friday, December 27, 2019

Christmas Has Come And Gone But I'm Not Done Making Decorations

I can't believe how many cute ideas I found to distract me this year.  I'm still working on several projects that are Christmas related.  I'm afraid that I will be Christmas crafting into the New Year.

I did manage to finish dear daughter's table runner, some small  tree ornaments, and her star garland, but I'm still working on the decoupaged cookie plates, my table runner, some fabric covered Christmas tree forms,  and a star garland for me.  My star garland may go up after I finish it and stay up all year.   Here is a picture of dear daughter's garland on her China cabinet.  She added fairy lights and it looks pretty.  I love the way this turned out and the stars are so easy to make. 


Other things I want to make are felt tree ornaments.   I found this picture on the internet and thought these felt ornaments were adorable.


I saw this picture a bunch of times for different ads.  The day I took this picture they were advertising Hobby Lobby craft store.  I have not been able to find this picture on Pinterest with a link to instructions or patterns, so dear daughter I made our own ornaments with green felt in the shape of a Christmas tree and we beaded them for her co-workers.

I also want to make some string art.  I found a string art star with instructions here.

As usual, I spent too much time watching YouTube videos showing items made from thrift store finds and I saw some interesting wood burning ornaments being made by using 4" wood rounds that you can get at Amazon.

One person was walking through a Antique store or 2nd hand shop and I also saw something I have to make.  It's a paper garland made from hymnal pages.  It's super simple, fan folding the pages and gluing a bunch together to make a long piece that you wind around a piece of twine.  I don't have a good picture of it but I took this screen shot from the video where I saw it.


I have looked on Pinterest and all over the Internet for a better picture or even instructions but could not find anything similar.  I fell in love with this garland, so much so that I bought a Baptist hymnal on Christmas day for this project.  I have the glue and twine.

I don't know when I'll finish Christmas decorations, I just hope I finish before next Christmas.

Thursday, July 11, 2019

English Paper Piecing.

  I have part of row 5 put together now and I've been busy basting hexagons in my spare time.  I don't have quite enough to finish the next three rows, but I'm working on them. 


Friday, March 1, 2019

A Quilted St. Patrick's Day Decoration

   I'm calling these St. Patrick's Day Stars.  I made these small wall hangings in green, orange and white for me and DD.  We love to decorate a little bit for the holidays and I like to make her little things to put around her house with the holiday color.


    I used a free paper piecing star pattern from the Carol Doak website.  The link is here.  It's the star pattern that is called Introduction to Paper Piecing and it's about half way down the page.  I've used this free pattern before I love it.  With the borders and binding they measure appoximately 13" x 13" square.  I gathered my fabrics for this project right after Christmas.

    These were fun to make and DD loves it.


Wednesday, January 16, 2019

Getting Back to Hand Sewing on the Grandmother's Flower Garden Quilt Top

   I pulled out my Grandmother's Flower Garden quilt top on last Friday.  I had to add three flowers to the third row to finish it and I finally finished those tonight.

     I started this quilt top way back at the end of May, 2017 and I can't believe that I am still working on this.  I have never had a project linger this long.  I really, really, really need to get this one done, so I am committing two hours each day during the week and more on Saturday and Sunday to sew on this top until it is finished.  I have four more rows of flowers and path to add.

    I notice in the second row that the half flower on the right hand side is wrong.  It should have an orange outer ring and a pink inner ring.  I will be taking that half flower off and fixing that. 

    I fell out of love with this project before, but looking at this picture reminds me how much I like this and I am excited to work on this again. 

    Here's a picture of the three rows finished.


Sunday, December 9, 2018

Paint, Modge Podge, Fabric and A Christmas Card

    I got this odd size free piece of wood a couple of years ago from Lowes or Home Depot when I was shopping one day.  I've been trying to figure out what to do with it since I got it.  I found this card a couple of weeks ago and I started getting the idea of using it on this piece of wood.  I painted the board, decoupaged a piece of pretty light blue polka fabric on the front and then I decoupaged the card on top of that.  It was fun to make, but I don't enjoy painting because it takes so long to dry.

Thursday, December 7, 2017

Pleated Christmas Tree Project and More

    I found this pleated Christmas tree tutorial a few years ago and I made one that I gave away to my daughter.   Here is a link to the tutorial:  pleated tree skirt tutorial.  I've been wanting to make one for  myself and I'm doing it now.  This is easy to make and you can have fun with colors for the tree and the tree skirt.  I stayed with Christmas colors for this one, but I will definitely be experimenting with colors for the next one I make.

    I will add the tree skirt on this one and it will be ready to frame.


      I've been watching Youtube videos on how to make easy and cheap Christmas decorations.  I love the snowflakes made with clothes pins.  I bought very small clothes pins from an etsy seller to make a few of these to add to my decorations.  I need to buy some silver spray paint and silver glitter to make them sparkle.  Here is a link to a Youtube video: Clothes Pin Snowflakes.

     I also like to the decorations I've seen made with the mason jar lid band.  I saw a lady tie a bunch of homespun strips around the band and it turned out extra cute.   Here's a link to her tutorial, she makes four different ornaments in this one.  Homespun Christmas Ornaments Youtube tutorial.  And yes, I have some mason jar lid bands for this project as well. 

    I also found a paper star tutorial on Youtube.  Here's a link:  Paper Stars.  I haven't done a lot of paper crafts, but this one looks doable.  I'm going to give it a try in the next few weeks.  I'll let you know how I get on.

No progress to report on my Grandmother's Flower Garden Quilt top.  I'm still stuck on the third row.


Tuesday, August 15, 2017

Still Hand Sewing

    I don't sew everyday, but I try to sew a few days a week.  I get a lot more accomplished on the weekend.  Here is an update on the Grandmother's Flower Garden quilt top.

    I have started the second row.  The second row flowers still have to be attached.


Thursday, June 15, 2017

Making Paper And Fabric Pieces For My Hexagon Quilt

I'm making my own hexagon paper pieces to use in my current quilt project.  In my last project I used old greeting cards and some junk mail and my Fiskars paper punch to make my hexagon paper pieces.  I also made some of my papers out of a heavy 110 lb. 8.5" x 11" white cardstock and those papers lasted the best and I was able to reuse them much longer than the others.  So I'm using the cardstock in this project.  The Fiskars paper punch is labeled an extra large, (I bought it on Amazon a couple of years ago) the sides measure 1" and the longest measurement from one point to another is 2".   I can punch out 20 hexies of this size from one sheet of this size cardstock.  I like to have lots of the papers available so I can baste enough hexies to make more than one flower at a time.

At this stage I cut the edges off leaving a piece big enough to punch out an additional 6 hexies.


All of my yellow centers are basted and ready to have flowers created around them.  This is all the fabric hexies basted.  


Time to cut more fabric.  To cut the fabric, I use a paper hexie with a 1/4" seam allowance added to it and I trace the shape onto the back of the fabric and I cut out each one with my trusty Gingher scissors. 

Here is a picture of the back of my hexies in my first block of this quilt.  I basted the hexies with blue thread so it's easy to find and remove when I take the papers out.  This block is ready to have the paper removed from the yellow, orange and pink pieces.  I leave the papers in the green ones until I have another block added to it.


Here are some hexies I made and put together.  I want to use these as a decoration on a bag in the future.


I

Tuesday, June 13, 2017

A Slow Start To My Slow Stitching Project

   I finally started my Grandmother's Flower Garden quilt.  I started this on a day I spent at the beach with dear daughter and friends.  I knew I wasn't going to be swimming in the Gulf and that I wanted to spend my time on the beautiful deck with a sea breeze and some hand stitching.  I finished my first flower for my new Grandmother's Flower Garden quilt during that beach trip.  I have since added the green path.  I am totally in love with this project.  I can't wait to see more of these lovely flowers appear.


  The green fabric almost looks minty or blueish, it's not. I tried to get a good picture using my faux Ott Light.    I will try to get a picture where the colors are more life like on a day with more sun.  We have had some rain the last couple of days and it's hard to get a good picture indoors.

    I was kind of worried about the pink and orange clashing but it looks stunning in this picture.  I originally bought a very pale yellow for the center, but I changed that to a bright yellow when I saw how dark the orange and pink are and I'm so glad I did.

   So there you have it, the beginning of a another quilt top.  


Tuesday, May 30, 2017

I Decided On My Next Quilt Project

   I finally decided on my next long term quilt project.  It will be a slow hand sewing project making little hexagons with English paper piecing.  I'm going to make another Grandmother's Flower Garden ("GFG"), but this time I want to make the quilt more traditional.  I will be using three fabrics for my flowers.  The center will be yellow, of course, and the two rows of petals will be orange and pink.  Here are the fabrics I purchased from Fabric.com this week for this project.


     Here is the green I found for path which I think is perfect.  It's a Kona cotton in the colorway Pond.  I can't wait to get started.


    Here's a link to the scrappy GFG I made last year.  It was totally different from a traditional GFG.  I don't know what I was thinking of when I bought the dark green and greyish fabric for this.  I should have made the flowers with two rows of petals and then used a lighter green for the path, but I made only one row of petals then I used that concrete color before the dark green path.  It it unusual to say the least.


Friday, May 12, 2017

Embroidery Machine Fun

   I almost forgot to tell about the machine embroidery adventure I had last weekend.  I have a Brother PE770 Embroidery Machine that my daughter gave me as a birthday present in 2014.  It was supposed to be a machine we both would use but it lives at my house so I use it more.  I set it up and use it about 3 or 4 times a year for making hanging dishtowels, embroideries to add to tote bags or to frame, and monogrammed linen napkins, I would love to play with a multi-needle machine someday.
   Back in January I had an idea for dear daughter to make her Father some embroidered toilet paper for Father's Day.  Dear daughter picked the design and I purchased it.  We got together last Saturday to embroider toilet paper.

    I did a sample stitch out of the design on Friday night on a plain piece of white cotton fabric with stabilizer.  It worked great and took me about 40 minutes from set up to final stitch.

     On Saturday we had a few problems and the project took a lot longer than anticipated.  I don't think my machine is built to embroider toilet paper because when we tried to embroider on the toilet paper the machine jammed up and it would eat the toilet paper and the stabilizer.  

     We ended up with three designs stitched out on regular white muslin which dear daughter will wrap around toilet paper rolls.  The three designs took us almost 5 hours including an hour of that time taken to go to Walmart to get the fabric.

       It was a fun project and a real learning experience.  Dear daughter got a chance to really work with the machine up close for the first time since we have had it.

    Here is a picture of the design we stitched out.


Thursday, May 11, 2017

Replacement Irish Chain

    I had to make a replacement Irish Chain for myself.  I invited a friend to come over and shop my quilts last month.  She fell in love with my favorite Irish Chain that I made with Tanya Whelan rose fabrics.

     This is the front of the original Irish Chain that I made for myself a few years ago.


This is the back.


  The original quilt was a little small but I loved the fabrics I used in it.  My friend took it home with my love and I tried to forget the quilt, but I knew I wouldn't be happy until I made a replacement.  Not a carbon copy but an Irish Chain using fabrics I love.  I used a green and pink floral for my nine patch blocks and the backing/binding fabric is a lovely light green with tiny bees all over it.  The fabrics are great and I even made the quilt a little larger than the original.  So my replacement Irish Chain is finished.


        I don't have any more quilts that I want to make, so I'm going to continue making string quilt blocks for more string quilts.  I have two big boxes with lots of scrap strips from my stash.   I make my tops with 49 blocks which I think make a good size top.  I make an additional 7 blocks to piece the backing.  So each quilts needs 56 string blocks.  I've been using full size paper towels which measure 10.4" x 11" which I cut down to 10" after I sew my strips on.  Using 10" blocks is so much fun for me.  I love the 7 block rows x 7 rows and this layout makes it easy to line up my backing fabric with the row of blocks in the center.  I line that row up with the fourth row of the top and that centers my back with my top really nicely.   The paper towel rolls have 96 sheets in them so I can  make almost two tops with one roll of paper towels.  While I'm making my string quilts, I'll be on the hunt for a great quilt pattern with some great fabric.

Sunday, April 30, 2017

One more thing,

   I did some more paper piecing and made up this pretty block to decorate my front door in between specific holidays.  I used a fat quarter set that I won from Barbara at Cat Patches blog.  It was eight fat quarters of Junebug Fat Quarter Bundle by Dear Stella Fabrics. I used the free paper piecing pattern from Carol Doak.  If you go to Carol Doak's site and click on Free patterns and scroll down to this one which is the 11th picture, it's called "Introduction to Paper Piecing" and it's pretty simple, but I think it super pretty.  It looks great no matter what fabric you use.  I would love to make an entire quilt with these blocks.


Wednesday, August 24, 2016

Scrappy String Blocks For One Quilt Top Are Done


   I made the 49 scrappy string blocks I need for a quilt top.  I laid them out to see all the pretty colors.  Some of the blocks are placed in the wrong direction but that's easily fixed.  I just have to remove the paper towel foundation from each block and I can sew these up into rows.


   I'll finish this quilt top up and then I'll make more string blocks for another top.

Tuesday, August 23, 2016

Scrappy String Block Process Photos And Foundation Research

    So I spent the morning making scrappy string blocks and I took some pictures of my process because these are so easy and fun to sew.

    I place my center white strip right side up on the paper towel diagonally, I don't use glue or pins.  I lay my first scrap strip right side down on top of the white with the edges lined up.  I sew along the right edge using the presser foot to measure my seam, approximately a 1/4".  I press the fabric open, and place another scrap piece right side down on top of the last strip sewn and I sew up the right edge, press open, repeat, until the entire paper towel is covered.  I usually work on one side until it's covered then I flip the paper towel and sew strips on the other side.


    After I sew up a few blocks, I trim off the edges and square each block to 10".


    I now have 29 blocks sewn up, I have to make 20 more.  Forty-nine blocks will give me a top that is 7 blocks x 7 rows and measure 66.5" square.  The perfect size for quilting this on my domestic sewing machine.

     I did a bunch of research on what to use as my foundation and I'm using a full size paper towel because I want 10" blocks and these full size paper towels measure 10.4" x 11".  The price is right as well, I got two rolls with 96 sheets each for about $3.50 at Walmart, that's 192 blocks which are enough blocks for 3.91 quilt tops with 49 blocks each.  I got the idea to use paper towels from my former mother-in-law who made string block quilts for her grandchildren and used paper towels as foundation.  Thank you, Mama.

    I also looked at children's doodle pads a/k/a newsprint paper (the sheets were too small, 9" x 12", a pad of 100 sheets about $2.00) or a roll of newsprint 18" x 300' (too much paper waste for 10" square blocks and the cost for the roll is $16.15 on Amazon).  I also thought about using muslin but I would have to spend almost $20.00 for the fabric and still have to cut it to 10" blocks.  I don't have to cut the paper towel before I sew on it.  It's already a great size to trim down.

 One Final Note On The New Ironing Board Cover

       I almost forget to add some new padding to the ironing board when I put the new cover on it last week.  The old padding was flat.  The other day I added two layers of cotton batting and placed it on top of the old cover (I kept the old cover and the old padding under the new cover) using a crib size Warm and Natural cotton batt  ($8.00).  My ironing board has lots of cushion now and the cats enjoy using it as a napping spot when I'm not pressing my quilt blocks.


Thursday, August 4, 2016

Another Great Way to Use Up My Stashed Fabric

      I started a second quilting project today.  I made my first scrappy string block using a paper towel as the foundation.  This was fun to make.  I will have to take some time to cut fabric strips, but that's as easy as sewing the block together.  I will make the center strip white on all the blocks so when I put the blocks together a border will be created with the white strips.  Very cool.


     And I'm still working on my scrappy 16-patch blocks.  I have 12 made so far.  I need 23 more for this quilt top.


     I have the fabric for my paper pieced stars (wallhanging) and it's been washed.  I just have iron the fabric and print out my paper piecing patterns to get started.  You can see the pattern and the fabrics here.

Tuesday, July 26, 2016

Change In Sewing/Crafting Strategy

    I'm changing my sewing/crafting strategy.  Instead of only working on one project at a time, I'm going to try to work on a couple of projects at the same time, one big quilt project and one smaller project. I'm hoping I can work my way through my big storage box of projects which include all the patterns/fabrics/findings to make each one.  The projects include:  a doll pattern, a teddy bear, a Gadget Girl Tool Kit bag, several embroidery/cross stitch projects, another dog harness, a table topper kit, a lap quilt, and a jewelry project.  

  I had no business planning two new projects with all the items I have waiting, but I did.  I'm cutting fabrics for a scrappy 16 patch block quilt with a white sashing.  I'm making the scrappy blocks with 3" squares cut from my stash.  I also ordered the white fabric for the sashing on Saturday.

    I have this almost full box of 3" squares ready to be sewn together.


   And yesterday I picked out a lovely foundation paper pieced pattern on etsy to make a wallhanging for my living room.  I also bought some fabric (on sale) at Connecting Threads for the wallhanging.

   Pattern:


Fabrics:


   I've only done a couple of small paper piecing projects so this should be fun.  I'll probably get the fabric next week and I should be finished with my current project by then.  

   I'm currently working on my red plaid Christmas nightgown.  I finally ironed the fabric last night, next step is cutting my pattern pieces out.

Fabric for nightgown:


   That's all I'm working on now.  I'll let you know how the new sewing strategy is working for me. 

Sunday, May 1, 2016

My First Hexagon Block For My Grandmother's Flower Garden Quilt Top.

   I have to make 34 more of these for my quilt top.  This quilt top will definitely take me a while but it's a lot of fun to make.  I love the scrappy flower center, the third round looks like cement pavers in the garden, and the fourth round is the green grass growing around the pavers and the flowers.  This is my Grandmother's Flower Garden Quilt in progress.


Friday, April 1, 2016

Grandmother's Flower Garden Quilt Start

   I have started my Grandmother's Flower Garden Quilt that I have been dreaming about for a while.  The flower centers will be bright yellow, the second ring will be scrap fabrics, the third ring will be white, and the finally ring will be light green for the garden path.  This will be an ongoing quilt project for the next year or so.

    I bought a hexagon paper punch last year to make my own 1 inch hexagon papers and I did make some hexagon papers from some old greeting cards last year.  Last week I pulled out some 110 lb. cardstock from my paper stash and made more hexagon papers.  I can punch out 19 - 1 inch hexagon from one piece of  8.5" x 11.5" cardstock.

   These are my first ever hexies and they were a lot of fun to make.