Pages

Showing posts with label stitch. Show all posts

Wednesday, August 11, 2021

Farm Aprons , Patriotic Pennants, Vinyl Front Cross Stitch Project Bags, and Secret Sewing


            I finished the farm aprons that I have been wanting to make since I found this duck fabric in my stash.  The instructions from Cosmopolitan Cornbread blog were very good and I was able to get two aprons cut out in less than an hour.  The ironing, hemming and sewing for each apron took about an hour.  These aprons are perfect for going out into the yard to do a messy job or even in the house for a messy job.  I love the big pockets.  


       It's that time of year when I do a little secret sewing for dear daughter's birthday.  I found some lovely colorful fabric that is being turned into something useful for her.  I will show the finished product after they are gifted in November.


       I have some old curtain panels from my bedroom that will be made into tote bags for me and dear daughter.  These curtain panels make lovely tote bags.  Here is a picture of the fabric I'm using.  I have a couple of these already and I gave about 4 of the tote bags to dear daughter a few months ago.  


I've decided to make a patriotic pennant banner with some red, white, and blue fabrics in my stash.  I drew up a triangle to use as a pattern and I made a fabric string from some red, white, and blue fabric I used in my patriotic wall hanging earlier this year.  I cut the fabric for the string like a narrow binding and folded in the edges and sewed it down.  It's perfect for a banner.  I just have to make the pennants.   I want to make one for me and one for dear daughter.  I don't know if I have enough fabric to make two, but a quick trip to Joann's will fix that.  Here is a picture of the fabrics I'm using for the pennants.


        I never posted any pictures of all the clear vinyl front cross stitch project bags I made a few months ago.  These bags are not perfect  and I did not really enjoy making them, but I have to say that the instructions are super easy and they went together very quickly.  They are so much cheaper for me to make then to buy from an etsy seller.  It's a very good use of stray pieces of fabric and batting.  Each bag has a little mini vinyl front pouch to match and all have zipper pulls either made with charms by me or purchased.


Tuesday, August 14, 2018

Some Cross Stitch Charts I Love

  Now mind you, I have never cross stitched before, but I want to start and I know, it's early for Halloween, but I wanted to share a link to a chart I bought because I love it so much.  I think this will be the first chart I ever cross stitch because it's just so clever.

Link To Clever Halloween Cross Stitch 


Here's another chart that I bought and love.

  Link to Christmas Cross Stitch 


Here's another chart that I haven't bought but I like this one a lot.

Link to Pretty Cross Stitch


I found free cross stitch charts on the DMC website here.  All you have to do is sign up for a newsletter and you can have free charts for flowers, bugs, borders, tiles, small animals, alphabets, and tiles.

I found this free cross stitch pineapple welcome chart on Pinterest.  Link here.

Here are some very cute free charts from Country Living.  Link here.

There is another place I found free cross stitching patterns, but you had to sign up for a newsletter with an email address and they also asked for your physical address.  I did all this because there was one chart I could not live without.  The site is called cross-stitching.com and the link is here if you don't mind giving out this information.

Tuesday, July 24, 2018

A Little (Emphasis on Little) Peek

   I have been doing my secret sewing this week and I have one project half done.  Here is a sneak peek at what I have been working on.


   I have also been busy knitting dishcloths.  I have to make a couple more dishcloths and I will call it quits for the year.  I finished three dishcloths in the last four days. 

   I'm watching Flosstube on youtube and learning about cross stitching.  I have never done any cross stitching but there are some super cute charts out there.  I couldn't resist buying some of my favorite charts and a couple of little kits to start off with.  I will be starting off stitching on 14 count Aida cloth.  This is yet another craft that yields lovely projects but the sky is the limit as far as how much you can spend getting to the end result.   There is hand dyed floss, hand dyed fabrics and lots of accessories and notions to help the cross stitcher finish beautiful pieces.  I'm enjoying watching Floss Tube and seeing all the pretty finishes.

Friday, May 12, 2017

Embroidery Machine Fun

   I almost forgot to tell about the machine embroidery adventure I had last weekend.  I have a Brother PE770 Embroidery Machine that my daughter gave me as a birthday present in 2014.  It was supposed to be a machine we both would use but it lives at my house so I use it more.  I set it up and use it about 3 or 4 times a year for making hanging dishtowels, embroideries to add to tote bags or to frame, and monogrammed linen napkins, I would love to play with a multi-needle machine someday.
   Back in January I had an idea for dear daughter to make her Father some embroidered toilet paper for Father's Day.  Dear daughter picked the design and I purchased it.  We got together last Saturday to embroider toilet paper.

    I did a sample stitch out of the design on Friday night on a plain piece of white cotton fabric with stabilizer.  It worked great and took me about 40 minutes from set up to final stitch.

     On Saturday we had a few problems and the project took a lot longer than anticipated.  I don't think my machine is built to embroider toilet paper because when we tried to embroider on the toilet paper the machine jammed up and it would eat the toilet paper and the stabilizer.  

     We ended up with three designs stitched out on regular white muslin which dear daughter will wrap around toilet paper rolls.  The three designs took us almost 5 hours including an hour of that time taken to go to Walmart to get the fabric.

       It was a fun project and a real learning experience.  Dear daughter got a chance to really work with the machine up close for the first time since we have had it.

    Here is a picture of the design we stitched out.


Monday, September 19, 2016

Another Crochet Project With Colorful Yarn

    Here is another yarn I had a hard time finding the right pattern for.  It is a 70% superwash wool, 30% nylon blend called Chroma from Knitpicks.com.  I bought this yarn in 2011 when I was a new knitter and I fell in love with the colorway called Midwinter.  It's a blend of dark blue, gray and purple.  I have two skeins of fingering weight.  It also comes in a worsted weight and I made my crocheted earwarmer with two skeins of worsted weight in this colorway.

   So I settled on the feather and fan pattern to make a scarf and I tried to knit it but I get frustrated knitting so I switched to a crochet pattern.  There are lots of feather and fan patterns available for free on the Internet.  The free crochet pattern I am using is available on Ravelry (membership is free) or you can go to you tube and find a how to video here.

   I'm using a size I (5.5 mm) crochet hook, which is a larger hook than what is recommended for this yarn, because I want a lacy look and the larger hook is working.

   Here is a picture of what I have done so far.


    I'm planning to use both skeins of yarn on this scarf and I'm about half way through the first skein.


Saturday, March 12, 2016

My New Shawl Project

   I've never knit a big shawl and last month I found a pattern by a designer that I like and I thought it would be a pattern I would be able to make without too much trouble.  I cast on last week.  

    Yesterday I was working on the shawl and I noticed a dropped stitch.  I tried to fix it but it was really hard because the yarn is sock weight yarn and very thin.  I'm not good about frogging my knitting by unraveling it and picking up the stitches, so I decided that the best thing to do was to start again.  I was going to frog the old knitting and reuse the yarn but the yarn got snagged together at the point where I was trying to pick up the dropped stitch and I couldn't get it unraveled.  I ended up just cutting the yarn and restarting the shawl from the very beginning.

    This is the Atwood Shawl (the pattern is a paid pattern on Ravelry) by Nicole Clark.  I'm knitting it on 3mm Options (nickel plated) 47" circulars with Loops and Threads Woolike in Denim Blue.


Wednesday, November 11, 2015

Emery Sand Reclamation

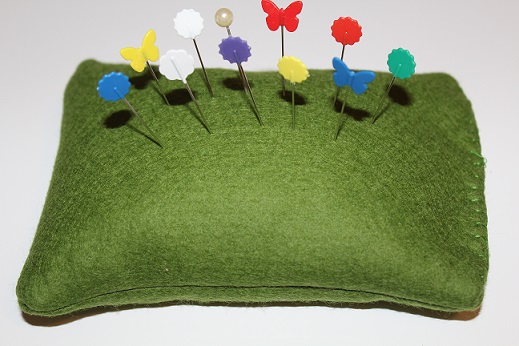
   I reclaimed the emery sand from a pin cushion I made a couple of years ago.  The cotton cover on that pin cushion was looking very old with all the pin holes in it.  So I took it apart and saved all the emery that was in it and made a new cover.  The last time I bought emery sand I bought it at this etsy shop, My Sweet Accent, link here.  I see she also sells pin cushions, but I prefer to make my own.  I have also purchased emery sand from Nakpunar on Amazon, as well.

   I've never used the walnut shells or any of the other nut shells that are sold for pin cushion stuffing because I have not heard good things about them.  One person told me that her pins were sticky with some type of residue from the pin cushion she made with the nut shells.  You also have to be careful because lots of people have allergies to nuts.

    When I make emery sand pin cushions, the emery is placed in its own little pouch so it's contained and easy to reuse.  I took the emery from my old pin cushion and added some that I had leftover in my stash.  It was originally shipped in a zip loc bag, so I just poured the emery from the old pin cushion in with the leftover to hold it until I was ready for it.  I was able to make a new pin cushion with most of that emery.  I wanted to make two pin cushions, but I didn't have enough, so one will have to do.  I made my pin cushion in a simple rectangle shape.

      First I made a cotton pouch to put the emery in.  The pouch was made from a piece of cotton.  I cut a two pieces of cotton 4" x 6" for the pouch.  I sewed up three side of the pouch using a 1.8 stitch length to make it secure using a 1/4" seam allowance.  After I made the pouch, I filled it with emery, very carefully.  I use a funnel and a spoon with the pouch propped up in a small mixing bowl to catch any loose emery, then I hand sewed the pouch closed using very small stitches.

     I made the cover with some wool felt I had in my stash and I cut it just about a quarter of an inch bigger than the original cotton pouch so the emery pouch would fit .  I sewed up three sides of the cover on the machines with the 1.8 stitch length, using a scant 1/4" seam allowance, (when sewing felt you can use a very tiny seam allowance because the material doesn't fray) turned it right side out, slipped the pouch inside and hand sewed the open end.

   It's done.  A new pin cushion with sharpening emery sand for my straight pins.


Friday, April 10, 2015

Time To Start A Knitting Project


    So I bought some red and white yarn a couple of weeks ago.  I'm going to make myself a Santa hat.  I made one a few years ago and gave it away in a Christmas swap.  I really wish I had kept it.  I don't think it was appreciated.  So I'm going to make one just for me.  I'll be using Wool of the Andes yarn that I bought from Knitpicks.com.  I love Wool of the Andes yarn, it comes in a great selection of colors, it felts well and it's cheap.  I bought three skeins of red and one skein of  white to make my hat.


    Here is a picture of the hat I gave away.   This one was started with 100 stitches and I knit a 3 x 2 rib section in white for about 3 inches. I'll be using 16" size 8 circular needles to start.  This one was a  little too big (you can see how big it is with the white section on the neck of the head model) so I'm going to reduce that number of ribbing stitches to 80.  The red section is knit in stockinette stitch, and I reduce the number of stitches every 7 or 8 rounds.


Tuesday, February 3, 2015

Twin Needle/Stretch Stitch Research on My Sewing Machines

    I pulled out the owner's manual on my Singer 3400 XL (computerized, 2001) and the Bernina 1530 (computerized, 1992) this morning so I could research twin needle stitching and stretch stitches on these machines.

    I read a LOT of quilting, sewing, and crafting blogs and lots of those blogs are about garment sewing, which is something I did when I first started sewing in my teens when I was taking a sewing course almost every semester in high school.

     All the reading about garment sewing reminds me of the first sewing machine I ever owned.  It was given to me for Christmas or my birthday (my birthday is a few days after Christmas so they kind of run together) when I was about 15 years old by my oldest brother.  It was a Singer (I don't remember what model) that did twin needle stitching and it also had a stretch stitch which was super cool.  I wish I still had that machine but I don't.  I lent that machine to someone who broke it and I couldn't afford to get it fixed so I threw it away.  Shame on me.

   My brother did have an ulterior motive for giving me that sewing machine.  He wanted me to make a few things for him.  I made curtains for his room, I made curtains for his van, and I made his girlfriend a really cool stuffed teddy bear made from fake fur.  He supplied the money for all the materials and I did all the work, measuring, shopping, cutting and sewing.  It wasn't a bad way to spend my free time in high school.

   So, back to the research on my current machines.  My Singer 3400 XL doesn't have anything in the manual about twin needle stitching, but I may try it after I check my needle plate to make sure I have enough room for the twin needles to pass through.  The Singer does have a lovely stretch stitch as well as an overcast stitch and and an overcast foot.  My Bernina 1530 manual does not mention twin needle stitching, but after I check my needle plate, I may play with this carefully.  It does have a couple of stretch stitches.

   My hands on research will continue this evening and I'll give you results tonight.

Sunday, February 1, 2015

Pink Fluffy Afghan With Crab Stitch Border, Done.

     My pink granny square afghan is finished.  I've been working on this all week to get it done.  This afghan finished at about 6 feet square.  I used almost 9 skeins of the Petal Pink Red Heart Super Saver yarn.  I finished the afghan this afternoon and took this picture in artificial light so the color is off.  The color is actually just a  little darker (more pink less salmon).  In the picture you can see the three rounds of crab stitch I did on the border.  I have enough yarn left to make some granny square pillow covers.


   I'm going to start working on my Christmas quilt again.  I started working on the back first and now I don't know if I have enough fabric to make the back for the top I planned.  So things are kind of screwy with this project.  I should have some pictures by next weekend of something, I don't know what, but something.

    One other project I finished last week was the organization of  my knitting needles and crochet hooks.  I didn't realize I had so many fixed circular knitting needles and interchangeable needles/cords, what a stash.  I bought 2 shallow plastic boxes from Walmart and used one for the knitting needles and one for the crochet hooks.  The boxes work perfectly to keep my kitties out of my tools.