Pages

Showing posts with label sewing. Show all posts

Wednesday, August 11, 2021

Farm Aprons , Patriotic Pennants, Vinyl Front Cross Stitch Project Bags, and Secret Sewing


            I finished the farm aprons that I have been wanting to make since I found this duck fabric in my stash.  The instructions from Cosmopolitan Cornbread blog were very good and I was able to get two aprons cut out in less than an hour.  The ironing, hemming and sewing for each apron took about an hour.  These aprons are perfect for going out into the yard to do a messy job or even in the house for a messy job.  I love the big pockets.  


       It's that time of year when I do a little secret sewing for dear daughter's birthday.  I found some lovely colorful fabric that is being turned into something useful for her.  I will show the finished product after they are gifted in November.


       I have some old curtain panels from my bedroom that will be made into tote bags for me and dear daughter.  These curtain panels make lovely tote bags.  Here is a picture of the fabric I'm using.  I have a couple of these already and I gave about 4 of the tote bags to dear daughter a few months ago.  


I've decided to make a patriotic pennant banner with some red, white, and blue fabrics in my stash.  I drew up a triangle to use as a pattern and I made a fabric string from some red, white, and blue fabric I used in my patriotic wall hanging earlier this year.  I cut the fabric for the string like a narrow binding and folded in the edges and sewed it down.  It's perfect for a banner.  I just have to make the pennants.   I want to make one for me and one for dear daughter.  I don't know if I have enough fabric to make two, but a quick trip to Joann's will fix that.  Here is a picture of the fabrics I'm using for the pennants.


        I never posted any pictures of all the clear vinyl front cross stitch project bags I made a few months ago.  These bags are not perfect  and I did not really enjoy making them, but I have to say that the instructions are super easy and they went together very quickly.  They are so much cheaper for me to make then to buy from an etsy seller.  It's a very good use of stray pieces of fabric and batting.  Each bag has a little mini vinyl front pouch to match and all have zipper pulls either made with charms by me or purchased.


Saturday, January 16, 2021

Mugs Rugs Made Into Pot Holders

    I found a cute mug rug pattern at Quilt Addicts Anonymous, link here.  The pattern is free, but you do have to put it in a cart to get the download.  

    I enjoyed making these tree blocks.  I used Christmas fabric I already had and muslin for the background, but I did buy two yards of the green fabric I used for the borders, backing and binding.  They finish at 8" before binding, so I added 1.5" borders to them to make them a little bigger for potholders.  I put two layers of cotton batting in my potholders with a layer of insul-brite in the between the cotton batting.  I like the scrappy trees, but I really like the tree where I used the Christmas light fabric on the entire tree.  That is my favorite.  I made seven of these potholders.  Three for me, three for dear daughter, and I sent one up to my sweet big brother who is always looking out for me.


I have more fabric cut to make more of these blocks for a wallhanging.  So that's what I'm doing in January, making home decor items for Christmas 2021.

Thursday, December 31, 2020

Homemade Potholders and A Birthday

I was putting my Christmas decorations away the other night and I realized that I do not have any homemade Christmas potholders and if I don't have any, that means my daughter does not have any.  That made me sad.  That's a situation I had to fix.  Pulling out my stack of cute Christmas fabric, some cotton batting scraps, and insul-brite I started making potholders.

I made these with just a solid piece of fabric on the front (one of them is scrappy) and the back to show off the cute fabric.  To made a decent potholder I add three layers in between the fabric.  I use one layer of cotton batting, then  a layer of insul-brite and then another layer of cotton batting.  That makes a pretty thick sturdy potholder.  I do a simple cross hatch quilting through all layers to get it ready to bind.


This weekend I'll be piecing Christmas tree mug rugs to make more potholders.  Of course, I am sharing all of these with dear daughter.  

Here is a link to the youtube video on how I bind my potholders:  Youtube video on how to bind potholders.  


I had a birthday yesterday.  Another year older.  I made myself a rum cake to celebrate.  Dear daughter came to the house after work to have cake with me and give me fun gifts.  She did a good job with gifts this year.  So clever.  

I splurged and bought myself a quilting gift.  I bought  "Vintage Christmas Book" by Lori Holt of Bee in My Bonnet for It's Sew Emma.  This past fall this book was very popular because everyone was making the quilt Bringing Home the Christmas Tree (a car/SUV with a tree on the roof) that is in the book.  I fell in love with that pattern after seeing it all over.  I won't be making a full size quilt from the pattern just yet.  Right now I just want to make a car block and the standing tree blocks for a wallhanging/table runner.  It's too cute.  

Friday, November 20, 2020

Fun Quick Sewing

 Made a zipper pouch from a candy bag using Missouri Star's Tutorial here.  This is a nice quick project and they are really fun to give.  I made one a couple of years ago for dear daughter and she thought that I was giving her a bag of candy.  It was so funny.  Here is the one I made tonight.  It took me about an hour to sew up after I gathered all my supplies and cut up the candy bag.  The one I made tonight is kind of on the small side.  I might frankenstein two bags together next time to get a bigger pouch.  I hope it works.


I've been saving candy bags for a while and I have a whole bunch.  I also have a load of zippers to use up so I think I'll be making some more of these.  

Sunday, September 20, 2020

One More Pumpkin Block Decoration

 This was made from scraps of fabric I had.  It's nice to have some new pumpkin decorations for the fall season.  This block has two corner triangles in the top corners for slipping a dowel in there for hanging.


And I finished the applique pumpkins.  Here is mine all finished.  I echo quilted around the pumpkin and I bound it in the same muslin as the background fabric.  I also put a hanging sleeve on each one for hanging.  


Sunday, September 13, 2020

Making Projects From My Stash

 I found some fabrics in my stash for a three holiday projects.  

I made this tree block with fabric left over from a project last Christmas.  I made it into a pillow cover for a 14" pillow form.


I found this leftover Halloween fabric that I bought last year to wrap daughter's birthday present and I turned this fabric into a pillow cover for a 14" pillow form.  The costumes on the dogs and cats crack me up.


I used scraps to make these cute pumpkin blocks that I will turn into wall hangings.  I found the templates at this link:  Scrappy Pumpkin Tablerunner.  The navy blue one is mine and the turquoise one is for dear daughter.  I place the applique pieces on a 13" square piece of muslin.  I still have to sew down the applique pieces, quilt and bind them.


I used a new tool while making my pillow covers.  I used the Lori Holt Seam Roller.  I like it a lot and I think I will get a lot of use out of it.


After I finish my pumpkins I continue with my scrappy quilt top.  After I finish that quilt top I will start on one of the three quilt tops I have planned.  After I make those four tops, I will start making string blocks again.  I have two big storage boxes of strings that I need to use up.

Wednesday, August 26, 2020

Making Little Things and Changing My Scrap Quilt

 I made one secret birthday sewing project and I think I will make two more.  They are quick projects that take about 2.5 hours each from first cut of fabric to last stitch so I can get them sewn up in an afternoon or evening.  No pictures until after the birthday girl opens her pressies.

I cleaned my office and organized it a little bit.  I found this piece that I did several years ago.  I took this Laurel Burch picture (I love Laurel Burch's artwork) off the internet and printed it on an 8.5" x 11" piece of fabric that is designed to be fed through the printer.  I put a gold border on it and a backing and sewed beads where all the dots are on the picture.  I framed it in a simple clip frame and put it in the window of my office.  The gold fabric faded so I replaced it with this pretty gray.  I just have to find a frame for it now.  


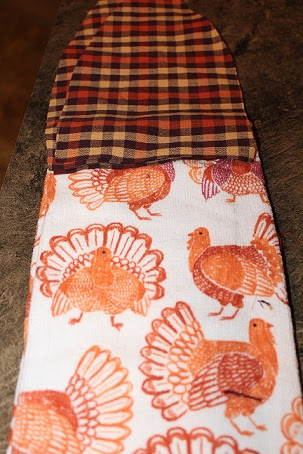
Dear daughter has requested some fall hanging dishtowels.  I'm making them with this ugly orange turkey dishtowel I bought a couple of years ago and this pretty orange and brown homespun.


I took my scrap quilt apart.  I had originally sewed four patches together, alternating white, beige and print fabrics and I planned to put them together with seams matching, but I'm not doing a real good job keeping my seams even so I'm going to offset the seams on each row of four patches.  To do this I had to take the six rows I had already sewn apart and re-sew them.  I got that done last night.  Now I can move on to make more rows.


Here are some current pictures of my cats.  They turned 15 in May and I think they still look like kittens.

This is Merlin, the older brother.  He is a great boy cat.  So loving.  He keeps me and his sister in line.  He is the security office and the nosiest animal I ever saw.


This is Taffy Morgana, his sister.  She was born last in the litter of three.  She is a sweet little snuggle bug (took her five years to figure out that the lap is the place to be).  Loves to sit on my lap whenever and even sleeps in the bed with me.


Thursday, July 30, 2020

Working On A Scrappy Quilt

I found a bag of 2.5" squares I cut last year in the colors of green, blue, gray, and yellow that I cut from fabric that I found in my stash.  I also cut some white and beige neutrals to alternate the colors with.   I made my first stand mixer cover with these fabrics last year and I enjoyed the soft colors together.  

I'm sewing these pieces together and I should have more than enough for 68" square quilt.  It's a nice easy sewing project.  Here's a sample of the first two rows put together.


Tuesday, July 28, 2020

Some Little Projects

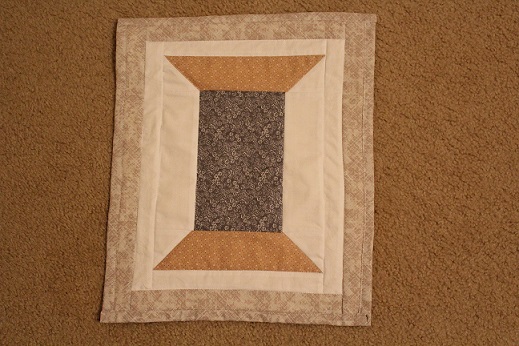
I took time on Sunday morning to make a spool block to decorate my sewing space.  I used the MSQC youtube tutorial to make the block.  It was fun and I would love to make a full quilt with spools.


I also got my embroidery done that I wanted.  It was much easier the fourth time.  These were made with white thread on navy blue fabric.


Friday, July 24, 2020

Christmas In July

I love Christmas tree quilt blocks.  I found this tutorial on a blog, The Spruce Crafts,  Christmas Tree Block  and I had to make one.  I thought the original size was a little too small so I increased the size of the strips to 3.5" and I increased the length of the tree pieces about 2 to 4 inches each so they would be substantial.  The final size is about 15.5" x 17.5 inches.  Perfect for a pillow cover.


Friday, July 17, 2020

The Grandmothers Flower Garden quilt is finished

I'm finished quilting the top last night and the binding was finished today.  I'm so glad this is done because I can't make myself have more than one quilt on the go and I want to make other quilts.  I have loads of scraps for string quilts and some charm squares set aside for another quilt.   


I took this picture outside hoping it would show the quilt colors better.  I was wrong.  I didn't do a great job picking my colors because they are the same bright tones, but I loved them when I got them and thought they would be an awesome combination.  They look cool, but it's hard to distinguish the pink from the orange in my pictures.

More pictures.


Monday, June 29, 2020

Garden Apron - Repurposing Old Blue Jeans

About a month ago my dear daughter asked me for some advice on making a garden apron from some old jeans she had cut up.  She wanted to gift the apron and she had cut the piece with the back pockets for the apron.  I told her I would use quilting cotton to make a lining with a pocket on the inside, bind the two pieces together and make a nice long tie threaded through the belt loops and securely fastened.

We made her garden apron using the piece of the pants she had cut and raiding my quilting cotton stash.  It turned out really cute and when I left her house that day I knew I wanted to make one for me. 

I had to go to Goodwill and buy a pair of jeans for this project.  I bought a big pair of men's jeans because I wanted my apron to be a nice size.  The jeans I found had some lovely embroidered omega symbols on the pockets and I couldn't resist the colors.  The back pockets originally had buttons or rivets but they had been ripped out, so instead of replacing the buttons, I layered two buttons on the flap and glued them on so it looks like the pockets button but the pockets will be easy to get in and out of.  I lined it with some fabric I had leftover, added a colorful pocket and made my binding and tie from fabric my daughter bought me to replace the fabric she used on her garden apron.

Here is my garden apron all done.  It took me about 3 and a half hours to make.  The jeans cost me $7.00.  This was a fun project and I love the result.


I'm making a purse from the legs of the jeans.  I have it cut out and all I have to do is sew it up.  I'll show that next time.  

Still haven't done much in the way of quilting my hexie quilt.  I'll probably start working on that over the holiday weekend.

Friday, June 19, 2020

Grandmother's Flower Garden Top Is Finished

Okay, I finished the seventh row this week, added the borders and sandwiched the top for quilting.  Here is a picture of the top with the gray borders.  Not a very good picture showing the colors.   It's currently draped over my cutting table waiting patiently as I do my version of hand quilting.  Once it's finished, I will take a picture outside in good light to show the colors properly.


Thursday, June 11, 2020

Row 6 is done! Quick review of small tool.

I finished row 6 on my quilt top.  I have one more row to go.  Then I will applique this top to a grey border fabric.  I bought the border fabric almost 2 years ago so it's been very patiently waiting to be used.  Here is a picture of the 6 rows.  I'll be using the grey fabric for the backing fabric as well.


My quick review is of the cute flower threaders I bought last year.  I have been using the same threader for the last two rows of the quilt and it has held up very well.  The wire is sturdy but its not too big to fit in a small needle eye.  I bought the threaders from Amazon.  The link is here:   Flower threaders for sewing needles

Wednesday, June 10, 2020

I'm Hand Sewing Hexagons Again. Another Row Is Done.

   I picked up this quilt top a couple of weeks ago determined to finish it so I can move on because  I'm unable to start another quilt until I finish the one I'm working on and even though I'm not in deep love with my hand sewn hexagon quilt top, I do want to finish it. All the flowers are ready to be added, I'm just adding the green path to the flowers and sewing them to the quilt.  Now I have to add 8 full flowers and 2 halves to it to make it done.

    So I finished row 5 and I started row 6 last night.  Here's a picture the 5 rows.


Friday, June 5, 2020

Quilt Ladder Finished

I finished staining my quilt ladder this week.  I put the quilts on it this morning.  It will be set up in the living room.  I'm very happy with how this one turned out.  It was easier to make the second time.


I pulled out my hexagon quilt project that has been in the works for over 2 years.  I decided to make up all the flowers I need for the next three rows.  I'm working on the last flower of row 7 then I will start adding the green path to the flowers and add each flower with the green path attached one by one.  I have a total of fourteen full flowers and 2 half flowers to add to the quilt to get it finished.  I will post a picture after I get row 5 added to the quilt.

Saturday, May 16, 2020

Lots More Navy Blue Gingham Items For The Kitchen

My large 40 ounce white teapot needed a tea cozy.  I put a ruffle on this one.  I keep this teapot in the pantry but now it's ready to use with a nice roomy cozy.


Pot holders.  I made these to be a wall decoration in the kitchen.  I'm putting them up with velco command strips.


Apron/dress for my dish detergent bottle.  This was easy and fun to make.  I actually ended up using glue to secure the bias binding on the back because the binding strip was too narrow to sew on the back.


Stand mixer cover.


And I still have about two and a half yards of the blue gingham.   I haven't made the toaster cover or a cookbook cover.  Two things that may happen in the future.


Thursday, April 30, 2020

More Navy Gingham In The Kitchen

I  made a quilted tea cozy for my little blue tea pot with that lovely navy blue gingham. 


It looks like my toaster may be next for a new blue gingham cover.


Wednesday, April 29, 2020

Blue Gingham Hanging Dishtowels

   I made some hanging dishtowels with some of the blue gingham that I used to make the kitchen curtains.  I love these.


    I have plenty of the blue gingham fabric to make a cover for my stand mixer.  I'm going to make that as soon as I get the coordinating white solid and navy solid fabric I ordered a couple of weeks ago.  I want to make the cover in the patchwork style like the one I made a couple of months ago  using 2.5" squares.  I will probably make some potholders as well.  Then I have to think of something else to make with all the leftover gingham.

   I've also been knitting some dishcloths.  I'm making a kitchen set for a niece who got married last fall.  I know it's late but I just decided the other day that I wanted to do this.  I will knit her a set of dishcloths, sew up  a couple of potholders and make a couple of hanging dish towels for her.  I wanted to show you the pot I use as a yarn bowl.  My daughter bought this strawberry pot for me about 12 years ago from someone who throws pots in Indiana while she was on vacation.  I have never used this for any plants.  I have been using it as a decoration and as a yarn bowl for years.  It's kind of fragile and I wanted to keep it nice.


Wednesday, April 15, 2020

Little Heart Decorations

I found these fun paper mache hearts at Hobby Lobby and I'm using them to decorate around the house.  I painted two of them navy blue to match my new kitchen curtains and added a bow and a hanging loop.  I have two of these hanging in my kitchen.


I have a few more of these that I will paint, decorate and put in my bedroom.  Pictures of those later.