My large 40 ounce white teapot needed a tea cozy. I put a ruffle on this one. I keep this teapot in the pantry but now it's ready to use with a nice roomy cozy.
Pot holders. I made these to be a wall decoration in the kitchen. I'm putting them up with velco command strips.
Apron/dress for my dish detergent bottle. This was easy and fun to make. I actually ended up using glue to secure the bias binding on the back because the binding strip was too narrow to sew on the back.
Stand mixer cover.
And I still have about two and a half yards of the blue gingham. I haven't made the toaster cover or a cookbook cover. Two things that may happen in the future.
I like to sew, quilt, crochet and knit in my free time and this blog is all about my projects, past and present.
Showing posts with label kitchen. Show all posts
Saturday, May 16, 2020
Thursday, April 30, 2020
Saturday, April 11, 2020
Making Kitchen Curtains Makes Me Happy
I have to admit that I have had a hard time adjusting the last 4 weeks since my work world changed with half of the staff in the office were sent home to work remotely. Since then I have been sent home to work remotely on the order of the Governor.
It was time to do something that would make me happy and that I have been dreaming of since December. I have been wanting to buy a bolt of navy blue gingham to make kitchen curtains and a back door curtain. I was waiting until I had enough money to buy the bolt, and that happened at the end of last month.
I bought my fabric from Fabric.com and I got the navy gingham that is a 60" wide cotton/poly blend. I think I paid about $4.50 a yard for it. The more yardage you buy on Fabric.com the cheaper the price.
I'm hoping the cotton/poly blend with keep the curtains from fading too bad in the hot sun.
I make my kitchen curtains double sided with the right side of the fabric on the inside and outside. I sew two pieces together leaving an opening at the top on each side for the casing and an opening at the top for turning the curtain right side out. I turn the curtain right side out, sew up the opening that I used for turning, then I sew two seams across the top to create the casing. So simple. I also make a tie for each curtain and position it about half way down in the center. I made six panels for my wide kitchen window.
I also made a curtain for my back door using the same method so I can have the right side of the fabric on both sides of the curtain.
It was time to do something that would make me happy and that I have been dreaming of since December. I have been wanting to buy a bolt of navy blue gingham to make kitchen curtains and a back door curtain. I was waiting until I had enough money to buy the bolt, and that happened at the end of last month.
I bought my fabric from Fabric.com and I got the navy gingham that is a 60" wide cotton/poly blend. I think I paid about $4.50 a yard for it. The more yardage you buy on Fabric.com the cheaper the price.
I'm hoping the cotton/poly blend with keep the curtains from fading too bad in the hot sun.
I make my kitchen curtains double sided with the right side of the fabric on the inside and outside. I sew two pieces together leaving an opening at the top on each side for the casing and an opening at the top for turning the curtain right side out. I turn the curtain right side out, sew up the opening that I used for turning, then I sew two seams across the top to create the casing. So simple. I also make a tie for each curtain and position it about half way down in the center. I made six panels for my wide kitchen window.
I also made a curtain for my back door using the same method so I can have the right side of the fabric on both sides of the curtain.
I didn't use the entire bold for the curtains. The rest of the fabric will keep me busy while I make some items to decorate in my kitchen. Some hanging dishtowels, a new stand mixer cover, some decoupage projects, and a plastic bag holder.
Friday, December 7, 2018
Christmas Kitties In The Kitchen
I found this cute, cute, cute dishtowel at Hobby Lobby last weekend and had to have it. I think it was 40 or 50% off. Score! I love the cat on this one.
I was going to cut it up into two hanging dishtowels then I got an idea. I decided to keep it as one towel and make a hanging dishtowel that is doubled. I folded it in the center and pleated it so the cat would show up real well on both sides. Then I added a cap of the fabric below with two ties.
I love this old fashioned toile Santa/Christmas fabric. It's so turn of the century, 19th/20th century. Here is my finished hanging dishtowel. I made this one with ties so I could tie it onto the refrigerator and I love that it's doubled so my hands will dry quicker. I may make all my hanging dishtowels doubled from now on. This took me about 30 minutes to make from first cut to last stitch.
I hung the kitty from the freezer handle so I could get to it better and see it all the time.
Saturday, November 10, 2018
I've Been Making More Hanging Dishtowels For Holidays
I made some hanging dishtowels to keep and share for the Thanksgiving holiday. This is a picture of four the the six that I made. The other two are gifts and are going to get mailed later next week.
The towels with the white background have doggies on them and they look like this:
I'm share these towels with dear daughter and she will get hers tomorrow.
Labels:
accessories,
decoration,
dish,
fall,
hanging,
kitchen,
sewing,
towel
Sunday, May 27, 2018
I Love This Fabric
I mentioned that I bought a fat quarter bundle of Bake Sale by Riley Blake. Well, I actually ordered two of them, even though I didn't know what all the fabrics looked like, I fell in love with the background colors and some of the obvious designs, like the gingham. The other designs include flowers, mixing bowls, cake stands, recipes, cherries, and some stylized dotty fabrics. I took pictures of all the color groups and fabrics in it. I had to share.
This fat quarter has two color designs on it. I had never seen that before. So fun.
More colors.
Some of these fabrics will end up as hanging dish towel toppers because, hello, kitchen scheme. I don't know where the rest will be used but these fabrics will be used carefully and thoughtfully because I am in love with this collection.
Monday, December 21, 2015
Granny Square Dishcloths Made With Cotton Yarn
I had a bunch of cotton yarn in my stash (Peaches and Creme Yarn) and it was time for new dishcloths. Instead of small squares of closely crocheted stitches, I made eight traditional granny squares with lots of open spaces. I make them with with 6 rounds of crochet and a size G hook. They are easy to make (each square takes about 45 minutes), very absorbent, good for scrubbing, and last a long time. You do have to wring them out really well after using and let them dry or they will get mildewed because the cotton yarn hangs onto moisture.
Monday, November 16, 2015
An Ohio Star Block Decoration And More
I made this Ohio Star Block to hang somewhere. This block was a lot of fun to make and I enjoyed stash diving to find the fabrics for it. I used the instructions in a video by Amanda of 3and3quarters blog. The link to her video is right here.
This is a nice big block. It finishes at 14" x 14". Later I'll be making a door decoration using three of these blocks and some stash fabrics. I would love to make a quilt using this block, but I have several quilt projects on my list already, so that will have to wait.
I have a pile of fabrics on my cutting table waiting to be cut for fabric trees, two will be made with cute Arctic Antics fabric I made my rag quilt from. See a picture at this post here. Another tree will be pink for my bedroom made with fat quarters from the Far, Far Away fabric line (see picture below), and one will be made with some miscellaneous blue fat quarters I found (picture below) to make a sewing table decoration.
Today I picked up some bar mop kitchen towels to make some new hanging dishtowels for DD's kitchen. I will be using some of my precious Time With Friends by Lynette Anderson fabric (see below) to make the fabric section to create the button holes. DD asked for gray, maroon, and white fabrics and this is the perfect combination plus she loves dogs and cats.
There are tons of tutorials on line and the last time I made some I used a tutorial that had me make bias binding for ties. I want to make one with a buttonhole this time, because I just learned how to make buttonholes on my Janome machine and I'd like to get some more experience used that cool foot, plus you don't need all that extra fabric for buttonholes. Let's face it when I make bias binding, I waste some fabric and I'm not going to waste any of the only yard of this lovely Time With Friends fabric. Here is the hanging dishtowel tutorial that I will be using for this project.
Wednesday, October 7, 2015
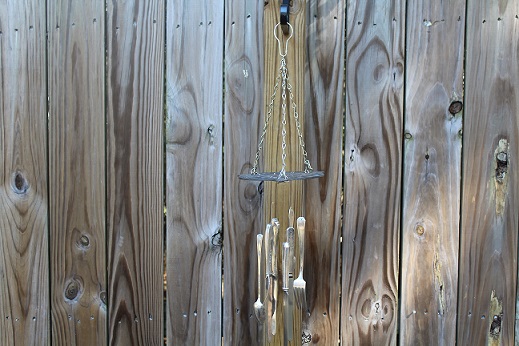
Recycled Garden Windchime
I found this cool wind chime made with recycled kitchen items on etsy. I had to have it. The silverware has a great sound when the breeze blows.
Wednesday, March 18, 2015
Kitchen Drawer Fix Up and Clean Up Project
I live in a mobile home. I love my mobile home. I bought it new 7 years ago and I love the floor plan. My kitchen is huge and it opens into the living room and the dining room with a door to the laundry room. It also has a great pantry (no pictures, it's kind of messy in there now and needs to be cleaned up). My kitchen has tons of cabinet space but I only have three drawers in the entire kitchen. It's really sad. I like drawers and I wish I had a few more. While I'm wishing for more drawers, it's time to fix and organize my existing drawers.
View from the dining room looking straight to the laundry room door.
This is the view from the dining room looking at the pantry door.
This is the view from the living room with my homemade curtains on the windows.
Yes, the counter tops were cleaned off to take these pictures. The counters are normally covered with all manner of kitchen things, dish soap, hand soap, and hand lotion by the sink; dog food, cat food, and dry cereal under the cabinets by the refrigerator, dish towels hanging on racks set on the cabinet doors, and pot holders by the stove top.
These drawers were not built for heavy use. The front of the top drawer I was using for silverware has come off two different times. In examining the top drawer for problems when I cleaned it out, I realized that the right side slider mechanism of the top drawer was placed lower than the left side slider mechanism. I unscrewed the bracket and placed the bracket in line with the left side bracket. I hope this solves my top drawer problem and I can use it without the front coming off. I was only using this drawer for small items that I never needed so I wouldn't have to open it.
Bracket fixed. You can see the hole under the bracket where it was originally placed and it was way too low.
I have been using the second drawer to store knives, but I have too many in there. This drawer needed to be cleaned out and I also checked the slider mechanism for this drawer to make sure it was working properly.
I'm ditching these old, old, old, chef knives [so tired of sharpening them] and I ordered two new chef's knives from Amazon on Monday.
New chef knives.
This is the bottom drawer and it holds all my large utensils. I thought the basket would help keep everything under control, but the drawer is clearly too deep. I weeded out all the unnecessary stuff, cleaned the drawer and put my crazy utensils back in the basket in the drawer.
Here is the top drawer all cleaned up.
Here is the knife drawer all cleaned up with my new chef knife set.
I'm really happy with my drawer fix and clean up. It was interesting trying to find a good position so I could reach the back board to put that slider mechanism bracket back on.
Subscribe to:
Posts (Atom)