Pages

Showing posts with label fall. Show all posts

Saturday, November 10, 2018

I've Been Making More Hanging Dishtowels For Holidays

   I made some hanging dishtowels to keep and share for the Thanksgiving holiday.  This is a picture of four the the six that I made.  The other two are gifts and are going to get mailed later next week.


  The towels with the white background have doggies on them and they look like this:


    I'm share these towels with dear daughter and she will get hers tomorrow.

Monday, October 29, 2018

Pattern Purchase

   I had to have this cute pattern.  I'm going to put this on my to do list for next fall.  This is called Patchwork Pumpkins by the Crafty Quilter.


Sunday, September 2, 2018

A Few Little Fall Decorations

I went into the Dollar Tree the other day to look for Halloween decorations.  Someone I know is going to make their own Harry Potter Wizard Wand using a Youtube tutorial.  The person doing the tutorial used some skeleton decorations that you can find at Dollar Tree and I had to get some of those exact skeletons.   Here is a link to the wand tutorial.  It's a really good tutorial and lots of fun to watch.

While I was in the Dollar Tree I took some time to look for Halloween and Fall greeting cards to frame.  I ended up picking up three cards,  the Home Sweet Home card and the Happy Thanksgiving card were inexpensive and look great in a frame.  These cards were $.50 each and the frames were cheap frames I found at Walmart.


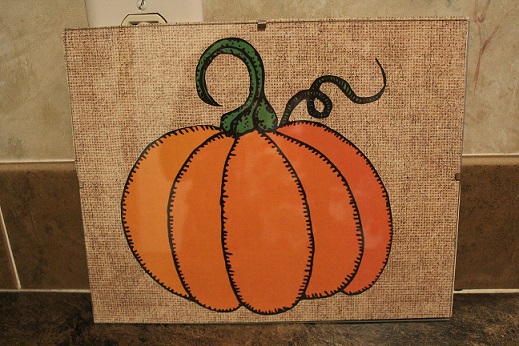
This pumpkin is a free image I found on the internet.  I printed it on regular copy paper, cut it out and  placed some burlap looking scrap book paper (on sale at Hobby Lobby for $.29 a sheet) behind it.  I set it in a 8 x 10 clip frame.  I'm not crazy about the frame and I will probably re-frame this at some point, but I love this.


The one Halloween card that they had that I like is this one.  I painted a wood plaque with purple paint and decoupaged it onto the plaque.  I already had the paint and the Mod Podge, the card cost me $1.00 and the plaque cost me $1.99.  I love this.


I saw a few pumpkins in Hobby Lobby over the last few weeks that are a teal/turquoise color.  I love the idea of adding that color into my fall decor so I bought a small pumpkin at JoAnn's for about $2.50 (used a coupon) and some turquoise paint which cost me $1.99, I think.  I did prime the pumpkin with a coat of white paint (which I already had) before I painted it blue.  Love this.


I also found a beautiful Youtube tutorial on painted pumpkins.  She does such a good job layering paint and she tells you exactly how to do it.  Someday I want to try to make the silver leaf pumpkin.  Here is the link:  Simply Handmade Pumpkin Painting Tutorial

One more project that I will be taking care of is cleaning out my old hand sewing needles.  I have some hand sewing needles that have eyes that are too small for a wire threader to fit in.  At my age, I don't need needles with eyes that small.  I will be donating them to my dear daughter.

Sunday, August 26, 2018

The Making Of A Banner (Without Buying An Expensive Cutting Machine)

    I thought about buying a Cricut or a Brother Scan and Cut last week.  I felt the need to make myself a banner saying "Happy Fall Y'all" to hang in my living room.  I thought that the only way I could make a beautiful banner would be to use a fancy expensive cutting machine and the machines I was looking at cost over $200.00 each.  The letters on the banner are in the wrong order.  They have to be fixed.  I misspelled Y'all.  It's easy to fix and I will do it after I take it down before I put it away. 

    I was in Hobby Lobby yesterday and I figured out a different way.  The best part is that I only spent about $10.00 for stencils and burlap ribbon.  I had the fabric, the stabilizer, the thread, the twine, and the magic marker.  This was fun to make and I love it.


    Here is a close up of the flags.


    I cut the flags from the fabric, then ironed them to stabilizer,and I sewed around the edges of each flag to hold them together.  I doubled up the burlap, and sewed the two layers together along the long edges.  I drew circles using a small plastic cup and a black Sharpie.  I sewed around each circle to keep the two pieces together, cut them out, then I used a stencil and a magic marker to make each letter.  I sewed each letter to a flag.  I attached the flags to a two pieces of twine using the sewing machine and it's done.  It took me about five hours to make from first cut to last stitch.  

Friday, November 17, 2017

More Kitchen Accessories

    I took some time out this week to make some hanging dish towels.  I bought the brown towel to make hanging towels for my hostess on Thanksgiving.  The chicken towels will be mine.  I found the chicken towel in my stash and I love the colors in it, so I had to make some hanging towels for me. 


    These lovely potholders were made on my Harrisville 7" loom with Harrisville cotton loops for my daughter.  She told me that she loves these potholders because they fit her smaller hands better than the bigger ones I make with big squares of cotton and batting.  I made some of these potholders a few years ago for her and since she loves them so much I thought it was time I made her a few more.  I will definitely be teaching her how to make these for herself sometime in the future,   Each one only takes about an hour and fifteen minutes to make.  They are easy and fun to do.  I love picking the colors and putting crazy colors together.


    You guessed it, no progress on my Grandmother's Flower Garden quilt top.  I'm still working on row three.  I've been having too much fun finding other things to make. 

Friday, August 14, 2015

New Project - Sunflower Door Decoration

  Yesterday I spent some time cutting up 100% wool felt sheets that I purchased several months ago for a sunflower door decoration I want to make for the fall season.  I purchased my wool felt from an etsy seller.  I used a petal pattern that I drew.  Petals are one of the things I can draw along with Christmas trees and holly leaves.  I used three different sizes of petals and two different colors of felt for the petals.  I'm waiting for my background fabric that I ordered a few days ago.  I should have that next week and then I can get the sewing part started.  Here is a little peek at what I did yesterday.