Pages

Showing posts with label project. Show all posts

Wednesday, February 17, 2021

New Living Room Wallhanging

 I had to replace my living room wall hanging.  I recently washed the old one and it shrunk up on the corners.  I should not have put that darn thing in the dryer.  Doing dumb things.  That's me.  

The replacement is a big star.  I used Missouri Star Quilt Company's video tutorial found here.  It a super easy block and it a lovely large size.  One block makes a gorgeous wall hanging.  The cool thing about this pattern is that if you adjust the size of your squares to any size you can make the block the size you need.  Using 10" squares of fabric for my block, I have a star that is 24" square.  


I love stars and this big star is easy to make.  The light blue fabric is the fabric I used to cover my ironing board, so my wall hanging matches it.  I made this in about 5 hours from fabric cutting to adding the hanging sleeve on the back.  


Friday, December 27, 2019

My Favorite Project from 2019

Lots of bloggers do a review of their projects for the year.  I didn't make a lot of things this year, but there was a lot of variety in my crafting.  I sewed, quilted, crocheted, and knitted.

My favorite project this year was my knitted ribbed ear warmer.  They are easy and cheap to knit and so useful.  Since the middle of September, I was able to knit 12 different ones in different colors of acrylic yarn.  I gifted 3 of them to dear daughter and kept the others for me.  These easily my favorite project this year for their usefulness and ease.  I'm pretty proud of the way I figured out how to make them double thick without using someone else's pattern.


I'm still knitting these.  I just finished a black one yesterday and I'm starting a beige one tonight.  These are fun, warm winter accessories that I needed and was able to make.


Tuesday, April 23, 2019

An Amazing Idea

   I had an amazing idea last week.  DD needed a sweater to go with an outfit for a wedding she is going to in a few weeks and  she couldn't find anything on line or in the store that she really liked.  I showed her this yarn and the project was born.  We decided a simple shawl crocheted with this yarn will work just great with her outfit.

    This is the Red Heart Unforgettable Boutique in the Cappucino colorway that I tried to knit a hat  with holding it double a few months ago and that didn't work out at all.  I was wondering if I would ever find a project for this yarn.


    I found this simple crochet shawl tutorial on line. I started this on April 17, 2019 and its done.  I used up all the yarn I had in this colorway.  Here is a link to the youtube video:  Double Crochet All The Way Shawl.   I used a size  I hook (5.5 mm), the yarn actually calls for a size J hook (6.0 mm).  I like the fabric I got with the size I hook.


   I have now used this yarn twice with success, both times I crocheted shawls with it. Here is the other shawl link using the stained glass colorway.

Sunday, August 26, 2018

The Making Of A Banner (Without Buying An Expensive Cutting Machine)

    I thought about buying a Cricut or a Brother Scan and Cut last week.  I felt the need to make myself a banner saying "Happy Fall Y'all" to hang in my living room.  I thought that the only way I could make a beautiful banner would be to use a fancy expensive cutting machine and the machines I was looking at cost over $200.00 each.  The letters on the banner are in the wrong order.  They have to be fixed.  I misspelled Y'all.  It's easy to fix and I will do it after I take it down before I put it away. 

    I was in Hobby Lobby yesterday and I figured out a different way.  The best part is that I only spent about $10.00 for stencils and burlap ribbon.  I had the fabric, the stabilizer, the thread, the twine, and the magic marker.  This was fun to make and I love it.


    Here is a close up of the flags.


    I cut the flags from the fabric, then ironed them to stabilizer,and I sewed around the edges of each flag to hold them together.  I doubled up the burlap, and sewed the two layers together along the long edges.  I drew circles using a small plastic cup and a black Sharpie.  I sewed around each circle to keep the two pieces together, cut them out, then I used a stencil and a magic marker to make each letter.  I sewed each letter to a flag.  I attached the flags to a two pieces of twine using the sewing machine and it's done.  It took me about five hours to make from first cut to last stitch.  

Monday, August 13, 2018

Modifying Another Free Pattern From A Blog

  I love the internet.  I don't know how I did any sewing or crafting before the internet.  I admire the super smart folks that post sewing tutorials with written instructions and pictures on their blogs so we all can make lovely items to use.  When I find a pattern I really like but need to modify, I don't mind taking those clever instructions and adjusting them to meet my needs.  It seems like I have been doing this a lot lately.

    I spent part of last Sunday modifying a water bottle carrier pattern that I found on one of those super smart blogs to accommodate a larger than 16.9 oz. bottle of water.  This carrier will swallow my largest water bottle and it's perfect.

    I had already used these instructions back in 2016 to make a regular size water bottle carrier for a normal 16.9 oz. plastic bottle like a Zephyrhills bottle.  That water bottle carrier is still in use, but sometimes I want to carry more than 16.9 oz. of water and for that I need a bigger carrier.

    When I made that regular size water bottle carrier in 2016, my daughter made one for herself, but she was thinking ahead and she modified the size so hers would be big enough for her big water bottle.  I helped her make that water bottle carrier, but unfortunately I didn't take any notes on the modifications she made, so I had to start from scratch.  That's one of the reasons I have been blogging about how I make my changes so I can just look them up in my blog.

    I started with the instructions at this blog post:   Instruction for water bottle carrier.  

   I didn't bother to measure my bottle because I have two big bottles, a 21 oz Camelbak and a 32 oz. Contigo and I wanted this carrier to be big enough for either bottle.  I figured whatever I ended up with would work fine for what I needed.  Here are my modifications.

  1.   I didn't bother to piece the outside of the carrier with coordinating fabric like the blogger did.  I hardly ever have coordinating fabric and I wanted to use my souvenir Hawaii fabric for these so I cut two pieces of fabric for the body of the carrier (the outside and the lining) 14" (width/around the bottle) x 12" (height/deep)  or you could cut one long rectangle that is 28" x 12" and just fold it where the two pieces would be seamed.  I also cut one piece of Insul-Brite 13" x 11" for the body of the carrier according to the instructions.

   2.   Since I didn't measure and I couldn't determine how big the circle bottom (2 pieces of fabric and one piece of Insul-Brite) had to be I cut mine at 8" in diameter which was way too big.  I ended up trimming this down to about 4.5" in diameter after the body of the carrier was put together.

   3.  I followed the instructions for sandwiching and quilting the body of the carrier and the circle bottom.  I sewed the body up to make a tube and I sewed a French seam here to enclose the edges.  I measured the circle bottom and trimmed my large circle down so it would fit and I attached it according to the instructions.

   4.  This water bottle holder will be holding heavier weight with the larger bottles, so I made my strap from the fabric I used for the rest of the project.  I think fabric straps are more comfortable than webbing and definitely stronger than ribbon.  I cut two  3" strips the width of the fabric.  I sew the short ends together to get one long strip, then I make the strap like the one in this tutorial:  Friendship Gift Bag Tutorial.   This is how I make the straps for most of my bags, wristlets and totes.  They are really sturdy.  One other thing I did was to hem the two short ends of the strap that are being attached to the body of the carrier by turning them up before I topstitched each end.  These straps are not enclosed and hemming keeps them neat.  I trim this strap to be about 56" long, which measures about 26" from your shoulder (taking into account that I used an inch on each end to attach the strap to the carrier).  You can make the strap as long or as short as you wish.  If you find that after you attach the strap that it is too long, you can just tie a knot in it to shorten the length.

   Those are my modifications and here is the final product  Pictures of the bottles in the carrier and pictures of the bottles next to the carrier.  I will definitely be making more of these.


   This took me about 2 hours to make from cutting fabric (not my favorite part of sewing) to final stitch.  That time includes finding the right color of thread to use, filling a bobbin, and moving kitties off my ironing board every time I had to use it. (LOL).

Friday, August 10, 2018

Beautiful Sea Turtles

I fell in love with green sea turtles when I traveled to Hawaii in April.  I learned that in Hawaii these turtles are called Honu.  I just had to have some fabric with beautiful sea turtles on it.  This evening I made one of my favorite bags with this fabric.  I have enough of this fabric to make a big tote bag, as well, so you will be see at least one more project made with this fabric.


Tuesday, April 17, 2018

Couldn't Resist

   I know I haven't worked on my grandmother's flower garden much.  I did take those made up hexagons to Hawaii with me but I only worked on one flower the whole trip and unfortunately I never had time to finish it.  I'm going to try to break out that quilt this weekend and add to it.

    I really love the grandmother's flower garden but I'm starting to itch to sew something new quilt wise.  So when I saw this charm square set, I couldn't resist.  It's called Home Sweet Home by Stacy Iest Hsu for Moda.  It has a Goldilocks and the three bears theme and the colors are beautiful.  Just the right shades of pastels.  I love it.  I bought six packs of these to make a simple quilt top and some yardage to sash the blocks with.  I should have enough charm squares to make up blocks for the back as well.  I may not start this until I finish the hexagon quilt top but I know it's waiting for me and that may be enough to get me going on the flowers.


Friday, January 26, 2018

Fixing My Knitted Christmas Hat Problem


    I'm knitting another Christmas stocking cap.  The last two that I knitted did not fit right and were too big.  On the other two hats I used a 3 x 2 rib on the white cuff then I switched to stockinette in the red section.  When I switched to stockinette it stretched out the ribbing and made it way too loose.  I even reduced the number of stitches I used on the second hat I knit, but it also stretched.  I'm blaming the stockinette stitch.  I was constantly pulling the hat back onto my head.  Annoying. 

     It is time to replace the poorly fitting hat.  I looked on Ravelry for a pattern and and I found the perfect pattern which should make a great stocking cap for me.  The hat is made with the ribbing for the entire hat until you start to decrease.  Why didn't I think of that.  I love to knit ribbing.  The pattern is in a book called "Holiday Boutique Knitting" by Mary Jean Daigneault.  I found the book used on Amazon.  The stocking cap is actually a child's pattern so I just used the ribbing pattern from my favorite knitted hat pattern which is a 3 x 2 rib.  I'm going to make this about 4.0 feet long all in the lovely rib until I start to decrease after the 3 foot mark. 

     I started this project a couple of weeks ago.  I couldn't resist because I was ready for a knitting project.  I haven't done any knitting for quite a while.  I should have waited until I finished my poncho but the knitting needles were calling.   I even bought new needles to make this hat.  I bought a pair of Knit Picks size 7, 16" Sunstruck fixed circulars.  They are lovely.  I also bought two pair of interchangeable needles (same size in the Sunstruck material) and 32" cords to use when I start the decreases.  I use two circular needles to do decreases on my hats.  I never got the hang of double pointed needles, I was always worried about dropping stitches, so two circulars is the easiest way I have found for me to work decreases on my hats.  I learned this technique from a youtube video. 

     I knitted the white cuff with Knit Picks Brava Worsted in white and the red yarn is Lion Brand Pound of Love in the Cherry colorway (that is over a thousand yards of red yarn.  Yes, that ball of yarn is huge).   All acrylic.  I made the cuff 6" wide which is enough to be able to turn it up.  I'll be knitting the red yarn for a while.  I figure if I do a couple of inches every couple of days, I will have it done in a few months. 


  I do use a lot of stitch markers on this rib pattern.  The stitch markers make it easy to keep track of which stitches are where on my project.  There are ten stitches between each stitch marker, 3 knit, 2 purl, 3 knit and 2 purl.  I always know what I'm doing as long as I can count to 3.
   

Thursday, January 25, 2018

Crocheted Poncho

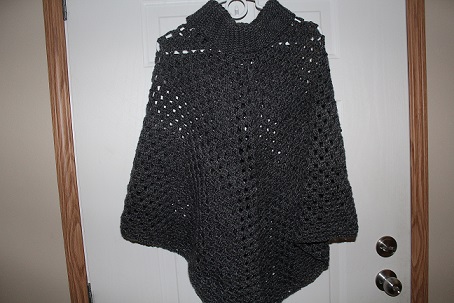
     I started this poncho last November after I bought a poncho pattern.  I did not make the pattern that I bought, but I ended up getting an easier pattern from a youtube video.  It was super easy to make.  I made the poncho then I added the ribbed collar.  This is the first poncho I have every made and I will not hesitate to make another when I have some time.

    I used acrylic yarn for this poncho and it's really soft.  I like to work with acrylic yarn.  I don't have to worry about bugs eating my project if I use acrylic.  I used Lion Brand Heartland in Great Smoky Mountains colorway that I bought from Michael's.  I bought ten skeins to make this poncho and I have three skeins left.  It's a beautiful dark grey color.


Sunday, June 25, 2017

Hexagon Quilt Update

   I have finished another block in my Grandmother's Flower Garden quilt.  I have two done now.  Only 33 more to make.  ðŸ˜Ž  I have been taking my sweet time with this project.  No rush.  I have plenty of quilts to keep my warm when the weather turns cold.


   I received the yarn for my Hotel of Bees Shawl on Friday and I wound all nine skeins into yarn balls so they are ready to use.  I should take a picture of my yarn.  I also took some time to read through some of the pattern last night.  I don't know when I will start this project, but I want to finish my Christmas hanging dishtowels before I start this.  I still have two dishtowels to embroider.  Once they get the embroidery done I have to make the top part.  I didn't get a chance to finish the embroideries on the last two towels this past weekend because . . . 

   I spent a lot of the weekend buying mulch for my large flower bed in the front of the house.  I have a small car so I can only buy 4 bags of mulch at a time.  I made four trips to the home improvement store buying mulch Friday night and Saturday morning to get enough mulch to cover this space.  I used 15 bags of mulch in this space.  I swear my roses look happier since I put the mulch down. 


Wednesday, June 21, 2017

Christmas Is Coming, Believe It Or Not

    I thought I would get an early start this year.  I hate giving Christmas gifts, I have a hard time deciding what to give anyone.  I do know that my daughter and my brothers like the hanging dish towels that I make, so that's what I will make to give to them.   I will make five of these pretty dish towels and I should have them all finished by next week.

    I bought the fabric and the towels for this project last month.  I bought two huge white tea towels and cut them into quarters.  I hemmed the one cut side on my sewing machine and then I put the towel into the hoop to add the embroidery to it.  I only got one embroidery made tonight but I love it.  I will embroider the rest over the weekend then I can start adding the fabric toppers to each one.

    Here's the embroidery design I'm using on the towels.


     This makes a nice break from hand sewing hexies.  I really miss my sewing machine when I'm doing a hand sewing project.  I love pressing down on the foot pedal of the machine and sewing at full speed.

Friday, June 16, 2017

Hotel Of Bees Crochet Shawl Project

   The Hotel of Bees shawl pattern was making the rounds earlier in the year.  I heard really good reviews of how well written the pattern was and I saw some beautiful finished shawls in youtube videos and on Ravelry.

   I ordered my copy of the pattern about a month ago.  I spent some time trying to find the yarn I wanted to use.  The designer made her sample with a cotton/acrylic blend yarn and I was trying to find a similar yarn  I found Knit Picks Comfy in Sport weight and ordered it this morning in three different colorways.  Three skeins of Peony (dusty pink), three skeins of Parchment (a natural color), and one skein of flaming0 (light pink).

   While I'm waiting for my yarn, I have printed the pattern (14 pages)  and I'm going to give it a good read.


Sunday, May 28, 2017

String Blocks Make A Great Big Dog Bed for McPherson

    I had to make a dog bed for my daughter's little Cairn Terrier, McPherson.  She rescued him in January and he has been a great addition to her life.

     I made him a scrappy bed a couple of months ago with some 3" scraps I needed to get rid of and he loves that bed.  No picture of that effort, sorry, but here's a picture of McPherson.  Isn't he the cutest?  He is 17 pounds of squirrel hunting craziness.


   Since his first scrappy bed lives in the great room area, McPherson needs another bed for the bedroom.  I had some string blocks all ready for this project.  I put 9 of my 10" square string blocks together, sewed that top onto a stabilizing piece of fabric, added a backing pieced together from three fat quarters, stuffed it with three bags of fiberfill and hand sewed the open end.  Done.


Friday, July 15, 2016

My First And Last Hand Sewn Quilt Is Finished.

   The Scrappy Grandmother's Flower Garden quilt is now finished.

    I did very big stitch quilting around the yellow centers and the beige hexies so it would go faster.

   I hand sewed hexies to the uneven sides to bind those edges.  Today I applied the binding on the straight sides with the sewing machine.  It felt really weird to use the sewing machine after spending so many months hand sewing all those little hexies.  I love this quilt and I'm so glad it's finished.


      I'm so happy I will be able to use my sewing machine to make my next couple of projects.

      I bought fabric to make myself a flannel rag quilt for Christmas.  I want to start it next week.  It's going to be made with a lovely red plaid flannel for Christmas.  I love plaid fabric.

      I'll be using the red plaid for the top.  I will use the blue flannel for the middle and backing fabric.  I bought 3 yards of the red plaid and 6 yards of the blue flannel.

     I will cut all the fabric into 10" squares.  I will need 108 of them to make a 6 block x 6 row quilt.  The blocks will be assembled with the red on top and the middle and bottom layer will be blue.  I made two flannel quilts last year and I really enjoyed the process.  


     Another project I have fabric for is a new cotton nightgown for the winter season.  I bought some red plaid cotton fabric, like the red plaid above, to make this one.  I won't share a picture of this sewing project because I'm not going to take the time to match my plaids at the seams and it will look very wonky.

Friday, April 29, 2016

Christmas Tree Wall Hanging Project Moving Forward

   I finally put the binding on the two Christmas tree wall hangings that I started in March.  I did simple quilting around the trees and I'm really happy these are done


   This week I've been working on making hexies for my Grandmother's Flower Garden quilt.  I have all the scrappy flowers hexies ready (210) and all the flower centers (35) ready to be sewn together.  Those are the first two rounds of my hexie blocks.  I still have to make a lot more hexies for the next two rounds of my blocks.  I should have a couple of blocks to show in the next week.  This is definitely a long term quilt project.

   I'm starting a new knitting project.  There is a free pattern on Ravelry called 198 Yards of Heaven that is a pretty lace shawl.   I tried to make this shawl a couple of years ago but it did not go well.  I finished the shawl but it didn't look anything like it should have.  I'm trying again with a skein of my current favorite acrylic yarn (Red Heart Boutique Unforgettable in Cappucino) and a pair of size 8 knitting needles.


Friday, April 1, 2016

Grandmother's Flower Garden Quilt Start

   I have started my Grandmother's Flower Garden Quilt that I have been dreaming about for a while.  The flower centers will be bright yellow, the second ring will be scrap fabrics, the third ring will be white, and the finally ring will be light green for the garden path.  This will be an ongoing quilt project for the next year or so.

    I bought a hexagon paper punch last year to make my own 1 inch hexagon papers and I did make some hexagon papers from some old greeting cards last year.  Last week I pulled out some 110 lb. cardstock from my paper stash and made more hexagon papers.  I can punch out 19 - 1 inch hexagon from one piece of  8.5" x 11.5" cardstock.

   These are my first ever hexies and they were a lot of fun to make.


Tuesday, March 22, 2016

Cutting Christmas Tree Appliques

  I have cut twelve Christmas tree appliques for my Christmas tree decoration wall hanging.  I drew the wonky Christmas tree pattern myself.   I was going to put a couple of trees on several wall hangings so I could put them all over the house, but I have decided to put all twelve trees together on one wall hanging.  I'm going to give each a brown fabric trunk, and I want each trunk to be a different fabric.  I need 9 more pieces of brown fabric to finish the trunks and it will be ready to assemble and sew up.


   Here are the twelve trees.


Friday, March 4, 2016

Bags, Bags, Fourteen Knitting and Crochet Project Bags!

   I sewed up all the bags I cut out a few days ago.  They were so easy, each one only took about 45 minutes to sew.  No zippers, no drawstrings, there are 4 seams and a little top stitching.  Such an easy pattern for a really nice bag that is perfect for a knitting or crochet project for me.  The lady bug bag and the Eiffel Tower bags in the fourth picture are being given away to dear daughter and a friend.

   I wanted to show the handle of the bag so the first three pictures are the bags hanging off a dowel stick.  The other two pictures have the rest of the bags laying on the table.


Saturday, February 27, 2016

Cutting Out Fabric to Make Lots of Bags and Crocheted Embroidery Hoops

   I'm making a bunch of Two Kates Project bags.  I love this beautiful bag pattern and I thought this would be a great project to use up some of my fabric stash and I need some new project bags for my knitting and crochet projects.  This bag is perfect to store my yarn projects because it doesn't use a zipper  or a drawstring and it's a nice size.  The link to the .pdf pattern is here. 

   Tonight I cut out fabric to make thirteen of these bags.  The picture of the bright green lady bug fabric at the end is a bag that will be given to dear daughter.  She loves lady bugs.  Most of these bags have the same fabric for the lining as the outside but a few of them have different lining fabric because I didn't have enough fabric for both.


   I'll be sewing on these bags for the next few days.

   I finished crocheting the borders on the rest of my 3" embroidery hoops for my Christmas tree project.  I did all of these crocheted borders with embroidery thread.  It was a lot of fun to do.  To finish these hoops I still have to add some embroidered trees.


Tuesday, December 29, 2015

2015 - My Crafting Year In Review


 I'm counting down to the New Year. Tomorrow is my birthday, then we have New Year's Eve, then we celebrate New Year's Day.  This week is always just as special to me as the week of Christmas.

   Short Review of 2015

       It's been quite a crafting year for me.  I made a lot of projects this year.  I painted, knitted, crocheted and sewed.  I made yard art, built a quilt ladder, fashioned jewelry and I have more pincushions than I will ever need.  I learned a lot this year about what I'm good at, what I like to do, and what I should not try a second time.  I made some lovely projects and others just didn't turn out like I expected.

     I did a lot of organizing this year to make sure I could find my crafting items more easily.  I replaced some of my old tools with new ones.  I added three sewing machines to my collection and re-homed two machines I wasn't using.  

  I made a lot of projects this year with my sewing machine that I love, but my favorite project would have to be the hanging dishtowels with the button closure.  They are so freaking cute and so easy to make it's hard not to love, love, love them.  This post from November has the link to the tutorial I used and some information on how I made my first, but definitely not my last, hanging dishtowels.

   My biggest fail had to be the bathmat I tried to make in January.  The three posts about that fail started here on January 12th, with another on January 13th, and my complete resignation on January 15th.  I ended up buying a bathmat.  I don't know if I will ever try this one again.

   My favorite quilt would have to be the disappearing hourglass in black and white.  I started it on June 3rd and finished it on July 29th.  It's a nice size quilt and I love the pattern the blocks make.  This is a link to pictures of the finish.

   There were so many projects and I had fun with all of them.  I'm working on my updated crafting to do list for next year and I'm looking forward to lots of  projects in 2016.