Pages

Showing posts with label machine. Show all posts

Saturday, May 16, 2020

Lots More Navy Blue Gingham Items For The Kitchen

My large 40 ounce white teapot needed a tea cozy.  I put a ruffle on this one.  I keep this teapot in the pantry but now it's ready to use with a nice roomy cozy.


Pot holders.  I made these to be a wall decoration in the kitchen.  I'm putting them up with velco command strips.


Apron/dress for my dish detergent bottle.  This was easy and fun to make.  I actually ended up using glue to secure the bias binding on the back because the binding strip was too narrow to sew on the back.


Stand mixer cover.


And I still have about two and a half yards of the blue gingham.   I haven't made the toaster cover or a cookbook cover.  Two things that may happen in the future.


Thursday, March 21, 2019

Two Quilty Items

Here are two quilty projects I have shared before.

This dresden plate wall hanging was made to fill up the alcove.where my TV sits.  It was originally supposed to be a fireplace, but I wouldn't use a fireplace so I elected not to add it to my mobile home and they gave me a nice alcove instead.  It's the perfect size for a long dresser and my TV and small stereo live there.  I made the dresden plate using four turquoise fat quarters, the dark blue was from stash and the backing fabric was a piece of batik from stash.  I didn't quilt this piece, I just hand sewed the plate to the brown batik and hemmed the backing fabric making a casing at the top for a curtain rod.


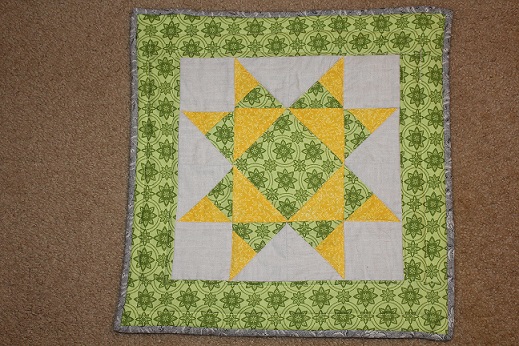
   I made this block into a small quilted piece to decorate my front door in between holidays.   I can't remember where I got the block from.   This one is quilted and bound.   Edited to correct my previous statement.  This is a Missouri Star Block and I got the tutorial from the Amanda Rolfe at Three and Three Quarters Blog.  Here is a link:  Missouri Star Quilt Block Tutorial


Sunday, June 25, 2017

Hexagon Quilt Update

   I have finished another block in my Grandmother's Flower Garden quilt.  I have two done now.  Only 33 more to make.  ðŸ˜Ž  I have been taking my sweet time with this project.  No rush.  I have plenty of quilts to keep my warm when the weather turns cold.


   I received the yarn for my Hotel of Bees Shawl on Friday and I wound all nine skeins into yarn balls so they are ready to use.  I should take a picture of my yarn.  I also took some time to read through some of the pattern last night.  I don't know when I will start this project, but I want to finish my Christmas hanging dishtowels before I start this.  I still have two dishtowels to embroider.  Once they get the embroidery done I have to make the top part.  I didn't get a chance to finish the embroideries on the last two towels this past weekend because . . . 

   I spent a lot of the weekend buying mulch for my large flower bed in the front of the house.  I have a small car so I can only buy 4 bags of mulch at a time.  I made four trips to the home improvement store buying mulch Friday night and Saturday morning to get enough mulch to cover this space.  I used 15 bags of mulch in this space.  I swear my roses look happier since I put the mulch down. 


Wednesday, June 21, 2017

Christmas Is Coming, Believe It Or Not

    I thought I would get an early start this year.  I hate giving Christmas gifts, I have a hard time deciding what to give anyone.  I do know that my daughter and my brothers like the hanging dish towels that I make, so that's what I will make to give to them.   I will make five of these pretty dish towels and I should have them all finished by next week.

    I bought the fabric and the towels for this project last month.  I bought two huge white tea towels and cut them into quarters.  I hemmed the one cut side on my sewing machine and then I put the towel into the hoop to add the embroidery to it.  I only got one embroidery made tonight but I love it.  I will embroider the rest over the weekend then I can start adding the fabric toppers to each one.

    Here's the embroidery design I'm using on the towels.


     This makes a nice break from hand sewing hexies.  I really miss my sewing machine when I'm doing a hand sewing project.  I love pressing down on the foot pedal of the machine and sewing at full speed.

Friday, May 12, 2017

Embroidery Machine Fun

   I almost forgot to tell about the machine embroidery adventure I had last weekend.  I have a Brother PE770 Embroidery Machine that my daughter gave me as a birthday present in 2014.  It was supposed to be a machine we both would use but it lives at my house so I use it more.  I set it up and use it about 3 or 4 times a year for making hanging dishtowels, embroideries to add to tote bags or to frame, and monogrammed linen napkins, I would love to play with a multi-needle machine someday.
   Back in January I had an idea for dear daughter to make her Father some embroidered toilet paper for Father's Day.  Dear daughter picked the design and I purchased it.  We got together last Saturday to embroider toilet paper.

    I did a sample stitch out of the design on Friday night on a plain piece of white cotton fabric with stabilizer.  It worked great and took me about 40 minutes from set up to final stitch.

     On Saturday we had a few problems and the project took a lot longer than anticipated.  I don't think my machine is built to embroider toilet paper because when we tried to embroider on the toilet paper the machine jammed up and it would eat the toilet paper and the stabilizer.  

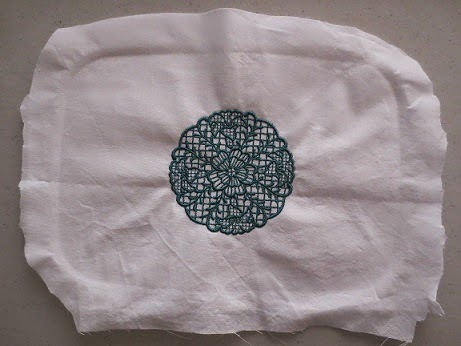
     We ended up with three designs stitched out on regular white muslin which dear daughter will wrap around toilet paper rolls.  The three designs took us almost 5 hours including an hour of that time taken to go to Walmart to get the fabric.

       It was a fun project and a real learning experience.  Dear daughter got a chance to really work with the machine up close for the first time since we have had it.

    Here is a picture of the design we stitched out.


Thursday, December 10, 2015

Packaging That I Can Recycle To Hold Needles and Pins

   I've been trying to find a decent container for my used sewing machine needles and bent pins.  I had a pill bottle that I filled up over the last four years which I disposed of last month.  I currently have two pill bottles that I prepared and are ready to fill with old needles and bent pins.  Today I found some packaging that would work really well for this job.

   Burt's Bees makes a tinted lip balm that comes in a plastic blister package.  The blister package holds a cardboard tube that then holds the separate plastic tube of lip balm.  I bought the lip balm because I wanted to try it.  I had no idea that the packaging would be this cool.  The cardboard tube is closed on both ends and is the perfect size to store old needles and pins or you can even use it for your traveling sewing kit.

  The lip balm was $6.62 at the store.

   Here's a picture of the tube.


Monday, November 30, 2015

Singer One Sewing Machine

    I couldn't resist picking up the Singer One machine that I was crowing about in my post of November 22, 2015.    I ordered it the same day I found it on line.  I wished I had taken the time to shop around before I paid $249.00 with free shipping at Joann Fabrics.  I could have saved more money if I had purchased it from Amazon the same day for $179.00 with free Prime shipping.  On the plus side shipping from Joann Fabrics was pretty quick, they shipped it be Fed Ex and I had it by Friday, the 27th.  By the way, the price today is $209.00 at Joann Fabrics and Amazon.

      There are two models of the Singer One, I bought the cheaper model that only has 24 stitches because I have three other machines with lots of decorative stitches, so I felt like I didn't need to spend more for stitches I already had.  

     This will make a great back up machine for me and I think it will do well with projects that have thicker layers.  My Janome Horizon 7700 does not do well with thick layers of fabric, it stalls and stammers unless I have the walking foot or the dual feed foot on and I don't always have those feet on the machine when I need them.  I now have two computerized Singer sewing machines and I will be depending on them to do a lot of my craft sewing with thicker layers.


   This machine is bigger than I thought it was from the pictures, it's heavy, but not too heavy to lift, and it has a nice big work surface.  There is a built in handle that folds down.  The table that slides on to the free arm on the left slides off with the touch of a button so you can sew with the free arm.  There is also an accessory box that slides out from that table so you don't have to remove the entire table to get to the accessory box where you store your bobbins and presser feet.  It has a reverse sewing button on the front of the machine and it makes 24 stitches (6 essential, 4 stretch, 12 decorative, and 2 fully automatic 1-step buttonholes).  

    The machine comes with a comprehensive manual, a instructional DVD, 4 empty bobbins, an all purpose presser foot, a blind hem foot, a satin stitch foot, a zipper foot, a buttonhole foot, a little brush for cleaning the bobbin and hook area, an extra spool pin, a small key size screwdriver for removing the needle plate, and a variety pack of machine needles.  I ordered some additional bobbins for this machine, because I like to have more than 4.  There are lots of options for stitch length and width and it's easy to adjust with the plus and minus buttons near the LED display.   It does twin needle sewing and you can adjust the needle position when sewing straight stitch to 13 different positions using the stitch width control.

    The feed dogs on this machine do not drop for free motion quilting or darning.  This machine does not have an up/down needle button.

   I wound a bobbin this morning and gave it a test run.  It was a cinch to thread and the tension was perfect right out of the box.  While I was sewing up the sample below I couldn't hear the television, so it does run loud, but it sews great and you can sew pretty fast with it.  Here's a sample of the stitching front and back.  It was easy to switch stitches just by pressing a button.

 
    Front:


   Back:


      I think this would make a great beginner sewing machine.  The manual is easy to read, it explains all the parts of the machine, how to wind a bobbin, how to thread the machine, and it has a needle/thread/fabric chart.  The manual also covers how to make buttonholes, how to use the machine to sew on a button, how to insert a zipper, how to use the blind hem stitch, when to use stretch stitches, how to care for the machine, troubleshooting tips, and even what size bobbins to buy.  This manual is well written and should help keep a beginner from becoming frustrated with this machine.

  I'm really happy I bought this machine.  I think I am going to do a lot of fun sewing with it.


Wednesday, November 25, 2015

I Keep A Sewing Machine Inventory

      Since I have more than one sewing machine and they change periodically, I decided to keep a sewing machine inventory for my daughter's use when I pass away.

    I know she will probably want to sell some of my sewing machines when I die and I don't want her to be one of those people that says, "I have this sewing machine for sale, but I don't know if it works or what it does."  She can just look at my inventory to see when the machine was bought, how much I paid for it, the serial number of the machine, a description of the kind of sewing you can do with the machine, all the presser feet that go with that machine, and whether there is an owner's manual.  Knowing how much I originally paid for it will definitely help her set a price.

   I've let her sew on three of the machines, so she knows how to use them and will know that they work, if and when she tries to sell them.

   I keep this list up to date with each machine purchased or discarded.

Wednesday, November 11, 2015

Emery Sand Reclamation

   I reclaimed the emery sand from a pin cushion I made a couple of years ago.  The cotton cover on that pin cushion was looking very old with all the pin holes in it.  So I took it apart and saved all the emery that was in it and made a new cover.  The last time I bought emery sand I bought it at this etsy shop, My Sweet Accent, link here.  I see she also sells pin cushions, but I prefer to make my own.  I have also purchased emery sand from Nakpunar on Amazon, as well.

   I've never used the walnut shells or any of the other nut shells that are sold for pin cushion stuffing because I have not heard good things about them.  One person told me that her pins were sticky with some type of residue from the pin cushion she made with the nut shells.  You also have to be careful because lots of people have allergies to nuts.

    When I make emery sand pin cushions, the emery is placed in its own little pouch so it's contained and easy to reuse.  I took the emery from my old pin cushion and added some that I had leftover in my stash.  It was originally shipped in a zip loc bag, so I just poured the emery from the old pin cushion in with the leftover to hold it until I was ready for it.  I was able to make a new pin cushion with most of that emery.  I wanted to make two pin cushions, but I didn't have enough, so one will have to do.  I made my pin cushion in a simple rectangle shape.

      First I made a cotton pouch to put the emery in.  The pouch was made from a piece of cotton.  I cut a two pieces of cotton 4" x 6" for the pouch.  I sewed up three side of the pouch using a 1.8 stitch length to make it secure using a 1/4" seam allowance.  After I made the pouch, I filled it with emery, very carefully.  I use a funnel and a spoon with the pouch propped up in a small mixing bowl to catch any loose emery, then I hand sewed the pouch closed using very small stitches.

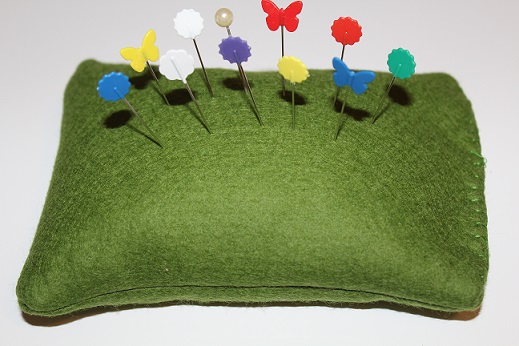
     I made the cover with some wool felt I had in my stash and I cut it just about a quarter of an inch bigger than the original cotton pouch so the emery pouch would fit .  I sewed up three sides of the cover on the machines with the 1.8 stitch length, using a scant 1/4" seam allowance, (when sewing felt you can use a very tiny seam allowance because the material doesn't fray) turned it right side out, slipped the pouch inside and hand sewed the open end.

   It's done.  A new pin cushion with sharpening emery sand for my straight pins.


Friday, July 17, 2015

Preliminary Review of my Janome Memory Craft 7700 QCP, Magnolia


 I took Magnolia out the same day my company left last week.  I rearranged all my furniture so I could put my sewing studio back into the living room, and I put her in a nice spot right in front of the windows.  I love sewing in the living room, there is lots of light and lots of room.

   This is a preliminary review because I have only been piecing my disappearing hourglass blocks with her.  I haven't done any speciality sewing or used any of the various feet that came with her other than the 1/4" patchwork foot that I need for my piecing.  I haven't even used the knee lift yet, I keep forgetting to put it on.  I love the big acrylic table I bought for her.  It gives me lots of space to set my pieces up for sewing.

    I have to say I love the size of the machine and the sturdy feel when I'm sewing.  She's a big one.    The machine is super easy to thread.  I used the needle threader a couple of times, but I don't use it every time I have to thread the machine because I find them to be too time consuming.  Her straight stitch is perfect.  I did adjust the presser foot pressure because I found my fabric wasn't feeding through like the presser foot was too tight for my cotton seams.  I lowered it to 5 from 7.  The manual says 7 is normal.  It may be because the machine is new and I have to break it in,  Bobbin winding is easy.  The drop in bobbin is under a clear cover, but there is a glare on the cover and I'm using black  thread so it's hard for me to see how much thread is left on the bobbin before I run out unless I lift the cover up.   Other than that, I am enjoying the lighting on the machine, there are lights in the throat area and over the needle.

   I plan to quilt my current quilt project with this machine so I'll let you know how the dual feed foot works.    

Tuesday, July 7, 2015

Progress on the Black and White Disappearing Hourglass

      I managed to get some quilting done this past weekend while I had company staying with me.  They are late sleepers, so I had plenty of time in the morning to play with my fabric.  I now have all my half square triangles sewn and I'm in the process of ironing them and trimming dog ears for the next step, making the hourglass blocks.    I have six completed blocks and another 35 to finish.  I haven't decided how I am going to set these blocks or what fabric I'm using for the back.  I'm thinking about placing some sashing in between the blocks.  I do have the batting for this quilt, at least that is something I don't have to think about.


     My company leaves today and I have a few things to do to get settled back into my bedroom, and after that I'm planning on getting Magnolia fired up (my new Janome 7700) to see how she does piecing hourglass blocks.  I want to test it with the cotton quilting thread I bought at JoAnn's that I'm using on this project.  I hope she is not going to be fussy about what thread I use on her.  I'll let you know how that experiment goes.


Saturday, April 25, 2015

Saying Goodbye to Elsie, the Singer 401A

   I received Elsie from a friend about 4 years ago who asked if I wanted it and I immediately said yes.  I love vintage sewing machines.  This machine has a lovely history.  My friend's mother bought it new in 1959 with inheritance money from her father's estate.  She made dresses for her four daughters with it and my friend learned to sew on it and made her own clothes until she graduated High School.


   While we were loading the machine into my car, my friend say that I should never sell it.  If I ever wanted to get rid of it, I should contact her so she could take it back.  I agreed.  

    At the time my friend gave Elsie (I named her after my friend's mother) to me, she was moving in with her daughter and downsizing.  The machine was out of its cabinet, (the cabinet was taken as a piece of furniture by a family member, whereabouts unknown) kind of moldy, missing the power cord, with rusty attachments.  I had the machine serviced, bought a new power cord, and cleaned up the attachments.  But I never really bonded with the machine.  I used it about 3 times.  I think the reason I never bonded with the machine is because it was never completely mine.  It always belonged to my friend.

   So I emailed my friend today and told her I needed to get rid of this machine for space and I would gladly meet her halfway (about 100 miles) and give it back to her.  I haven't had a response to my email yet.


Thursday, February 19, 2015

Just Had To Have It


 I found this cute novelty USB drive on Amazon and I had to have it for the embroidery machine.


Link to the Amazon page here.

Sunday, February 15, 2015

Time Spent with My Embroidery Machine

      Wow, I just spent 6 hours with my embroidery machine learning, learning, and learning some more.  In that time I made two items that I deem good enough to give away.  I made this super cute dish towel for someone I love.  I can't say who, but they will adore it.  My family loves St. Patrick's Day.  My mother was 100% Irish and St. Patrick's Day was very special to her.  By the way, I ruined two other dish towels getting this one done.  The other two dish towels each have one good stitched out design on them and I will cut them up and sew them together for me.

     I learned a lot about my embroidery machine today.  I learned how to change the needle (I broke two), I learned how not to break the needle, and I learned how to insert the bobbin correctly.  I also learned how to go back and restitch when the thread breaks and I learned how to change colors on a design in my design software on my computer.  So all that time was not wasted.


Here's another design I stitched out today.  It was almost too easy except for the one time the 
thread broke (I have no idea why).  This beautiful Napoleanic bee in a laurel wreath will be going on tote bag I'm making for a birthday present for one of my bosses.  


Thursday, February 12, 2015

New Information On Sewing Machine Maintenance

       I do the bare minimum when it comes to sewing machine maintenance.  None of my sewing machines are under warranty so I don't take my machines in for service unless they are truly broken.  I really good about cleaning out the lint in the feed dog and bobbin area after a big project and I will change my needle pretty often, but I don't oil anything on my computerized machines unless it's specifically mentioned in the owner's manual.   The other morning I went on the internet looking for information on oiling my Martha, Bernina 1530.  I found this youtube video on how to clean and oil a Bernina (not specifically a Bernina 1530) but a really good video and super helpful.

Link to video on how to clean and oil your Bernina sewing machine.

      I had about 15 minutes before I had to leave for work so I did a little maintenance on Martha.  I took my feed dog plate off, my needle out, and my bobbin assembly apart, brushed out all the lint, oiled the hook, and replaced my needle.  The video recommends you oil your hook every 3 to 5 bobbins.  I usually change my needle and do a full clean out about every 8 hours of sewing, but I never knew that I should oil my hook.  I did notice that after I oiled the hook, the machine seemed to run quieter and smoother.  It might be wishful thinking, but I think Martha is a little happier these days.  

Sunday, January 11, 2015

Embroidery Machine Test Success.

   This morning I completed a successful test of my embroidery machine using my newly acquired supplies of stabilizer and thread.  I did a couple of tests of a small one color heart then I watched the machine stitch out this 25 minute one color design that is pre-loaded in the machine.  I was interested to see if I would run out of bobbin thread on the large design, but I still had lots of bobbins thread left.  Next I have to get my software set up on my computer.  On Friday I did some browsing on the Embroidery Library site and purchased one design and a alphabet design pack which has letters with pretty wreaths around them.   I really enjoyed shopping at the Embroidery Library site and I put a few items in my wish list for later.

   Picture of the machine in action.


   This is the finished embroidery.  It was interesting to see the machine stitched the design in  layers.


Friday, January 2, 2015

Notes on Purchasing Supplies for My Embroidery Machine


   I wanted to make some notes on my journey into the world of machine embroidery supplies.

   On New Year's Day it took me over two hours to decide what kind of thread I wanted to buy and where I wanted to buy it from.  There a lot of choices of thread and just as many vendors.  I bought an 80 spool variety of polyester thread from Threadart.com.  The price was reasonable and I've read decent reviews about the company's customer service and the products from the members on the Quilting Board.  (The Quilting Board is a free message board found right here).  I spend a lot of time on the Quilting Board learning about all things quilting, which includes embroidery.

   On New Year's Eve I took the time to read all the information in the posts on The Seasoned Homemaker Blog.  She created 30 days of posts to cover a wide range of machine embroidery topics and I learned a lot.

   The most important thing I learned from The Seasoned Homemaker's posts is that I need computer software to import designs from the computer onto my embroidery machine.  I did not know this.  I did some research and I purchased the basic Brother software here at sewingmachinesplus.com.  I did look at the on-line software available on embird and embrillance, but the cost of those was more than I wanted to spend at this time.  I'm trying to resist over spending on supplies before I figure out how much I like doing machine embroidery.

   I placed an order for extra Schmetz titanium needles for this machine with an ebay seller.  

   I will be placing my order on Amazon for pre-wound bobbins, extra empty bobbins, and medium weight tear away stabilizer on Sunday.  I understand that Walmart.com also carries stabilizers and thread.  The prices for both are supposed to be very good.  So I may be trying Walmart.com as a vendor for stabilizers and other supplies.

   That should take care of my machine embroidery supply needs for a while.  As soon as I get my stabilizer I will start to play with my new embroidery machine.

    I decided on a name for my Brother PE 770 embroidery machine.    She will be called Myrna.  I could say she was named after Myrna Loy (one of my favorite actresses), but she is actually named after the sheep that was on the birthday card my DD gave me when she presented me with the machine.  The sheep, Myrna, had her front half sheered and her bottom half wooly and the caption on the top of the card read:  On a dare, Myrna goes topless.  And inside the card it said:  Expose yourself to plenty of birthday fun!  You can see the card right here.  It is a really cute card.

    I haven't started quilting my Pretty in Pink quilt just yet.  I'll be working on that tomorrow and Sunday.   See you soon.

Wednesday, December 31, 2014

My New Toy

  I celebrated my birthday yesterday and I had a really nice day.  Dear daughter took me out to dinner and gave me some birthday gifts.  One of her gifts to me was this:


     In November I talked to my daughter about the two of us going in together to buy the Brother PE 770 embroidery machine so we could expand our crafting horizons.  My daughter doesn't sew as much as I do but I knew that as soon as I bought this machine on my own she would want to use it.  I always let her use my sewing machines and whatever else she needs to make a project, but embroidery is a little more expensive so I thought it would be better if we shared the cost of this machine.  My plan was foiled by a sneaky child.       

    I can't wait to open the box up.  This morning I got busy doing some research on how to use it and figuring out what kind of supplies I have to have.  I also watched an hour long Youtube video on how to set the machine up and stitch out a design, then I found stabilizer, thread, pre-wound bobbins, and usb thumb drives on Amazon.  I'll place the Amazon order on Sunday so I should those supplies by early next week.  

    In the meantime, I'm going to set the machine up in the kitchen tonight (the cutting table and sewing table will be busy with the Pretty in Pink quilt, which I have to iron and pin baste tonight) and do some playing on it tomorrow, thank goodness for paid work holidays.  I have six spools of rayon embroidery thread that I can use to test the machine and I'll hoop two pieces of cotton on it for testing since I don't have any stabilizer.  The rayon thread was given to me by a friend who doesn't sew, but inherited her Mother's sewing supplies.  I wasn't sure I would ever be able to use those spools of thread, but now I'm glad I held onto them.

   I will share my stitching results with you tomorrow, in between cleaning my very dirty oven and quilting my Pretty in Pink quilt.

Saturday, November 8, 2014

My Hand Crank Singer

       I have been wanting a hand crank for a few months now.  I finally found one I could afford on ebay a couple of months ago.  I had to repair the wood base because the seller shipped the base with the machine in it and the back joints were showing signs of stress.  I put some liquid nails on it and nails it back.  Good as new.  Now that it's fixed, I'm ready to play with my Singer Model 15 hand crank.  I dated it to 1947 with the serial number.  It has a beautiful scroll plate on the side and the hand crank has Chinese characters with the words "Made In The Peoples Republic Of China" which is kind of fun.  I'll give it a little oil and wind a bobbin or two and start playing real soon.