I found this pleated Christmas tree tutorial a few years ago and I made one that I gave away to my daughter. Here is a link to the tutorial: pleated tree skirt tutorial. I've been wanting to make one for myself and I'm doing it now. This is easy to make and you can have fun with colors for the tree and the tree skirt. I stayed with Christmas colors for this one, but I will definitely be experimenting with colors for the next one I make.
I will add the tree skirt on this one and it will be ready to frame.
I've been watching Youtube videos on how to make easy and cheap Christmas decorations. I love the snowflakes made with clothes pins. I bought very small clothes pins from an etsy seller to make a few of these to add to my decorations. I need to buy some silver spray paint and silver glitter to make them sparkle. Here is a link to a Youtube video: Clothes Pin Snowflakes.
I also like to the decorations I've seen made with the mason jar lid band. I saw a lady tie a bunch of homespun strips around the band and it turned out extra cute. Here's a link to her tutorial, she makes four different ornaments in this one. Homespun Christmas Ornaments Youtube tutorial. And yes, I have some mason jar lid bands for this project as well.
I also found a paper star tutorial on Youtube. Here's a link: Paper Stars. I haven't done a lot of paper crafts, but this one looks doable. I'm going to give it a try in the next few weeks. I'll let you know how I get on.
No progress to report on my Grandmother's Flower Garden Quilt top. I'm still stuck on the third row.
I like to sew, quilt, crochet and knit in my free time and this blog is all about my projects, past and present.
Showing posts with label pins. Show all posts
Thursday, December 7, 2017
Thursday, December 10, 2015
Packaging That I Can Recycle To Hold Needles and Pins
I've been trying to find a decent container for my used sewing machine needles and bent pins. I had a pill bottle that I filled up over the last four years which I disposed of last month. I currently have two pill bottles that I prepared and are ready to fill with old needles and bent pins. Today I found some packaging that would work really well for this job.
Burt's Bees makes a tinted lip balm that comes in a plastic blister package. The blister package holds a cardboard tube that then holds the separate plastic tube of lip balm. I bought the lip balm because I wanted to try it. I had no idea that the packaging would be this cool. The cardboard tube is closed on both ends and is the perfect size to store old needles and pins or you can even use it for your traveling sewing kit.
The lip balm was $6.62 at the store.
Here's a picture of the tube.
Burt's Bees makes a tinted lip balm that comes in a plastic blister package. The blister package holds a cardboard tube that then holds the separate plastic tube of lip balm. I bought the lip balm because I wanted to try it. I had no idea that the packaging would be this cool. The cardboard tube is closed on both ends and is the perfect size to store old needles and pins or you can even use it for your traveling sewing kit.
The lip balm was $6.62 at the store.
Here's a picture of the tube.
Wednesday, November 11, 2015
Emery Sand Reclamation
I reclaimed the emery sand from a pin cushion I made a couple of years ago. The cotton cover on that pin cushion was looking very old with all the pin holes in it. So I took it apart and saved all the emery that was in it and made a new cover. The last time I bought emery sand I bought it at this etsy shop, My Sweet Accent, link here. I see she also sells pin cushions, but I prefer to make my own. I have also purchased emery sand from Nakpunar on Amazon, as well.
I've never used the walnut shells or any of the other nut shells that are sold for pin cushion stuffing because I have not heard good things about them. One person told me that her pins were sticky with some type of residue from the pin cushion she made with the nut shells. You also have to be careful because lots of people have allergies to nuts.
When I make emery sand pin cushions, the emery is placed in its own little pouch so it's contained and easy to reuse. I took the emery from my old pin cushion and added some that I had leftover in my stash. It was originally shipped in a zip loc bag, so I just poured the emery from the old pin cushion in with the leftover to hold it until I was ready for it. I was able to make a new pin cushion with most of that emery. I wanted to make two pin cushions, but I didn't have enough, so one will have to do. I made my pin cushion in a simple rectangle shape.
First I made a cotton pouch to put the emery in. The pouch was made from a piece of cotton. I cut a two pieces of cotton 4" x 6" for the pouch. I sewed up three side of the pouch using a 1.8 stitch length to make it secure using a 1/4" seam allowance. After I made the pouch, I filled it with emery, very carefully. I use a funnel and a spoon with the pouch propped up in a small mixing bowl to catch any loose emery, then I hand sewed the pouch closed using very small stitches.
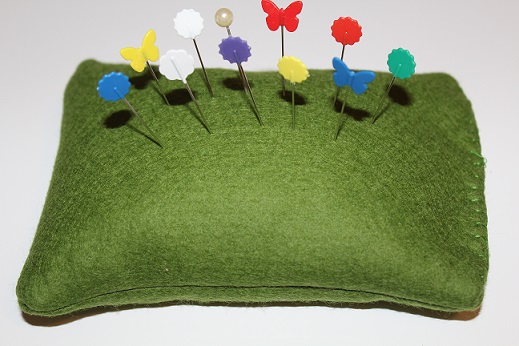
I made the cover with some wool felt I had in my stash and I cut it just about a quarter of an inch bigger than the original cotton pouch so the emery pouch would fit . I sewed up three sides of the cover on the machines with the 1.8 stitch length, using a scant 1/4" seam allowance, (when sewing felt you can use a very tiny seam allowance because the material doesn't fray) turned it right side out, slipped the pouch inside and hand sewed the open end.
It's done. A new pin cushion with sharpening emery sand for my straight pins.
I've never used the walnut shells or any of the other nut shells that are sold for pin cushion stuffing because I have not heard good things about them. One person told me that her pins were sticky with some type of residue from the pin cushion she made with the nut shells. You also have to be careful because lots of people have allergies to nuts.
When I make emery sand pin cushions, the emery is placed in its own little pouch so it's contained and easy to reuse. I took the emery from my old pin cushion and added some that I had leftover in my stash. It was originally shipped in a zip loc bag, so I just poured the emery from the old pin cushion in with the leftover to hold it until I was ready for it. I was able to make a new pin cushion with most of that emery. I wanted to make two pin cushions, but I didn't have enough, so one will have to do. I made my pin cushion in a simple rectangle shape.
First I made a cotton pouch to put the emery in. The pouch was made from a piece of cotton. I cut a two pieces of cotton 4" x 6" for the pouch. I sewed up three side of the pouch using a 1.8 stitch length to make it secure using a 1/4" seam allowance. After I made the pouch, I filled it with emery, very carefully. I use a funnel and a spoon with the pouch propped up in a small mixing bowl to catch any loose emery, then I hand sewed the pouch closed using very small stitches.
I made the cover with some wool felt I had in my stash and I cut it just about a quarter of an inch bigger than the original cotton pouch so the emery pouch would fit . I sewed up three sides of the cover on the machines with the 1.8 stitch length, using a scant 1/4" seam allowance, (when sewing felt you can use a very tiny seam allowance because the material doesn't fray) turned it right side out, slipped the pouch inside and hand sewed the open end.
It's done. A new pin cushion with sharpening emery sand for my straight pins.
Subscribe to:
Posts (Atom)