
Showing posts with label cover. Show all posts
Showing posts with label cover. Show all posts
Friday, July 24, 2020
Christmas In July
I love Christmas tree quilt blocks. I found this tutorial on a blog, The Spruce Crafts, Christmas Tree Block and I had to make one. I thought the original size was a little too small so I increased the size of the strips to 3.5" and I increased the length of the tree pieces about 2 to 4 inches each so they would be substantial. The final size is about 15.5" x 17.5 inches. Perfect for a pillow cover.

Saturday, May 16, 2020
Lots More Navy Blue Gingham Items For The Kitchen
My large 40 ounce white teapot needed a tea cozy. I put a ruffle on this one. I keep this teapot in the pantry but now it's ready to use with a nice roomy cozy.


Pot holders. I made these to be a wall decoration in the kitchen. I'm putting them up with velco command strips.

Apron/dress for my dish detergent bottle. This was easy and fun to make. I actually ended up using glue to secure the bias binding on the back because the binding strip was too narrow to sew on the back.

Stand mixer cover.

And I still have about two and a half yards of the blue gingham. I haven't made the toaster cover or a cookbook cover. Two things that may happen in the future.


Pot holders. I made these to be a wall decoration in the kitchen. I'm putting them up with velco command strips.

Apron/dress for my dish detergent bottle. This was easy and fun to make. I actually ended up using glue to secure the bias binding on the back because the binding strip was too narrow to sew on the back.

Stand mixer cover.

And I still have about two and a half yards of the blue gingham. I haven't made the toaster cover or a cookbook cover. Two things that may happen in the future.
Wednesday, April 29, 2020
Blue Gingham Hanging Dishtowels
I made some hanging dishtowels with some of the blue gingham that I used to make the kitchen curtains. I love these.

I have plenty of the blue gingham fabric to make a cover for my stand mixer. I'm going to make that as soon as I get the coordinating white solid and navy solid fabric I ordered a couple of weeks ago. I want to make the cover in the patchwork style like the one I made a couple of months ago using 2.5" squares. I will probably make some potholders as well. Then I have to think of something else to make with all the leftover gingham.
I've also been knitting some dishcloths. I'm making a kitchen set for a niece who got married last fall. I know it's late but I just decided the other day that I wanted to do this. I will knit her a set of dishcloths, sew up a couple of potholders and make a couple of hanging dish towels for her. I wanted to show you the pot I use as a yarn bowl. My daughter bought this strawberry pot for me about 12 years ago from someone who throws pots in Indiana while she was on vacation. I have never used this for any plants. I have been using it as a decoration and as a yarn bowl for years. It's kind of fragile and I wanted to keep it nice.


I have plenty of the blue gingham fabric to make a cover for my stand mixer. I'm going to make that as soon as I get the coordinating white solid and navy solid fabric I ordered a couple of weeks ago. I want to make the cover in the patchwork style like the one I made a couple of months ago using 2.5" squares. I will probably make some potholders as well. Then I have to think of something else to make with all the leftover gingham.
I've also been knitting some dishcloths. I'm making a kitchen set for a niece who got married last fall. I know it's late but I just decided the other day that I wanted to do this. I will knit her a set of dishcloths, sew up a couple of potholders and make a couple of hanging dish towels for her. I wanted to show you the pot I use as a yarn bowl. My daughter bought this strawberry pot for me about 12 years ago from someone who throws pots in Indiana while she was on vacation. I have never used this for any plants. I have been using it as a decoration and as a yarn bowl for years. It's kind of fragile and I wanted to keep it nice.

Sunday, September 15, 2019
Using Scraps For A Quilted Appliance Cover
I cut a bunch of 2.5" squares from stash fabrics and made an appliance cover for my new stand mixer that I gave myself for Christmas. I also used leftover batting scraps. I enjoyed using up fabric and batting that was just sitting around. I made a long rectangle (18 rows by 9), quilted it and put two ties on each side. I love the way this one turned out.


Saturday, September 7, 2019
Scrappy Project
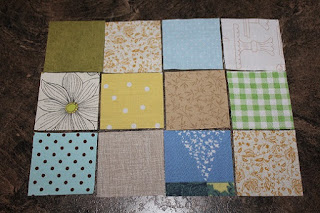
I'm making a scrappy appliance cover for my stand mixer. I dug through my scrap fabrics and cut up a lot of 2 1/2" squares. I concentrated on neutrals, white, blue, green, yellow, gray and a little bit of dark brown. This is the beginning of the my project. I will be working on this for a while.

Saturday, August 18, 2018
Wild Christmas Pillow Cover
I made myself a bright and wild red and green Christmas pillow cover. I love it. I found the fabrics on Etsy and I used the quilted pillow cover tutorial here.


Saturday, August 4, 2018
Secret Sewing Is Done, On To Selfish Sewing And Making
I can't believe it's August already. This year is flying by. I've only made one trip to the beach this summer so my summer season has not been filled with fun and excitement, just working and doing regular household and life maintenance. I am trying to schedule more beach day trips before the end of September.
I'm so glad that I I finished five secret sewing projects last week for dear daughter's birthday in November. It's hard for me to do secret sewing because I can't share it on social media until after it is gifted.
My selfish sewing projects start with this adorable snow family fabric. I found this at JoAnn's a couple of years ago and I made some hanging dishtowels with it to give away to my Christmas day hostess. I have been wanting more of this fabric ever since.
I found the snow family fabric again last weekend and had to buy it. I made this quilted pillow with a whole cloth piece of the cute snow family fabric so I could see all the little family members. I especially love the kitty and doggy in this print. I cut the fabric a little bigger than my sixteen inch pillow form to allow for the quilting and I cross hatch quilted the top piece with a scrap of 80/20 Heirloom batting and a white muslin backing. Then I joined this quilted top to an envelope backing. It was really simple and I love it.
The front of the pillow.

The back of the pillow.

Close up of snow kitty with a redbird on its head.

I found another YouTube pieced pillow cover tutorial that I just love. I have purchased red and green Christmas fabric to make one for me. Here is a link to the tutorial: quilted pillow cover tutorial. This tutorial is really well done and I used the dimensions to make the whole cloth pillow cover that I made above.
I still have to make the tote bags from my Hawaii souvenir fabric and that fabric is sitting on my ironing board waiting patiently.
There is one more Christmas decoration that I want to make. I have a crochet angel dishcloth pattern that I want to experiment with by making the pattern with worsted white cotton yarn combined with silver crochet size 10 thread. I want to make a couple for me and a couple for dear daughter for Christmas decorations. I'll have to see how the first one turns out before I commit to making four. LOL.
I have knit 24 dishcloths since the beginning of the year. I am finished with knitting dishcloths for awhile. I have plenty to give to dear daughter and keep for me. I still have to get back to my hexagon quilt top and my crochet blankets that I started.
I'm so glad that I I finished five secret sewing projects last week for dear daughter's birthday in November. It's hard for me to do secret sewing because I can't share it on social media until after it is gifted.
My selfish sewing projects start with this adorable snow family fabric. I found this at JoAnn's a couple of years ago and I made some hanging dishtowels with it to give away to my Christmas day hostess. I have been wanting more of this fabric ever since.
I found the snow family fabric again last weekend and had to buy it. I made this quilted pillow with a whole cloth piece of the cute snow family fabric so I could see all the little family members. I especially love the kitty and doggy in this print. I cut the fabric a little bigger than my sixteen inch pillow form to allow for the quilting and I cross hatch quilted the top piece with a scrap of 80/20 Heirloom batting and a white muslin backing. Then I joined this quilted top to an envelope backing. It was really simple and I love it.
The front of the pillow.

The back of the pillow.

Close up of snow kitty with a redbird on its head.

I found another YouTube pieced pillow cover tutorial that I just love. I have purchased red and green Christmas fabric to make one for me. Here is a link to the tutorial: quilted pillow cover tutorial. This tutorial is really well done and I used the dimensions to make the whole cloth pillow cover that I made above.
I still have to make the tote bags from my Hawaii souvenir fabric and that fabric is sitting on my ironing board waiting patiently.
There is one more Christmas decoration that I want to make. I have a crochet angel dishcloth pattern that I want to experiment with by making the pattern with worsted white cotton yarn combined with silver crochet size 10 thread. I want to make a couple for me and a couple for dear daughter for Christmas decorations. I'll have to see how the first one turns out before I commit to making four. LOL.
I have knit 24 dishcloths since the beginning of the year. I am finished with knitting dishcloths for awhile. I have plenty to give to dear daughter and keep for me. I still have to get back to my hexagon quilt top and my crochet blankets that I started.
Wednesday, May 30, 2018
I Made A Serger Cover
I needed a nice cloth cover for my serger. The serger came with one of those plastic covers but I don't like plastic on plastic. I wanted to have something so I wouldn't have to unthread the machine or take off the overhead thread guide. So I designed my own take on a very simple serger cover.
The front

The back

I sewed this up in about 3 hours. It was easy to make and I loved that I got just exactly what I needed. Here's how I did it. I took a rectangle of fabric about 20" x WOF and hemmed up the two long sides and one short side. The unhemmed short side would be the back. I cut a slit up the back for the thread guide rod to slide in. I hemmed up the slit to the curved U part at the top and covered that portion with binding, it's not pretty, but it works. I fit the cover on the machine and hemmed the last side so it wasn't too long. Then I made six ties (they took the longest to make because I only cut the fabric 1 1/4" wide and they were fiddly to get folded and sewn up, but they look great because they are so thin). The ties are a little two long, but I didn't want to take the time to make the perfect length so I left them at WOF and just cut the selvedges off. The sides and the back are secured with the ties. I love the cover. It's pretty and functional.
The front

The back

I sewed this up in about 3 hours. It was easy to make and I loved that I got just exactly what I needed. Here's how I did it. I took a rectangle of fabric about 20" x WOF and hemmed up the two long sides and one short side. The unhemmed short side would be the back. I cut a slit up the back for the thread guide rod to slide in. I hemmed up the slit to the curved U part at the top and covered that portion with binding, it's not pretty, but it works. I fit the cover on the machine and hemmed the last side so it wasn't too long. Then I made six ties (they took the longest to make because I only cut the fabric 1 1/4" wide and they were fiddly to get folded and sewn up, but they look great because they are so thin). The ties are a little two long, but I didn't want to take the time to make the perfect length so I left them at WOF and just cut the selvedges off. The sides and the back are secured with the ties. I love the cover. It's pretty and functional.
Tuesday, August 16, 2016
Ironing Board Cover Finished
I made my ironing board cover this morning. The project took me a couple of hours. I cut the fabric out using the ironing board as a pattern, then I ironed and sewed up a casing for the elastic, finally feeding the elastic into the casing and securing it. I used 2 yards of 44" wide cotton fabric and 2 1/4 yards of 1/2" elastic. I left the old cover on underneath this cover to give myself some extra padding.


Friday, August 12, 2016
Sawtooth Stars Wall Hanging
I finished the wall hanging and it's been on the wall for the last few days. It was really easy to make and I love it on the wall.


After I finish up this scrappy top I'll start working on my scrappy string blocks. I have to make 49 of them and I have only one made so far.
I won't be assembling the scrappy 16 patch blocks quilt top into a quilt sandwich for quilting until I finish the scrappy string block quilt top.
The pre-printed vest project called "Needle Art From My Heart" was awful. I hated the stiffness of the pre-printed fabric. I couldn't make myself finish it. I threw the whole thing in the trash.
I have to make a new ironing board cover and I'll start that this weekend. It won't take long to get a new cover made. I'm using this:


I have resumed making my scrappy 16 patch blocks and I finished making all 35 of them today. I'm in the process of putting the sashing and the rows together and in a few days I should have a quilt top.
Here are the first two rows of blocks sewn up.

I won't be assembling the scrappy 16 patch blocks quilt top into a quilt sandwich for quilting until I finish the scrappy string block quilt top.
The pre-printed vest project called "Needle Art From My Heart" was awful. I hated the stiffness of the pre-printed fabric. I couldn't make myself finish it. I threw the whole thing in the trash.
I have to make a new ironing board cover and I'll start that this weekend. It won't take long to get a new cover made. I'm using this:

Wednesday, November 11, 2015
Emery Sand Reclamation
I reclaimed the emery sand from a pin cushion I made a couple of years ago. The cotton cover on that pin cushion was looking very old with all the pin holes in it. So I took it apart and saved all the emery that was in it and made a new cover. The last time I bought emery sand I bought it at this etsy shop, My Sweet Accent, link here. I see she also sells pin cushions, but I prefer to make my own. I have also purchased emery sand from Nakpunar on Amazon, as well.
I've never used the walnut shells or any of the other nut shells that are sold for pin cushion stuffing because I have not heard good things about them. One person told me that her pins were sticky with some type of residue from the pin cushion she made with the nut shells. You also have to be careful because lots of people have allergies to nuts.
When I make emery sand pin cushions, the emery is placed in its own little pouch so it's contained and easy to reuse. I took the emery from my old pin cushion and added some that I had leftover in my stash. It was originally shipped in a zip loc bag, so I just poured the emery from the old pin cushion in with the leftover to hold it until I was ready for it. I was able to make a new pin cushion with most of that emery. I wanted to make two pin cushions, but I didn't have enough, so one will have to do. I made my pin cushion in a simple rectangle shape.
First I made a cotton pouch to put the emery in. The pouch was made from a piece of cotton. I cut a two pieces of cotton 4" x 6" for the pouch. I sewed up three side of the pouch using a 1.8 stitch length to make it secure using a 1/4" seam allowance. After I made the pouch, I filled it with emery, very carefully. I use a funnel and a spoon with the pouch propped up in a small mixing bowl to catch any loose emery, then I hand sewed the pouch closed using very small stitches.
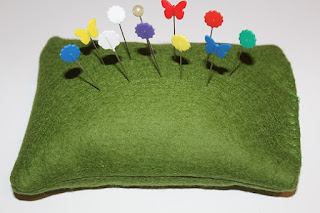
I made the cover with some wool felt I had in my stash and I cut it just about a quarter of an inch bigger than the original cotton pouch so the emery pouch would fit . I sewed up three sides of the cover on the machines with the 1.8 stitch length, using a scant 1/4" seam allowance, (when sewing felt you can use a very tiny seam allowance because the material doesn't fray) turned it right side out, slipped the pouch inside and hand sewed the open end.
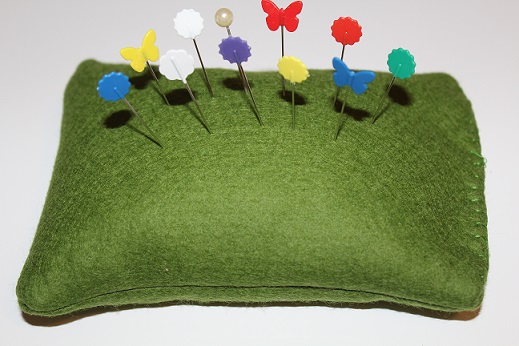
It's done. A new pin cushion with sharpening emery sand for my straight pins.
I've never used the walnut shells or any of the other nut shells that are sold for pin cushion stuffing because I have not heard good things about them. One person told me that her pins were sticky with some type of residue from the pin cushion she made with the nut shells. You also have to be careful because lots of people have allergies to nuts.
When I make emery sand pin cushions, the emery is placed in its own little pouch so it's contained and easy to reuse. I took the emery from my old pin cushion and added some that I had leftover in my stash. It was originally shipped in a zip loc bag, so I just poured the emery from the old pin cushion in with the leftover to hold it until I was ready for it. I was able to make a new pin cushion with most of that emery. I wanted to make two pin cushions, but I didn't have enough, so one will have to do. I made my pin cushion in a simple rectangle shape.
First I made a cotton pouch to put the emery in. The pouch was made from a piece of cotton. I cut a two pieces of cotton 4" x 6" for the pouch. I sewed up three side of the pouch using a 1.8 stitch length to make it secure using a 1/4" seam allowance. After I made the pouch, I filled it with emery, very carefully. I use a funnel and a spoon with the pouch propped up in a small mixing bowl to catch any loose emery, then I hand sewed the pouch closed using very small stitches.
I made the cover with some wool felt I had in my stash and I cut it just about a quarter of an inch bigger than the original cotton pouch so the emery pouch would fit . I sewed up three sides of the cover on the machines with the 1.8 stitch length, using a scant 1/4" seam allowance, (when sewing felt you can use a very tiny seam allowance because the material doesn't fray) turned it right side out, slipped the pouch inside and hand sewed the open end.
It's done. A new pin cushion with sharpening emery sand for my straight pins.
Sunday, March 15, 2015
Disappearing Hourglass Quilted Stand Mixer Cover
I've been wanting to make a disappearing hourglass block since I saw the video by Jenny Doan of Missouri Star Quilt Company demonstrate the process. I even bought fabric to make a quilt top with this block in the future.
Yesterday I decided to make a stand mixer cover to replace the one I bought many years ago. I was only going to make the blocks and jimmy up the cover with some white borders, then I thought the whole thing would look better quilted. So I put borders on the blocks, added some white fabric at the top to pull the two blocks together. I used the white fabric as backing and leftover batting from my last quilt to sandwich it. I quilted it with straight lines and put the blue binding and blue ties on it.

I really like this stand mixer cover and it was the perfect project to get me out of my daylight savings time slump. Now I can move on with my vinyl pouch project.
Tuesday, March 3, 2015
The Christmas Quilt Is Finished.
Here it is. It's kind of ugly but it will give me a a pop of red and green color in the living room during the holidays and it's something that the most destructive kitties in Christendom cannot tear up. You can see the black/red/green poinsettia flowers on the binding material. It kind of blends in with the top, but it shows up nicely on the back.

I'm making fun granny squares to cover a pillow for my pink and green bedroom. I'm using a 16" pillow form, pink yarn leftover from my afghan project, and the pink rose fabric leftover from my pillowcase project.

I'll be working on vinyl pouches after I finish covering my pillow.
I still have to varnish my barn quilt. I want to do that job outside and I'm waiting for drier weather.
Thursday, January 15, 2015
Time To Buy A Bathmat
I'm going to buy a bathmat from Walmart today. I will not be finishing the crochet bathmat I planned to make with the the 1" strips of fabric I sewed together to make fabric yarn. I did a test crochet last night with the ball of yarn I made the other night and I hate it. I just wanted to let you know that I will not be working on this project anymore and you won't see a picture of the little bit I crocheted last night. It is completely U G L Y. I wasted about a week on this sewing/crochet fail and I'm moving on to the items listed below.
1. Recover the cardinal pillow I made last year with red plaid fabric I bought a couple of weeks ago.
2. Cut the squares for my Civil War Buckshot pincushion and order the emery sand.
3. Make the 4 pillow cases with the yardage of Tanya Whelan fabric I purchased last year.
4. Iron the muslin and trace the pattern for the hand embroidery, Never Underestimate A Woman
With A Sewing Machine. Then pick the colors of floss for the embroidery.
5. Organize the box holding more projects, fabrics and supplies.
6. Start the pink fluffy granny square afghan for my bedroom.
1. Recover the cardinal pillow I made last year with red plaid fabric I bought a couple of weeks ago.
2. Cut the squares for my Civil War Buckshot pincushion and order the emery sand.
3. Make the 4 pillow cases with the yardage of Tanya Whelan fabric I purchased last year.
4. Iron the muslin and trace the pattern for the hand embroidery, Never Underestimate A Woman
With A Sewing Machine. Then pick the colors of floss for the embroidery.
5. Organize the box holding more projects, fabrics and supplies.
6. Start the pink fluffy granny square afghan for my bedroom.

Thursday, January 8, 2015
Look! They Match!
My big and little ironing board covers match now. I covered the little ironing board last month and on Monday night I made the new cover for the big ironing board. It took me a couple of hours to make it while I watched TV. It's nice to have matching covers on my ironing boards. I'm thinking about making matching machine covers for all the sewing machines, but that will have to wait for a little while.

I've added a couple of quickie projects to my list. I'm going to make myself a bathmat (pieced quilting cotton quilted to an old towel) and a dishmat, same idea as the bathmat but for the kitchen counter as a place to put wet just washed dishes when my dish drainer is overflowing.
I also just ordered some yarn to make a big fluffy pink crocheted afghan for my bedroom. I'm going to use a size N/P crochet hook and a double strand of Red Heart Super Saver making a large granny square. These afghans work up really quick and are super warm. I make these a lot when I want to get a big fluffy blanket done in a hurry.
Here's a picture of the one I made with my scraps last year.


I'll be playing with my embroidery machine this weekend. I have plenty of tear away stabilizer, thread, and bobbins.
I've added a couple of quickie projects to my list. I'm going to make myself a bathmat (pieced quilting cotton quilted to an old towel) and a dishmat, same idea as the bathmat but for the kitchen counter as a place to put wet just washed dishes when my dish drainer is overflowing.
I also just ordered some yarn to make a big fluffy pink crocheted afghan for my bedroom. I'm going to use a size N/P crochet hook and a double strand of Red Heart Super Saver making a large granny square. These afghans work up really quick and are super warm. I make these a lot when I want to get a big fluffy blanket done in a hurry.
Here's a picture of the one I made with my scraps last year.
Here's a picture of the one I made for my daughter in a teal color. This one has a crab stitch border on the edge.
I'll be playing with my embroidery machine this weekend. I have plenty of tear away stabilizer, thread, and bobbins.
Saturday, December 13, 2014
Recycled Duvet Cover Makes a Super Utility Quilt
Last year I wanted to make myself a utility quilt for the car/beach but I didn't want to take the time to piece a top with nice fabric. I wanted to experiment. I was thinking about using some used twin sheets to make my quilt, so I went on ebay and found this twin duvet cover. I can't remember what I paid for the duvet cover, I think it was about $18.00. I washed the cover and I stuffed a twin Hobbs Heirloom 80/20 batt in it and pin basted it. There is space on the edges of the long ends where the batt did not quite fill the cover completely and I probably could have pieced some of the extra batting from the short end to fill that in, but I didn't want to fuss with it. I did straight line quilting on it diagonally with my walking foot on my domestic machine. After I finished quilting it, I folded in the open end of the cover and top stitched that closed. One of the best parts of this project was that I did not need to bind the finished quilt. This quilt is super heavy and really useful.
I love the madras plaid fabric (it looks like it was pieced by a quilter) on the top. The bottom is the blue strip.

Sunday, November 30, 2014
Not So Pretty Potholders and Pretty Ironing Board Cover
I made some not so pretty potholders to match my blue and yellow kitchen curtains this weekend. I used scraps of different fabrics for the first set because I thought it would be pretty, but they didn't turn out as cute as I wanted them to. I made the round set after the square set because I thought they would turn out better. Not. All of these potholders are, however, very functional, since I used a layer of 100% cotton batting and a layer of Insulbrite in each one. The binding is a tad messy on the scrappy potholders and the round ones just curled up after I applied the bias binding. Crazy potholders. I also had a chance to crochet a new dishcloth, using up some of the tons of white cotton yarn I accumulated for some project or another that I now be using for new dishcloths for my kitchen.

I made a new cover for my new small ironing board this weekend. This ironing board came with a very thin muslin cover and a super thin layer of batting under the cover. The muslin started to stain after two uses. I sometimes spray my fabric with water to get out the tough wrinkles and the water stained the light beige muslin and that's when I knew I had to re-cover it. I made a quick cover for the ironing board and I beefed up the inside with one layer of cotton batting and one layer of Insulbrite. I left the old cover on it and used the ironing board as my pattern (I love this trick, learned on the Internets). I put my fabric on the floor and turned the ironing board upside down on it and cut around the board giving myself about 4 inches for side coverage and my elastic casing. I cut the batting and Insulbrite the exact size of the top of the ironing board with no overhang for a neater look. I made a casing for my 1/2 inch elastic and threaded the elastic in it. I put the new cover on the board over the old cover along with the new insulating layers and tightened the elastic, knotting it really well. That cover is on there to stay, I can't get it off without cutting the elastic. I love the blue and I love the thickness of it. It's perfect.


I washed some of fabric for my new quilt project. I'm ironing today. These are the pinks and greens, the patterns are for the top and the solid pink is the backing fabric. The white fabric that also goes on the top will be washed today. I'll start cutting soon.

I made a new cover for my new small ironing board this weekend. This ironing board came with a very thin muslin cover and a super thin layer of batting under the cover. The muslin started to stain after two uses. I sometimes spray my fabric with water to get out the tough wrinkles and the water stained the light beige muslin and that's when I knew I had to re-cover it. I made a quick cover for the ironing board and I beefed up the inside with one layer of cotton batting and one layer of Insulbrite. I left the old cover on it and used the ironing board as my pattern (I love this trick, learned on the Internets). I put my fabric on the floor and turned the ironing board upside down on it and cut around the board giving myself about 4 inches for side coverage and my elastic casing. I cut the batting and Insulbrite the exact size of the top of the ironing board with no overhang for a neater look. I made a casing for my 1/2 inch elastic and threaded the elastic in it. I put the new cover on the board over the old cover along with the new insulating layers and tightened the elastic, knotting it really well. That cover is on there to stay, I can't get it off without cutting the elastic. I love the blue and I love the thickness of it. It's perfect.
I washed some of fabric for my new quilt project. I'm ironing today. These are the pinks and greens, the patterns are for the top and the solid pink is the backing fabric. The white fabric that also goes on the top will be washed today. I'll start cutting soon.
Sunday, November 23, 2014
Cat Pillow Done and Another Project Started
I finished the cat pillow today. I had to dog sit my granddog at my home this weekend. He is an American Bulldog and he always scares my kitties, so I have to stay with him the entire time he is in my home. Yesterday I spent my day setting up my new computer and today I finished one sewing project and started a new one.
This is the fabric before I turned it into a pillow cover.


 \
\
This is the fabric before I turned it into a pillow cover.
And this is the front of the finished pillow. I made the pillow envelope style. It was really easy once I got the fabric made. I put a muslin back on the fabric and I sewed the fabric to the muslin for stability. The muslin also gave the fabric a lot of body.
I started my patriotic door decoration for next summer. It's a simple star, 10" squares made into half square triangles that is super easy to make.
\
I have the rows put together now and the backing is sewn to it. I didn't put any batting in it, but I am going to bind it with top with the back and I'm using the blue fabric to bind it.
I should have the binding done in a couple of days and I'll share the finish with you.
Tuesday, November 18, 2014
Making a Pillow Cover with Laurel Burch Kitty Fabrics
I love, love, love Laurel Burch Cats. I have a few bags, earrings, and socks with her colorful cats on them.
I also collected a few different Laurel Burch fabrics over the last few months that I have been wanting to use to cover an 18" pillow form.
Here is one strip of the fabric I'm creating to cover my pillow. I have to make one more strip like this, then I can sew the two together to have enough fabric to cover my pillow.


I also collected a few different Laurel Burch fabrics over the last few months that I have been wanting to use to cover an 18" pillow form.
Here is one strip of the fabric I'm creating to cover my pillow. I have to make one more strip like this, then I can sew the two together to have enough fabric to cover my pillow.
Subscribe to:
Posts (Atom)