Pages

Showing posts with label muslin. Show all posts

Wednesday, July 27, 2016

Scrappy 16-Patch Blocks

   I finished my red plaid nightgown.  I didn't match up any of the plaids on the seams so it's not very pretty and I won't show a picture of it.  Suffice to say, I love it and that's all that matters sometimes.

   I started working on my next quilt project.  I'm making a scrappy quilt with 16-patch blocks set with white sashing.  I finished these three blocks.  I'm planning a quilt with 35 blocks, 7 rows of 5 blocks each.  The white sashing fabric should arrive by Saturday.


    I washed 4 1/2" yards of muslin this evening.  I bought it this morning at Walmart.  It was $3.97 a yard and I took all the material that was left on the bolt.  I will be making a lining for the "Needle Art From My Heart" vest with some of this muslin.  The rest of the muslin will go into stash.


Tuesday, July 26, 2016

Look What I Found In My Storage Box Of Projects

   I bought this vest a few months ago and completely forgot about it.  It's a panel by Leslie  Beck called "Needle Art From My Heart."


   I love the artwork on this panel, it's sew cute.


   I'm going out tomorrow for some natural muslin for the lining for the vest.  I'm looking forward to making this project.  

   I had a productive morning cutting out and sewing the plaid nightgown.  I'm almost done with it.  I just have to apply the bias binding on the neck and armholes, and hem it.  That project will be finished tomorrow.


Saturday, May 2, 2015

Bead/Sewing Cat Picture Project


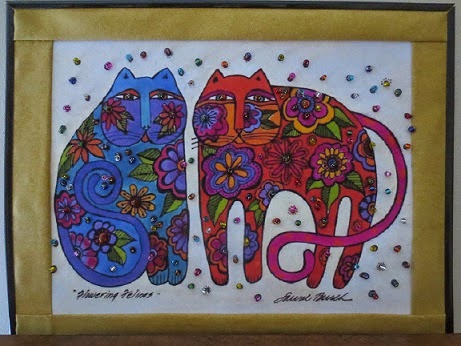
  I found this pretty picture on the internet.  This is an art drawing by Laurel Burch.  It's called "Flowering Felines."

   Ms. Burch drew colorful pictures of cats, dogs, horses, sea life and plant life.  Unfortunately, Ms. Burch passed away several years ago.  I found her work after I bought my bengal kittens, Taffy Morgana and Merlin almost 10 years ago.  I was all into cat everything and I knew I had to have some Laurel Burch cat stuff.  I bought a few pieces of jewelry, two pair of socks and three bags, but I never had anything by her to hang on my wall.  This picture is going on my wall with a few enhancements.

   Here are the two pair of enamel earrings that I cherish.


   Back to the picture.  After looking at Flowering Felines for a while I decided that beads were the way to go.  I wanted this picture to shimmer when the light hit it.  I printed the picture onto a fabric sheet made for my ink jet printer.  I used Avery 3384, 8 1/2" x 11" printable fabric sheets.  It worked very well in my HP ink jet printer and it printed right the first time.  When you use this type of product you have to make sure you put the fabric sheet in paper tray right so the picture prints on the fabric side.  The other side is glossy and has the adhesive to make the sheet an iron on.  I did a quick print test to make sure I put the fabric sheet in the paper tray the right way.  I mark a piece of paper indicating which way the paper was set in the paper tray so after I print I can figure out which way my fabric sheet should go in.  It only takes a minute to do and is worth the trouble to get the picture printed right on the fabric sheet.

    After printing my picture, I ironed it to a piece of muslin to stabilize it before I started adding beads.   The piece was stiff and I could not put it in an embroidery hoop.  I also had a hard time finding the exact spots I wanted to put my beads from the back side of the work, but I used a flashlight to pin point the exact spot I wanted to put my needle in from the back and that helped a lot.

     I did all the beads in the cats first, then I added the orange borders and finished beading the dots outside of the cats.  By the way, I thought sewing the orange borders on through the fabric sheet would leave an adhesive residue on my sewing machine needle, but it did not and it was really easy to sew through.  That was a nice surprise.  I used gold metallic embroidery thread to put the beads on and it was a real pain to work with.  I had a hard time separating my threads and keeping them from shredding while I sewed, but I wanted shimmer and I thought cotton embroidery thread would dull the shine of the beads.  I used multi colored 6/0 glass beads by Craft Designer that I found at Joann's Fabrics.

   The beading was done and it was time to frame this.  I bought the frame at Walmart for $5.00.  It was a 10" x 13" floating frame and the black part of the frame is actually clips that secure the piece to the glass.  Super easy.


Up close of the  beads.


   Cost for my picture was about $15.75.

   Done.

Thursday, February 12, 2015

Granny Square Quilt - A Finish from Last August

         I had a couple of jelly rolls that I bought for DD.  I thought she might like to make herself a quilt at some point.  She told me she doesn't have a lot of interest in making a quilt (she enjoys making smaller, quicker projects) so I told her I would make the quilt for her.  The jelly rolls were called "Wilderness" and I bought them at Connecting Threads right after I started quilting in 2012.  I knew we needed some additional  yardage to go with the jelly rolls so I asked her for her input and she suggested the cream and the turquoise solids.  To cut down on the inevitable duplication with the jelly roll fabrics, I also added some of my stash that I thought would look good.  I picked the pattern, the good old granny square.  You can see I quilted it with my walking foot in a grid pattern.  The back is a dyed muslin (she picked that fabric out as well) with blocks I made especially for the back pieced into it.  I used the dyed muslin for the binding as well.  Of course, she loves it.  So glad I made this for her and she was able to help with the planning.


Sunday, November 30, 2014

Not So Pretty Potholders and Pretty Ironing Board Cover

     I made some not so pretty potholders to match my blue and yellow kitchen curtains this weekend.  I used scraps of different fabrics for the first set because I thought it would be pretty, but they didn't turn out as cute as I wanted them to.  I made the round set after the square set because I thought they would turn out better.  Not.  All of these potholders are, however, very functional, since I used a layer of 100% cotton batting and a layer of Insulbrite in each one.  The binding is a tad messy on the scrappy potholders and the round ones just curled up after I applied the bias binding.  Crazy potholders.  I also had a chance to crochet a new dishcloth, using up some of the tons of white cotton yarn I accumulated for some project or another that I now be using for new dishcloths for my kitchen.


    I made a new cover for my new small ironing board this weekend.  This ironing board came with a very thin muslin cover and a super thin layer of batting under the cover.  The muslin started to stain after two uses.  I sometimes spray my fabric with water to get out the tough wrinkles and the water stained the light beige muslin and that's when I knew I had to re-cover it.  I made a quick cover for the ironing board and I beefed up the inside with one layer of cotton batting and one layer of Insulbrite.  I left the old cover on it and used the ironing board as my pattern (I love this trick, learned on the Internets).  I put my fabric on the floor and turned the ironing board upside down on it and cut around the board giving myself about 4 inches for side coverage and  my elastic casing.  I cut the batting and Insulbrite the exact size of the top of the ironing board with no overhang for a neater look.  I made a casing for my 1/2 inch elastic and threaded the elastic in it.  I put the new cover on the board over the old cover along with the new insulating layers and tightened the elastic, knotting it really well.  That cover is on there to stay, I can't get it off without cutting the elastic.  I love the blue and I love the thickness of it.  It's perfect.


  I  washed some of fabric for my new quilt project.  I'm ironing today.  These are the pinks and greens, the patterns are for the top and the solid pink is the backing fabric.  The white fabric that also goes on the top will be washed today.  I'll start cutting soon.