I can't believe how many cute ideas I found to distract me this year. I'm still working on several projects that are Christmas related. I'm afraid that I will be Christmas crafting into the New Year.
I did manage to finish dear daughter's table runner, some small tree ornaments, and her star garland, but I'm still working on the decoupaged cookie plates, my table runner, some fabric covered Christmas tree forms, and a star garland for me. My star garland may go up after I finish it and stay up all year. Here is a picture of dear daughter's garland on her China cabinet. She added fairy lights and it looks pretty. I love the way this turned out and the stars are so easy to make.
Other things I want to make are felt tree ornaments. I found this picture on the internet and thought these felt ornaments were adorable.
I saw this picture a bunch of times for different ads. The day I took this picture they were advertising Hobby Lobby craft store. I have not been able to find this picture on Pinterest with a link to instructions or patterns, so dear daughter I made our own ornaments with green felt in the shape of a Christmas tree and we beaded them for her co-workers.
I also want to make some string art. I found a string art star with instructions here.
As usual, I spent too much time watching YouTube videos showing items made from thrift store finds and I saw some interesting wood burning ornaments being made by using 4" wood rounds that you can get at Amazon.
One person was walking through a Antique store or 2nd hand shop and I also saw something I have to make. It's a paper garland made from hymnal pages. It's super simple, fan folding the pages and gluing a bunch together to make a long piece that you wind around a piece of twine. I don't have a good picture of it but I took this screen shot from the video where I saw it.
I have looked on Pinterest and all over the Internet for a better picture or even instructions but could not find anything similar. I fell in love with this garland, so much so that I bought a Baptist hymnal on Christmas day for this project. I have the glue and twine.
I don't know when I'll finish Christmas decorations, I just hope I finish before next Christmas.
I like to sew, quilt, crochet and knit in my free time and this blog is all about my projects, past and present.
Showing posts with label beads. Show all posts
Friday, December 27, 2019
Monday, December 3, 2018
Lots of Snowmen
I made the rest of the snowmen ornaments and used up every inch of the white felted wool I bought. Very little waste on this project and I love these guys. There are twenty three of them. I made two banners of ten snowmen each with some bakers twine and they are hanging in my living room. The other three are standing with my trees in my dining room. So much fun.
Monday, July 2, 2018
More Snowmen
All the snowmen ornaments are done. I will not be making any more of these this year. I still have more white wool, buttons and beads to make more, but they will have to wait. It took me a whole week to make these ornaments in my spare time. I will be sharing these with my dear daughter. These snowmen were so much fun to make, but it's time to move along and get started on other projects.
Monday, December 14, 2015
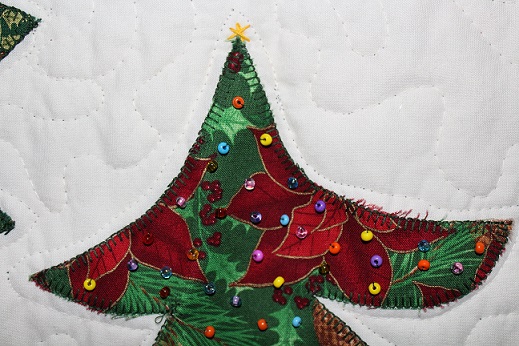
My Favorite Wonky Christmas Tree Wall Hanging
This was one of the first raw edge applique projects I ever did. I hand drew the Christmas tree pattern (love the wonky branches) and cut the trees out from three different fabrics. Each tree has a bunch of little colored beads on it. I wanted sequins but could not find any so I settled for beads. I made this originally to hang on my front door for the Christmas season. It has been replaced on the front door with a cardinal decoration and the trees now hang on the inside of the door.
Tuesday, November 10, 2015
Small Fabric Christmas Trees - Fun Sewing
I love to watch Debbie Shore sewing tutorials on youtube and in one of her videos she makes these ultra cute stuffed Christmas or any holiday or season trees. Here is a link to her video: fabric Christmas tree tutorial.
They are super simple to make. I just drew a big triangle on a piece of card stock and used that as my template for my tree pieces. I used fabrics I found in my stash and you can decorate them with thread, beads, bells, buttons or even some of those miniature ornaments you find at the craft store. I just tied some ribbon to the top to get the pictures done. I can also see these as a sweet decoration in rooms with color coordinating fabrics and this would so make a cool big pin cushion near the sewing machine in a pinch.
I did take some time off from working on my quilted shower curtain to make these trees because I needed a little break, but the shower curtain is coming along. I have the top done and I also added the backing. I'm in the middle of doing the quilting. Once I finish the quilting, I will add the buttonholes for hanging and it will be done. I should have it done in a couple of days and I will share pictures then.
Saturday, May 2, 2015
Bead/Sewing Cat Picture Project
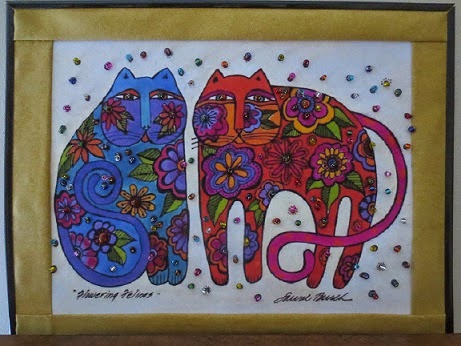
I found this pretty picture on the internet. This is an art drawing by Laurel Burch. It's called "Flowering Felines."
Ms. Burch drew colorful pictures of cats, dogs, horses, sea life and plant life. Unfortunately, Ms. Burch passed away several years ago. I found her work after I bought my bengal kittens, Taffy Morgana and Merlin almost 10 years ago. I was all into cat everything and I knew I had to have some Laurel Burch cat stuff. I bought a few pieces of jewelry, two pair of socks and three bags, but I never had anything by her to hang on my wall. This picture is going on my wall with a few enhancements.
Here are the two pair of enamel earrings that I cherish.
Back to the picture. After looking at Flowering Felines for a while I decided that beads were the way to go. I wanted this picture to shimmer when the light hit it. I printed the picture onto a fabric sheet made for my ink jet printer. I used Avery 3384, 8 1/2" x 11" printable fabric sheets. It worked very well in my HP ink jet printer and it printed right the first time. When you use this type of product you have to make sure you put the fabric sheet in paper tray right so the picture prints on the fabric side. The other side is glossy and has the adhesive to make the sheet an iron on. I did a quick print test to make sure I put the fabric sheet in the paper tray the right way. I mark a piece of paper indicating which way the paper was set in the paper tray so after I print I can figure out which way my fabric sheet should go in. It only takes a minute to do and is worth the trouble to get the picture printed right on the fabric sheet.
After printing my picture, I ironed it to a piece of muslin to stabilize it before I started adding beads. The piece was stiff and I could not put it in an embroidery hoop. I also had a hard time finding the exact spots I wanted to put my beads from the back side of the work, but I used a flashlight to pin point the exact spot I wanted to put my needle in from the back and that helped a lot.
I did all the beads in the cats first, then I added the orange borders and finished beading the dots outside of the cats. By the way, I thought sewing the orange borders on through the fabric sheet would leave an adhesive residue on my sewing machine needle, but it did not and it was really easy to sew through. That was a nice surprise. I used gold metallic embroidery thread to put the beads on and it was a real pain to work with. I had a hard time separating my threads and keeping them from shredding while I sewed, but I wanted shimmer and I thought cotton embroidery thread would dull the shine of the beads. I used multi colored 6/0 glass beads by Craft Designer that I found at Joann's Fabrics.
The beading was done and it was time to frame this. I bought the frame at Walmart for $5.00. It was a 10" x 13" floating frame and the black part of the frame is actually clips that secure the piece to the glass. Super easy.
Up close of the beads.
Cost for my picture was about $15.75.
Done.
Sunday, April 26, 2015
Beaded Stilettos
I finally found my turkey lacer skewers at Bed Bath and Beyond yesterday while I was out and about. We have a Michaels store in the same shopping center so I thought I could find some beads there. They must be in the process of re-organizing or deleting their bead section because it was gone except for a few packages on the end of the aisle. I didn't like what was out so I went to JoAnn's this morning and found beads.
Here are the beaded stilettos I made for myself.
I'd like to make more of these using a better glue and a longer skewer. I used Aleenes Metal and Jewelry glue, which is like a super glue. These skewers were kind of short and when you put big beads on them you don't have a lot of skewer left.
Just in case you are wondering, my friend contacted me about the Singer 401A sewing machine and she wants it back. We just have to find a day and time to meet halfway and I'll give it back to her.
Tuesday, April 14, 2015
Old and New Tools
Beaded Stilettos
I love seeing the pretty beaded stilettos that are being swapped on the Quilting Board. I got one in a swap a couple of years ago. I usually use a bamboo double pointed knitting needle as a stiletto because I have a ton of these. I also have these porcupine quill that I bought because they are so pretty. I don't always use a stiletto when I'm sewing, but I should. I moving my stiletto collection to my handy tool box that I keep by the machine.
Here's my stiletto collection.
And guess what? I found a tutorial on how to make beaded stilettos at this link. and I'll be adding that idea to my projects list.
Wooden Ruler Holder
I just got this cool wooden ruler holder from a seller on etsy. I've been wanting one for a couple of years, but I needed so many things, it always got pushed to the end of the list.
Mini Quilt Frame
I had to have this mini quilt frame. I bought it from Connecting Threads. I like the scrolly feet and the wavy pattern all the way around the frame. So cute. The piece that is draped on the frame is my attempt at a mini quilt that I make last week but I don't love it. Yesterday while I was reading quilt blogs I found a tutorial to make a small 5" snail trail block, (link here) and I'll be pulling fabrics for that soon. My mini quilt frame deserves something pretty on it.
I love seeing the pretty beaded stilettos that are being swapped on the Quilting Board. I got one in a swap a couple of years ago. I usually use a bamboo double pointed knitting needle as a stiletto because I have a ton of these. I also have these porcupine quill that I bought because they are so pretty. I don't always use a stiletto when I'm sewing, but I should. I moving my stiletto collection to my handy tool box that I keep by the machine.
Here's my stiletto collection.
And guess what? I found a tutorial on how to make beaded stilettos at this link. and I'll be adding that idea to my projects list.
Wooden Ruler Holder
I just got this cool wooden ruler holder from a seller on etsy. I've been wanting one for a couple of years, but I needed so many things, it always got pushed to the end of the list.
Mini Quilt Frame
I had to have this mini quilt frame. I bought it from Connecting Threads. I like the scrolly feet and the wavy pattern all the way around the frame. So cute. The piece that is draped on the frame is my attempt at a mini quilt that I make last week but I don't love it. Yesterday while I was reading quilt blogs I found a tutorial to make a small 5" snail trail block, (link here) and I'll be pulling fabrics for that soon. My mini quilt frame deserves something pretty on it.
Subscribe to:
Posts (Atom)