Pages

Showing posts with label thread. Show all posts

Wednesday, August 26, 2020

Making Little Things and Changing My Scrap Quilt

 I made one secret birthday sewing project and I think I will make two more.  They are quick projects that take about 2.5 hours each from first cut of fabric to last stitch so I can get them sewn up in an afternoon or evening.  No pictures until after the birthday girl opens her pressies.

I cleaned my office and organized it a little bit.  I found this piece that I did several years ago.  I took this Laurel Burch picture (I love Laurel Burch's artwork) off the internet and printed it on an 8.5" x 11" piece of fabric that is designed to be fed through the printer.  I put a gold border on it and a backing and sewed beads where all the dots are on the picture.  I framed it in a simple clip frame and put it in the window of my office.  The gold fabric faded so I replaced it with this pretty gray.  I just have to find a frame for it now.  


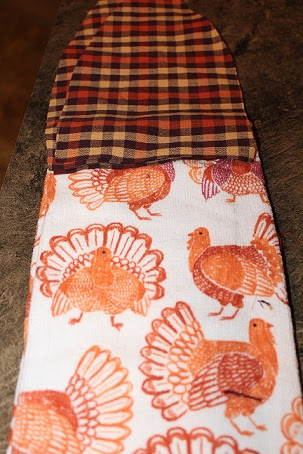
Dear daughter has requested some fall hanging dishtowels.  I'm making them with this ugly orange turkey dishtowel I bought a couple of years ago and this pretty orange and brown homespun.

I took my scrap quilt apart.  I had originally sewed four patches together, alternating white, beige and print fabrics and I planned to put them together with seams matching, but I'm not doing a real good job keeping my seams even so I'm going to offset the seams on each row of four patches.  To do this I had to take the six rows I had already sewn apart and re-sew them.  I got that done last night.  Now I can move on to make more rows.


Here are some current pictures of my cats.  They turned 15 in May and I think they still look like kittens.

This is Merlin, the older brother.  He is a great boy cat.  So loving.  He keeps me and his sister in line.  He is the security office and the nosiest animal I ever saw.


This is Taffy Morgana, his sister.  She was born last in the litter of three.  She is a sweet little snuggle bug (took her five years to figure out that the lap is the place to be).  Loves to sit on my lap whenever and even sleeps in the bed with me.


Tuesday, July 28, 2020

Some Little Projects

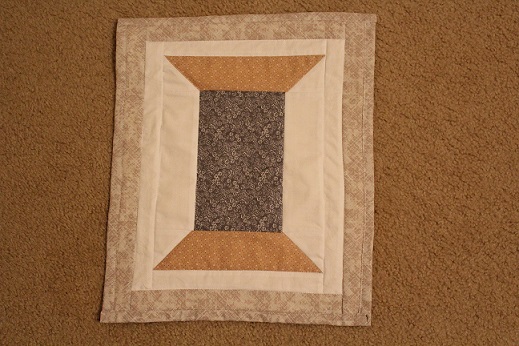
I took time on Sunday morning to make a spool block to decorate my sewing space.  I used the MSQC youtube tutorial to make the block.  It was fun and I would love to make a full quilt with spools.


I also got my embroidery done that I wanted.  It was much easier the fourth time.  These were made with white thread on navy blue fabric.


Saturday, May 16, 2020

Lots More Navy Blue Gingham Items For The Kitchen

My large 40 ounce white teapot needed a tea cozy.  I put a ruffle on this one.  I keep this teapot in the pantry but now it's ready to use with a nice roomy cozy.


Pot holders.  I made these to be a wall decoration in the kitchen.  I'm putting them up with velco command strips.


Apron/dress for my dish detergent bottle.  This was easy and fun to make.  I actually ended up using glue to secure the bias binding on the back because the binding strip was too narrow to sew on the back.


Stand mixer cover.


And I still have about two and a half yards of the blue gingham.   I haven't made the toaster cover or a cookbook cover.  Two things that may happen in the future.


Thursday, April 30, 2020

More Navy Gingham In The Kitchen

I  made a quilted tea cozy for my little blue tea pot with that lovely navy blue gingham. 


It looks like my toaster may be next for a new blue gingham cover.


Wednesday, October 23, 2019

Need to Baste, Use Needle and Thread or Pins, Not Glue

   I am a member of the Quilting Board which is an on-line quilting community.  I am amazed at the number of people on the board that use Elmers School Glue for basting quilt sandwiches, basting English paper piecing papers to fabric, basting seams, and basting zippers.

    I recently read a post by a person who wanted help because they used too much glue on their English Paper Piecing papers and the fabric was stuck to them and wondered how to fix the over use of glue.   It took all I had not to respond that using glue instead of thread to baste was just not smart.

    I have never used Elmers School Glue in my sewing.  If I want to baste something I get a needle and thread and baste it by hand or by machine.  I use large safety pins to pin baste my quilt sandwiches.  That's what sewing is all about, needle, thread and pins.  Not glue.

    I have used fusible interfacing, fleece, and webbing in my sewing.  I have also been intrigued by the two sided tape used to stabilize zippers (Dritz Wash Away Wonder Tape) but I have never used any.

    I would NEVER take the Elmers to my fabric.  Yes, I understand that the glue washes out, but  I think it's gross and really unnecessary.  It makes me wonder if the folks that are using glue don't really like to sew at all.

Monday, April 1, 2019

Crocheted Flower Garland

    I crocheted up the green thread that I received on Saturday.   Since the flowers were already made I just had to make the vine to add the flower (spool pin doilies).  It took me about an hour and a half to get all these flowers on.  This turned out really well and I'm going to hang it in my living room between the two spot lights that are on the ceiling.


Thursday, March 28, 2019

Flower Garland and Wedding Gift

     I'm going to use up all the spool pin doilies I haven't given away and make a garland to hang in my living room for spring.  I ordered a dark green cotton thread and I'm going to crochet a chain adding flowers as I go.  I have approximately 129 spool pin doilies made and I'm going to keep crocheting a chain until I run out of green thread.


   While I'm doing this, I'm knitting yellow dishcloths and making some pretty potholders for a special niece who is getting married in the summer.  I ordered two yards of this lovely fabric to make the potholders.  My DD and I had already purchased gifts from her registry, but I decided that she needed some homemade things in her kitchen.  She is not expecting this so this will be a nice surprise for her.

    Here's the fabric for the special potholders.


    I'm still working on my hexagon quilt top, or should I say, not working on it.  It seems I'm finding all manner of different projects to do that take me away from that monster.  I'll get back to it as soon as I finish my potholder dishcloth projects.

Friday, March 8, 2019

Gift Set

    I made a gift set for a friend this week.  I knitted her three dishcloths and made her two quilted potholders for her kitchen.  She loves handmade items and will enjoy having these in her kitchen.

    I had everything I needed for the potholders in my stash of fabric, Insul-brite and cotton batting.  I put a layer of Insul-brite in between two layers of cotton batting in the sandwich of my potholders.  It wasn't too thick to sew using my Accu-feed foot on my Janome machine.  The yellow cotton yarn was a new purchase bought specifically to make sunny dishcloths for my friends and family.


Saturday, August 18, 2018

Wild Christmas Pillow Cover

    I made myself a bright and wild red and green Christmas pillow cover.  I love it.  I found the fabrics on Etsy and I used the quilted pillow cover tutorial here. 


Saturday, August 11, 2018

Okay, This Is One Quick Project

  I made this purse from more of my souvenir fabric last night after work.  It took me about an hour and 45 minutes.  Love this.


   And I made this one this morning.  More souvenir fabric.


Wednesday, August 8, 2018

More Pretty Bags

   I made a couple of different quilted bags with more of the fabric from Hawaii.


Saturday, August 4, 2018

Secret Sewing Is Done, On To Selfish Sewing And Making

     I can't believe it's August already.  This year is flying by.  I've only made one trip to the beach this summer so my summer season has not been filled with fun and excitement, just working and doing regular household and life maintenance.   I am trying to schedule more beach day trips before the end of September.

    I'm so glad that I I finished five secret sewing projects last week for dear daughter's birthday in November.  It's hard for me to do secret sewing because I can't share it on social media until after it is gifted.

     My selfish sewing projects start with this adorable snow family fabric.  I found this at JoAnn's a couple of years ago and I made some hanging dishtowels with it to give away to my Christmas day hostess.  I have been wanting more of this fabric ever since.

    I found the snow family fabric again last weekend and had to buy it.   I made this quilted pillow with a whole cloth piece of the cute snow family fabric so I could see all the little family members.  I especially love the kitty and doggy in this print.  I cut the fabric a little bigger than my sixteen inch pillow form to allow for the quilting and I cross hatch quilted the top piece with a scrap of 80/20 Heirloom batting and a white muslin backing.  Then I joined this quilted top to an envelope backing.  It was really simple and I love it.

   The front of the pillow.


   The back of the pillow.


   Close up of snow kitty with a redbird on its head.


    I found another YouTube pieced pillow cover tutorial that I just love.  I have purchased red and green Christmas fabric to make one for me.  Here is a link to the tutorial:   quilted pillow cover tutorial.  This tutorial is really well done and I used the dimensions to make the whole cloth pillow cover that I made above.

    I still have to make the tote bags from my Hawaii souvenir fabric and that fabric is sitting on my ironing board waiting patiently.

    There is one more Christmas decoration that I want to make.  I have a crochet angel dishcloth pattern that I want to experiment with by making the pattern with worsted white cotton yarn combined with silver crochet size 10 thread.  I want to make a couple for me and a couple for dear daughter for Christmas decorations.  I'll have to see how the first one turns out before I commit to making four.  LOL.

    I have knit 24 dishcloths since the beginning of the year.  I am finished with knitting dishcloths for awhile.  I have plenty to give to dear daughter and keep for me.  I still have to get back to my hexagon quilt top and my crochet blankets that I started.


Friday, March 30, 2018

Call Her By Her Name

    I decided on the perfect name for my Singer Serger a few weeks ago.  She is now known as Dolly.  I love musicals and "Hello Dolly" is one of my favorites.  This machine is just as sassy and lovable as the main character in that movie.  I have had a couple of problems with threading her but it was all operator error.  Once I figured out exactly how to thread her correctly, it was all good and she works great.   I have a light grey thread running through her right now and it works for everything I'm doing at the moment.

    I spent the last couple of days putting a three thread rolled hem on the scarves I made a few weeks ago.  Originally I put a narrow rolled hem on them with my sewing machine (without a rolled hem foot because I like to live dangerously) but I wasn't happy with the finished product, it wasn't very neat and it needed to be fixed.  So I fixed them.

     See my lovely scarves now.  In the first picture you can see the beautiful three thread rolled hem I did on Dolly.


Sunday, February 11, 2018

I Changed My Mind

    I have a love/hate relationship with sergers.  I bought a Juki serger about three years ago that worked well for about a year and then the tension went wonky and I couldn't fix it.  I took that machine to Goodwill about a year ago and I thought I would be through with sergers forever.

     I really love what you can do with sergers, rolled hems, seam finishing, etc., so every once in a while I try to work out a way to own one without spending a boatload of money.  I wish I could afford a machine with air threading and all the fancy stitches, but that's not happening now.  So I spent the last weekend trying to find a machine I could afford and I settled on the Singer14T968DC, Professional 5, five thread serger that comes with 7 presser feet. I bought it from Allbrands.com.  I have made four purchases from Allbrands.com and I have been happy with all four purchases.

    I received the machine on Thursday (it was ordered on the previous Saturday) and took it out of the box.  I also downloaded the owner's manual/workbook from the Singer website and that is on my computer now.

    Here she is: 


   In the bottom picture the machine is threaded for 3 thread overlock stitching.  You can do a variety of stitching  styles with this machine.  It took me a little while to thread the machine last night, but threading this machine was a little more involved than it was on the Juki.  This machine has a few more levers and and knobs to adjust when you are threading for a certain type of stitching.  It's all laid out in the workbook, which is really handy. The 3 thread overlock stitching is actually working and I'm getting ready to make some headbands with some lovely knit jersey I bought.   I'll be sharing those when I finish them.

    I started another knitting project.  I watch several knitting podcasts on Youtube and several knitters are making trying to knit one or two dishcloths each week this year so they can use them for Christmas gift giving.  I love this idea, but I'm not going to make so many.  I'm just going to make as many dishcloths as I can from the four balls of KnitPicks Dishie yarn that I have in the Jalapeno colorway.  I bought this yarn last year to crochet dishcloths, I really like the knitted dishcloths but they take so much longer than crochet, but if I give myself a year, I should be able to get this yarn knitted up.  I'm using a size 8, 24" Bamboo ChiaoGoo circular needles to make Grandmother's Favorite Dishcloth.  I found this super easy dishcloth pattern on Ravelry years ago, but if you're not a member of Ravelry, you can find the pattern here

    Here's my first dishcloth in the works:


Sunday, October 29, 2017

Making A Fabric Pumpkin

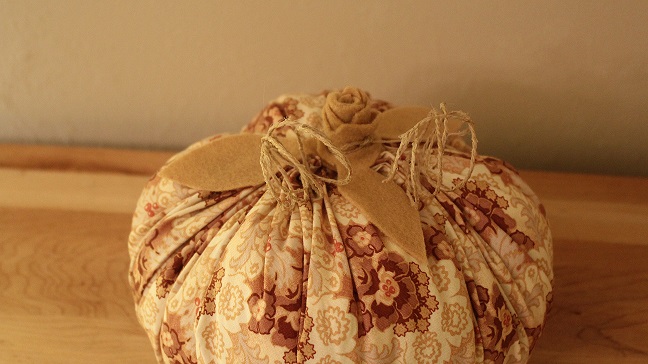
   I got a wild hair a couple of weeks ago to make fabric pumpkins.  I found several videos on Youtube.   There were quite a few videos and some of them were easier then others.  I made mine with just a little bit of hand sewing. 

   I made my pumpkin by cutting a 19" inch circle of fabric.  I did a running stitch 1/2" from the edge with embroidery thread (using all six strands) to gather up the top, stuffed it with fiberfill and closed up the top leaving a little opening to put my stem in it.  I made the stem by cutting a 2 1/2" strip of acrylic felt.  I cut one long edge of the strip making it rough, rolled it up and stuck it in the pumpkin.  You can hot glue the stem in the pumpkin, but I didn't need to.  I made the leaves with the same felt.  I cut a hole in a square of felt and slipped the hole over the stem and cut the leaves in the felt square.   The tendrils are twine treated with fabric stiffener. 

   This was a fun easy project and it would be so cute with some fun Halloween fabric or plain orange.  I will be making more of these to decorate next year.


Wednesday, September 7, 2016

Quilt Assembly

   I spent some of the day making the backing for the scrappy 16-patch quilt top and I now have it sandwiched and ready to quilt.  A twin size Hobbs Heirloom 80/20 batting was the perfect size for this quilt top.  I thought I would run short because of the length of my top, but I had just enough.

    Here's a picture of part of the backing with the row of blocks sewn in the middle.  I lined this row up with the center row of the quilt top.  The blue is quite washed out in this photo, it's a much brighter blue in real life.


   I will be straight line quilting this one using my walking foot.  I'll be using cream colored thread to quilt this one because I want to use up all that cream colored thread that I bought in June for my hexagon quilt.

Friday, July 8, 2016

Update On The Grandmother's Flower Garden Scrappy Quilt Top

   Here is my current quilt project with the sixth row added to it.


     I have one more row of flowers to add.  I'm hoping to have that last row done by Sunday afternoon.  Then I'll move onto the next step of sandwiching this with the batting and backing fabric.  I have decided to hand quilt (something I have never done before) this quilt and I will be using large stitches in order to get this done a little quicker.


Saturday, July 2, 2016

I've Basted The Last Of The Hexagons Needed For The Quilt Top


     I finally finished basting the last of the hexagons to finish my scrappy Grandmother's Flower Garden quilt top.  These represent what I need to sew up the last two rows, there are 10 scrappy flowers, 2 scrappy half flowers, 134 beige hexies for the third round of each flower, and 92 green hexies to finish the connecting path around each flower.  I'll start sewing these together tomorrow.


   I'm almost to the end of my first spool of thread (Essential Quilting Thread from Connecting Threads, 1200 yards).  I can't believe how much of this top was done with one spool of thread since I basted each hexagon and sewed them together with double thread in the top.

Sunday, June 12, 2016

My Favorite Cotton Quilting Thread

   I buy my favorite cotton quilting thread from Connecting Threads.  The 1200 yard spools of Essential Cotton normally sell for $2.79 but it's on sale now for $1.95 which is a 30% discount.  Nice. When I want to use cotton thread, I don't hesitate to use this in any of my sewing machines.  I'm now using to hand sew all the the hexagons for my current project.  I love this thread.

   I bought six more spools of the Cream colorway so I would have enough for my Grandmother's Flower Garden quilt.  I started this quilt top with a brand new spool of the Cream colorway.  I have used over half a spool on the two rows of the quilt and flowers I have already put together and I wanted to stay with the same thread all the way through the quilt top.

   I haven't decided how I'm going to quilt or bind this top yet so I have not decided what color thread I will be using quilting or binding.

   Here are my new spools of thread.  I should have plenty to finish piecing the quilt top.


   Here's a new spool compared to the spool used to make the flowers and two rows so far which means that six more spools should be more than enough for the five rows I have to finish.


Thursday, February 25, 2016

The Start of My 2016 Christmas Tree Project

   I made two crazy little Christmas tree decorations to start off this project that I will be working on all year.  These are going to be my substitute for a regular Christmas tree during the holiday season.   I don't put up a regular tree because of my kitties and I miss a Christmas tree, so I decided to make some trees that they can't destroy and put them around the house during the holidays.

    This is the first one I made a a couple of weeks ago.  This idea looked prettier in my mind than it actually does made up, but I like it.  My idea was to crochet a long piece and shape it into a tree and secure it on fabric.  To make the crocheted piece, I used embroidery thread with a 1.7 mm steel hook, crocheted a chain of about 64 stitches, crocheted a round of half double crochet around the chain and then added a picot edge.  I attached it to the fabric, added sequins, and bound it.


   This is the second tree I made.  I crocheted a border around this 3" embroidery hoop using embroidery thread then I added the small embroidery.  I found the border idea here.  I have five more of these embroidery hoops, so I'll be using those up and crocheting different borders in different colors.

     I used a skein and a half of embroidery thread with a 1.7 mm steel hook.  I put the border around the outside hoop so I could add the embroidery.  The designer uses the inside hoop for her borders because she is using them as picture frames and doesn't need the outside hoop.


    The third Christmas tree will be a larger appliqued piece.