Pages

Showing posts with label glue. Show all posts

Friday, May 29, 2020

Making Another Quilt Ladder

I bought the materials I need to make another quilt ladder.  I bought two 1 x 2 x 6 pine boards and three 3/4 inch 48 inch long dowel rods.

I have a 3/4 inch wood boring drill bit to make the holes for the dowels.  All I need to do is file a curve in the end of each board, drill the holes for the dowels, cut the dowels to about 20 inches long, glue them in and stain it.

Here is the cost of the wood I bought.

(2) 1 x 2 x 6 pine boards $3.94 each
(3) 3/4 inch by 48 inch dowel rods at $3.18 each.

I have the rasp, drill, drill bit, glue and stain.

The instructions I used to make my first quilt ladder said to make the ends of the boards curved so the ladder sits nice against the wall.  I can't find the instructions I used on the internet anymore so I can't link them here.  Here is the end of the boards with the curve filed.  It took about 30 minutes to file the four ends.   I don't have a fancy saw to cut the curve into the wood so I just use a rasp and elbow grease.


After making the curves, I drilled 5 - 3/4" holes in each board.  I sanded the curved ends and the holes in each board.  Then I cut  5 - 20" pieces from the 3 dowel rods.  I filed the ends of the rods and sanded them, then I glued them into each of the boards.

The ladder took me about 3 hours to put together.  It's an economical and easy project to do.

Here is the ladder put together before I stain it.


Saturday, May 16, 2020

Lots More Navy Blue Gingham Items For The Kitchen

My large 40 ounce white teapot needed a tea cozy.  I put a ruffle on this one.  I keep this teapot in the pantry but now it's ready to use with a nice roomy cozy.


Pot holders.  I made these to be a wall decoration in the kitchen.  I'm putting them up with velco command strips.


Apron/dress for my dish detergent bottle.  This was easy and fun to make.  I actually ended up using glue to secure the bias binding on the back because the binding strip was too narrow to sew on the back.


Stand mixer cover.


And I still have about two and a half yards of the blue gingham.   I haven't made the toaster cover or a cookbook cover.  Two things that may happen in the future.


Sunday, January 12, 2020

One More Valentine Decoration

   I like to hang garlands from two set of spotlights in my ceiling for holidays and seasons.  It's a great way to keep decorations from prying kitty noses and paws.  I found some ultra cute red gingham hearts at Hobby Lobby yesterday and I had to have them to make a garland for Valentine's Day (even though they were not on sale).

   These hearts needed loops and I know the easy way would be to get some red ribbon and glue that to the hearts, but I don't have any pretty red ribbon, so today at 5:00 a.m. I was rooting around in my fabric stash looking for some red fabric to make loops.  I wasn't sure I would find any because I don't have a lot of red fabric because of the dye running issues it has, so I usually stay away from red. 

   I was lucky I found a piece of red with tiny white polka dots on it in and that became the fabric for my loops.  I cut the fabric into 2" x 4" pieces and folded it up, ironed them, and sewed the folded edge closed..  I plugged in the glue gun and glued the ends together to make the loops and glued the loops onto the back of the hearts.  This project took about an hour and a half from fabric finding to finish.  So easy, fun and adorable.  I'll be stringing these up with some jute twine.


Tuesday, November 26, 2019

Another Christmas Craft

I've been watching Christmas DIYs on YouTube and I saw a couple of ladies cover Styrofoam cones with fabric or scarves to make Christmas trees and I decided to try it.

I bought my Styrofoam cone at Hobby Lobby last Saturday using my 40% coupon and I saved a three dollars on it.  I found the cute fabric in my Christmas fabric stash, I bought the silver star at Michael's on Sunday and saved a couple of dollars on that with my frequent buyer membership, I had the piece of round board (I bought it for a decoupage project, but it was perfect for this tree), and I bought some sliver metallic paint to paint the board.  I had a chance to use my glue gun and I used up two regular stick of glue putting this together.  Fun. 

I'm loving this tree.


Wednesday, October 23, 2019

Need to Baste, Use Needle and Thread or Pins, Not Glue

   I am a member of the Quilting Board which is an on-line quilting community.  I am amazed at the number of people on the board that use Elmers School Glue for basting quilt sandwiches, basting English paper piecing papers to fabric, basting seams, and basting zippers.

    I recently read a post by a person who wanted help because they used too much glue on their English Paper Piecing papers and the fabric was stuck to them and wondered how to fix the over use of glue.   It took all I had not to respond that using glue instead of thread to baste was just not smart.

    I have never used Elmers School Glue in my sewing.  If I want to baste something I get a needle and thread and baste it by hand or by machine.  I use large safety pins to pin baste my quilt sandwiches.  That's what sewing is all about, needle, thread and pins.  Not glue.

    I have used fusible interfacing, fleece, and webbing in my sewing.  I have also been intrigued by the two sided tape used to stabilize zippers (Dritz Wash Away Wonder Tape) but I have never used any.

    I would NEVER take the Elmers to my fabric.  Yes, I understand that the glue washes out, but  I think it's gross and really unnecessary.  It makes me wonder if the folks that are using glue don't really like to sew at all.

Wednesday, December 26, 2018

From T-shirt To A Great Fitting Hairband

I love this hairband and it's so easy to make.  Here's the LINK to the video tutorial on youtube.  This hairband doesn't take that long to make and it looks great and fits even better.  I had an old black t-shirt and make this one in about an hour (maybe less).  I don't use the glue gun to secure all the ends and attach the cover, I sew it by hand.  I just think that sewing it makes it more secure.  I don't trust glue on fabric that I want to wear.


Monday, July 2, 2018

More Snowmen

All the snowmen ornaments are done.  I will not be making any more of these this year.  I still have more white wool, buttons and beads to make more, but they will have to wait.  It took me a whole week to make these ornaments in my spare time.   I will be sharing these with my dear daughter.  These snowmen were so much fun to make, but it's time to move along and get started on other projects.


Monday, June 25, 2018

Quilt Ladder

    I made a quilt ladder several years ago and I used some instructions I found on a blog.  I looked for that blog today but I could not locate that specific blog.  I did find lots of other instructions for making all kinds of quilt/accessories ladders that use screws, nail, glue, and rope. 

     I made my ladder with pine boards and pieces of dowel.  I found all my materials at Lowes.   The boards measure 1.5" x 3/4" and the dowel sticks are 3/4".  I bought a spade drill bit to make the holes in the boards to insert the dowel sticks.  The ladder was easy to make and very cheap.  I want to say that even with the purchase of the drill bit it cost well under $20.00.  I stained the finished ladder and I also covered the stain with a polyurethane so the stain would not rub off onto my quilts.  I love this little piece and I want to make a couple more in the future.  This was such an easy project my daughter made one for herself.  She loves hers as well. 

      I took several picture of the quilt ladder because I wanted to show it well.

      This is the quilt ladder with four quilts on it.


     I took the top quilt off so you could get a sense of the width of the ladder.


     This is a picture of the ladder where it stays in a corner of the bedroom.


Saturday, December 23, 2017

Review - Mini Hi-Temp Glue Gun

I bought this glue gun from Amazon.com.  I couldn't resist the colorful plastic cover on this gun, it's awesome. 

I've used this glue gun three times in the last couple of weeks.  It gets hot very quickly (within 8 minutes) and the glue flows very nicely when the trigger is pressed.  I noticed that the glue gun does not drip when I'm not using it which is nice because that will save a little bit of glue.  The stand is actually molded from the plastic (not one of those wire stands) and it works very well.  This tiny glue gun fits in a plastic pencil box along with the 30 mini glue sticks.


Easy Christmas Tree Decorations

    I found these cute Christmas tree ornaments on Facebook and made three to give to my dear daughter.  Here is the link to a similar tutorial made with scrap ribbon.  Link to fabric Christmas trees. 

     I made mine a little different.  I used a dowel that I cut up into three different sizes.  I filed the ends of each piece to round off the edges caused by the cutting.  I painted the dowel stick, then I cut up 1.5" wide strips of fabric into 8" long pieces and I also used some green ribbon I had.  I tied the fabric to the dowel and trimmed it into a triangle.  I found the wooden stars at Michaels and painted them with some silver glitter paint I had.  I glued the star to the top and added a piece of twine for hanging. 

    These were easy and fun to make.


Wednesday, December 13, 2017

Rustic Christmas Tree Ornaments And A Quick Product Review

   I made tree ornament with the mason jar band and strips of fabric.  They turn out like little wreaths and they are super cute. I love rustic bows and buttons.  Here is a link to the video tutorial (it's the first ornament she makes in the video) homespun tree ornaments link.   The person in the video uses only homespun fabric for her ornaments but I used a mixture of homespun and Christmas patterned quilting cotton.  I think this will work with any fabric.  Have fun with it.

    I found out while making these ornaments that I desperately need a new glue gun.  I've had my Aleene's Glue Gun for twelve years and I dread taking it out to use because it takes so long to heat up and the glue just doesn't flow very well.  It's time for a newer model.  I went shopping on Amazon tonight and picked out two glue guns, one that takes full size glue sticks and has two temperature settings and a mini glue gun that is high temperature only.  I'm looking forward to upgrading my equipment.  I hope to do a review of my glue guns after I have had a chance to try them out.

    Here are the ornaments I made tonight.  I will definitely be making more of these.


    I want to mention that when I made my pleated/textured Christmas tree I used a product called Craft-Fuse by Pellon (Style 808) Iron-On Backing For Crisp Hand & Added Body.  It's a heavy duty fusible interfacing, and I used it to stabilize my tree piece while adding the sides to it.  It worked great.  It fused easily to the fabric and stayed put once it was ironed.  So if you are looking for a heavier weight interfacing to stabilize that is fusible, try Craft-Fuse.  It really works.  I bought two packs of this from Amazon about a year ago and I forgot I had it until I was looking for interfacing to do this project.  I'm glad I had it.

Sunday, October 29, 2017

Making A Fabric Pumpkin

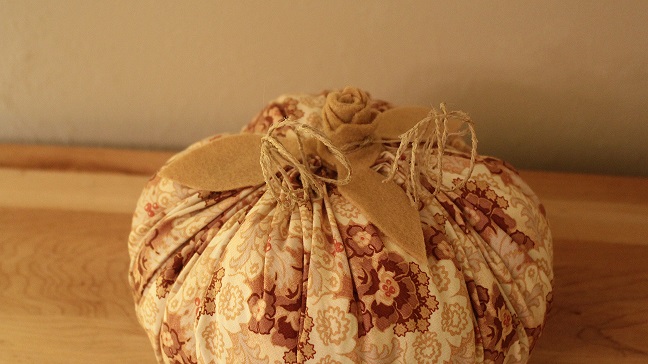
   I got a wild hair a couple of weeks ago to make fabric pumpkins.  I found several videos on Youtube.   There were quite a few videos and some of them were easier then others.  I made mine with just a little bit of hand sewing. 

   I made my pumpkin by cutting a 19" inch circle of fabric.  I did a running stitch 1/2" from the edge with embroidery thread (using all six strands) to gather up the top, stuffed it with fiberfill and closed up the top leaving a little opening to put my stem in it.  I made the stem by cutting a 2 1/2" strip of acrylic felt.  I cut one long edge of the strip making it rough, rolled it up and stuck it in the pumpkin.  You can hot glue the stem in the pumpkin, but I didn't need to.  I made the leaves with the same felt.  I cut a hole in a square of felt and slipped the hole over the stem and cut the leaves in the felt square.   The tendrils are twine treated with fabric stiffener. 

   This was a fun easy project and it would be so cute with some fun Halloween fabric or plain orange.  I will be making more of these to decorate next year.


Sunday, April 26, 2015

Beaded Stilettos

      I finally found my turkey lacer skewers at Bed Bath and Beyond yesterday while I was out and about.  We have a Michaels store in the same shopping center so I thought I could find some beads there.  They must be in the process of re-organizing or deleting their bead section because it was gone except for a few packages on the end of the aisle.  I didn't like what was out so I went to JoAnn's this morning and found beads.

    Here are the beaded stilettos I made for myself.


   I'd like to make more of these using a better glue and a longer skewer.  I used Aleenes Metal and Jewelry glue, which is like a super glue.  These skewers were kind of short and when you put big beads on them you don't have a lot of skewer left.

   Just in case you are wondering, my friend contacted me about the Singer 401A sewing machine and she wants it back.  We just have to find a day and time to meet halfway and I'll give it back to her.  

Sunday, April 19, 2015

Quilt Ladder Project

   I bought the supplies to make this quilt ladder a couple of weeks ago.  Using the instructions from this  A Beautiful Mess, I made it to store the quilts that I made.


My supplies:

  2 -  1" x 2" x 6' pine boards ($3.25 each)

  3 - 3/4" x 48" round dowels I'm making five rungs 20" long so I only needed 2 1/2 of these ($8.94)

  1 - 3/4" Forstner drill bit ($9.97)

  1 bottle of Elmer's Carpenter glue ($1.98)

Total  $27.39 (without state sales tax)

       I had a little trouble getting my drill to work.  I called in my dear daughter for help and we finished drilling the holes yesterday.  I sanded and set it up this morning for this picture.  I still have to stain it and I'm calling it done.  I have plans to make a couple of more for myself and dear daughter wants one or two.

Tuesday, March 31, 2015

Yard Art Complete.

Okay, so I sanded the bowling ball and then I filled the finger holes with some of the adhesive that I used to glue the glass gems on.  I had read that one person filled the finger holes with cement but I think the caulk is fine.  I let the caulk dry for 36 hours and then I leveled the caulked holes.


On Saturday, I painted the bowling ball silver.  It's hard to spray paint in the wind.  hehehe
I let it dry for overnight.


On Sunday I glued on all the glass gems covering every bit I could.  I was surprised how long this process took because I had to let each section dry for about an hour before I could move the ball and do a new section.  I worked on this from 11:30 a.m. until 4:30 p.m.


This is the finished piece of yard art in my gazing ball holder.


This one is done and that ugly bowling ball looks pretty in the garden now.


Wednesday, March 25, 2015

I'm Working On Yard Art

    This project will probably take me about a week to finish.  Tonight I'm sanding a bowling ball.  I'm preparing to make it into yard art.  This is a project that has been waiting patiently for 7 years.  It's time to get it done.

   Back Story:

   When I bought this house over 7 years ago, I did a lot of research on yard art made from other items.  I found a site where it showed how to make a bedazzled ball from a bowling ball using sand paper, caulk, spray paint, silicon adhesive and glass gems.  It's supposed to resemble a gazing ball.  After I mention this art project to dear daughter, she gives me an old bowling ball for Christmas so I can create this yard art.  That bowling ball has been sitting in my extra bedroom since then.  I bought the glass gems on-line about two years later and they have been waiting for me to use them as well.   I bought the silver spray paint a few weeks ago when I was buying paint for my barn quilt because I knew I wanted to get this project done.  All I needed was the clear silicone adhesive.  I bought the silicone adhesive today, so this project is ready to start.


  So to make this bowling ball into bedazzled yard art I have to sand this ugly bowling ball, fill the finger holes with caulk and let that dry, then spray paint the ball, let that dry, then use the silicone adhesive to glue all these crazy glass gems onto the ball.

   Here's a link to the picture of a purple bedazzled ball someone made and posted on the web.  Purple Bedazzled Gazing Ball

    Bowling ball all sanded.


  See you at the end with more pictures.


Wednesday, December 17, 2014

Pins, Pins, Pins, and Of Course, Pincushions.

     I love, love, love pincushions and pins.  One of the best things about sewing are all the fun notions I get to have.  Pincushions and pins are so simple and I am one of the sewists that can't sew without them.  I also love that they can be super decorative.  I buy them, I make them, I can't get enough of my pins and pincushions.

   When I make a pincushion I try to fill it with emery sand (not always possible) because it's so good for sharpening my pins.  I buy emery sand on Amazon or etsy.com so it's super easy to get and one pound of emery sand goes a long way.  You only need a little emery pincushions to help sharpen those pins.


       These teacup pincushions (I used the idea from a blog called MrsMMakes, link here) are filled with polyfil because it was the best material to get the nice plump pin cushion top on the cup.  I did cover them with wool (another good material to use for pins).  The pink cup has wool felt I bought in squares from an etsy seller.  The blue pincushion and the green pincushion are covered with felted wool I knit myself.  To make the blue and green covers I just knit a quick square of stockinette stitch from my wool yarn stash, felted it, filled it with polyfil, sewed it up and glued it into the cup.  The teacup is then glued to the saucer.  This is a super quick and fun project and they would also make a great gift for a fellow sewist.  The hardest thing about making these pincushions was finding a not too expensive pretty teacup and saucer to use.  I always go to ebay or etsy for my teacups and I try to buy them out of season like early in the year before Mother's Day and well before Christmas because the prices go up for those holidays.


       I have no idea what is inside these tomato pincushions I bought, I think it is sawdust, but I don't think my sewing room would be complete without a tomato pin cushion, or two or three.  I found the following information on wikipedia regarding these cuties:  "According to folklore, placing a tomato on the mantel of a new house guaranteed prosperity and repelled evil spirits. If tomatoes were out of season, families improvised by using a round ball of red fabric filled with sand or sawdust. The good luck symbol also served a practical purpose—a place to store pins.  Typically, the tomato is filled with wool roving to prevent rust, and the strawberry is filled with an abrasive to clean and sharpen the pins."


     I made the little wool pincushions with yarn I had in my knitting stash.  I posted how I made them here. 


      I made this big crazy, wonky pink pincushion with wool felt that I filled with emery, the best of both worlds.  It's really heavy and great for using at the machine because it's low profile and it doesn't get in the way of my sewing.


   I bought this felted wool pincushion because it's so pretty.


   I have a few more pincushion projects that I want to make.  There is a completely cute pincushion made using a 3" embroidery hoop, the tutorial is here.  And I know I really, really, really need a very cute ring pincushion to have for my hand stitching sessions, and that tutorial is here.