Pages

Showing posts with label tutorial. Show all posts

Friday, July 3, 2020

My Blue Jean Purse

  So I finally sewed up the blue jeans purse that I cut out from the legs of the blue jeans I bought to make my garden apron.  I found lots of youtube video tutorials on how to make a blue jeans purse.  I needed one that I could use my leg fabric and the one I found was perfect.  I love the shape of this one.

  Here is the link to the tutorial:  blue jeans purse.  The maker does not speak English so I watched it through to see if I could follow it.  The maker placed written notes in strategic places when they were making the pattern and after that it was easy to follow the video showing the cutting of the pieces and sewing up of the bag.  It's a 13 minutes video but it's really done very well.  It took me 3 hours to make the purse from making the pattern to the last stitch.  

   Here is my purse.  Blue jeans with navy blue gingham lining.  I love it.


  Next up I have to finish quilting my Grandmother Flower Garden quilt.

  I pulled out the fabric for my next quilt (purchased over a year ago) that I want to start.  I do that to give myself incentive to finish my current project.  I an incapable of working on more than one quilt at a time.  I will work on smaller projects while working on a quilt but I won't have more than one quilt on the go at one time.  I don't have the brain capacity for lots of quilt projects.

Tuesday, December 10, 2019

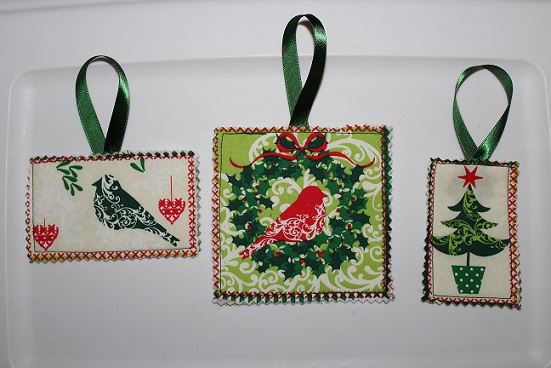
Easy Christmas Ornaments Made And Ready To Gift

Dear daughter is getting these.  I used the tutorial at Patchwork Posse.  She had a fussy cut ornament tutorial and the link is here.  These took me about an hour and half to make from first cut to last stitch.  These ornaments are double-sided.  I put the same picture on the back of each of these.


Wednesday, December 26, 2018

From T-shirt To A Great Fitting Hairband

I love this hairband and it's so easy to make.  Here's the LINK to the video tutorial on youtube.  This hairband doesn't take that long to make and it looks great and fits even better.  I had an old black t-shirt and make this one in about an hour (maybe less).  I don't use the glue gun to secure all the ends and attach the cover, I sew it by hand.  I just think that sewing it makes it more secure.  I don't trust glue on fabric that I want to wear.


Monday, November 5, 2018

My Favorite Tutorial For Joining My Binding Ends

   I wanted to share my favorite youtube video tutorial for joining my binding ends.  It's really simple and it works every time I use it.


    In case you can't get it to play from my post, here is the link here.

Saturday, September 29, 2018

One Last Halloween Decoration

    I've been waiting a couple of months to make this witch hat.  I found this tutorial back in the beginning of August, but I had to wait to make it because dear daughter wanted to make one too.  We had to coordinate our fabric buying trip and our sewing day.  We finally got the hats made today.  I love this project.  It was really simple to make  and lots of fun to decorate.  I used the tutorial you find HERE.

    Here is the hat I made.


Saturday, August 18, 2018

Wild Christmas Pillow Cover

    I made myself a bright and wild red and green Christmas pillow cover.  I love it.  I found the fabrics on Etsy and I used the quilted pillow cover tutorial here. 


Saturday, August 4, 2018

Secret Sewing Is Done, On To Selfish Sewing And Making

     I can't believe it's August already.  This year is flying by.  I've only made one trip to the beach this summer so my summer season has not been filled with fun and excitement, just working and doing regular household and life maintenance.   I am trying to schedule more beach day trips before the end of September.

    I'm so glad that I I finished five secret sewing projects last week for dear daughter's birthday in November.  It's hard for me to do secret sewing because I can't share it on social media until after it is gifted.

     My selfish sewing projects start with this adorable snow family fabric.  I found this at JoAnn's a couple of years ago and I made some hanging dishtowels with it to give away to my Christmas day hostess.  I have been wanting more of this fabric ever since.

    I found the snow family fabric again last weekend and had to buy it.   I made this quilted pillow with a whole cloth piece of the cute snow family fabric so I could see all the little family members.  I especially love the kitty and doggy in this print.  I cut the fabric a little bigger than my sixteen inch pillow form to allow for the quilting and I cross hatch quilted the top piece with a scrap of 80/20 Heirloom batting and a white muslin backing.  Then I joined this quilted top to an envelope backing.  It was really simple and I love it.

   The front of the pillow.


   The back of the pillow.


   Close up of snow kitty with a redbird on its head.


    I found another YouTube pieced pillow cover tutorial that I just love.  I have purchased red and green Christmas fabric to make one for me.  Here is a link to the tutorial:   quilted pillow cover tutorial.  This tutorial is really well done and I used the dimensions to make the whole cloth pillow cover that I made above.

    I still have to make the tote bags from my Hawaii souvenir fabric and that fabric is sitting on my ironing board waiting patiently.

    There is one more Christmas decoration that I want to make.  I have a crochet angel dishcloth pattern that I want to experiment with by making the pattern with worsted white cotton yarn combined with silver crochet size 10 thread.  I want to make a couple for me and a couple for dear daughter for Christmas decorations.  I'll have to see how the first one turns out before I commit to making four.  LOL.

    I have knit 24 dishcloths since the beginning of the year.  I am finished with knitting dishcloths for awhile.  I have plenty to give to dear daughter and keep for me.  I still have to get back to my hexagon quilt top and my crochet blankets that I started.


Thursday, June 28, 2018

Recycled Jeans To Skirts

   I found this fun video tutorial by the Stitch Sisters on transforming a pair of jeans into a skirt and I had to try it.  Here is the link to the tutorial:  Jeans to Skirt tutorial. I went to Goodwill and found three pair of jeans.  Two for the skirts and one to use for the extra material needed to fill in the cut areas.  I now have two jean skirts for $18.00.  I love them.

    Here is a wonky picture of one of the skirts on.


Saturday, June 9, 2018

Time To Think About Christmas Sewing and Making

    It's never too early to think about Christmas decorations.  I'm probably going to start my Christmas ornament making next month.   

     This is a quick post to give you a link to a video tutorial on how to make a cute snowman Christmas ornament.  I watch a knitting podcast on youtube called Craft House Magic.  Ellie has a video on how to hand sew an adorable snowman Christmas ornament.  She even provides viewers with a .pdf template for the shape of the snowman.  Which is great because I can't draw.   Her tutorial is wonderful, she shows you exactly how to make the whole ornament in a 24 minute video.  I have some white wool felt on order to make several of these lovelies for family and friends.

    Here's the link to the video:     https://www.youtube.com/watch?v=nZQ-HVBhHLA

     Have fun.

Sunday, February 11, 2018

My First Successful Serger Project

    I made my first headbands.  I bought a yard of pretty floral knit jersey (along with several other knit jersey prints) from Fabric.com.  I made three headbands and I have enough fabric left over to make a couple of scarves with this material, which I'm going to make up after I finish making my headbands up.  I used the Crafty Gemini video tutorial make up these headbands or turbands as she calls them.  The tutorial is here.


Sunday, January 7, 2018

Crochet Hearts for Valentine's Day.

   I found a crochet tutorial on youtube that I really like to make pretty hearts.  The tutorial is easy to follow as well.  It takes about 22 minutes to make a heart using the tutorial.  Here's a link to the tutorial I used:  Crochet Heart Video Tutorial

     You can use any weight yarn or thread and a hook size to match the material.  I used some pink Red Heart Acrylic yarn that I had leftover from a previous project (worsted weight) with a size G crochet hook.


    I think these hearts would be pretty with a picot edge.

Thursday, December 7, 2017

Pleated Christmas Tree Project and More

    I found this pleated Christmas tree tutorial a few years ago and I made one that I gave away to my daughter.   Here is a link to the tutorial:  pleated tree skirt tutorial.  I've been wanting to make one for  myself and I'm doing it now.  This is easy to make and you can have fun with colors for the tree and the tree skirt.  I stayed with Christmas colors for this one, but I will definitely be experimenting with colors for the next one I make.

    I will add the tree skirt on this one and it will be ready to frame.


      I've been watching Youtube videos on how to make easy and cheap Christmas decorations.  I love the snowflakes made with clothes pins.  I bought very small clothes pins from an etsy seller to make a few of these to add to my decorations.  I need to buy some silver spray paint and silver glitter to make them sparkle.  Here is a link to a Youtube video: Clothes Pin Snowflakes.

     I also like to the decorations I've seen made with the mason jar lid band.  I saw a lady tie a bunch of homespun strips around the band and it turned out extra cute.   Here's a link to her tutorial, she makes four different ornaments in this one.  Homespun Christmas Ornaments Youtube tutorial.  And yes, I have some mason jar lid bands for this project as well. 

    I also found a paper star tutorial on Youtube.  Here's a link:  Paper Stars.  I haven't done a lot of paper crafts, but this one looks doable.  I'm going to give it a try in the next few weeks.  I'll let you know how I get on.

No progress to report on my Grandmother's Flower Garden Quilt top.  I'm still stuck on the third row.


Monday, December 14, 2015

Easy Paper Ornaments

   I just found this tutorial about an hour and a half ago while I was surfing the net.  Here is the link.

    I pulled out my small supply of scrap booking paper, my buttons, my stash of tiny glass beads, my floral wire and proceeded to make two of these in less than an hour.  They were fun to make.  I substituted buttons for the big beads in the tutorial.  I don't have a supply of big beads.  The buttons worked fine.  If I were going to make these to give as gifts I would definitely use Christmas papers and get some big beads to give them lots of bling.  These are done in my favorite colors of pink and green.  These would also be fun in some one's school colors.


Saturday, December 12, 2015

Crochet, Crochet Thread, And A Doily Video Tutorial

   I think I love youtube.  I was browsing through youtube the other day and I found a tutorial on how to crochet a doily from start to finish.  I found this last week when I was making my braided ear warmers.

   I love crochet but I have never actually crocheted a doily because the instructions just seemed so complicated, but I think I can follow along with a video to get this done.

    Here is the link to the first part of the doily instruction video (there are three parts), the other two parts will show up on the right hand side of your screen for you to click when you are ready for them.

    I have a set of steel crochet hooks and I'll be using a size 1.65 mm hook to make the doily and I bought some crochet thread for this project.  I bought two 1,000 yard skeins of Aunt Lydia's Classic Crochet Thread Size 10 from Amazon.  Each skein was $6.40.

   Before I start the doily project I wanted to get used to using a small hook again so I started a granny square using the thread and a 2.25 mm hook.  I enjoy crocheting granny squares and this will make a nice doily when I get it to a decent size.


Monday, November 16, 2015

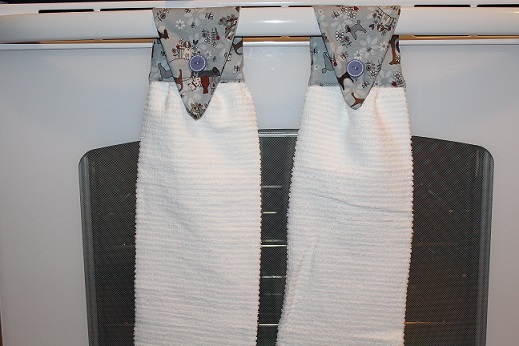
Super Cool Hanging Dishtowels

   I was going to make these tomorrow, but I couldn't wait and started them tonight after dinner.  The tutorial is perfect in its instruction and I had no trouble getting these handy hanging dishtowels made for my dear daughter.  The only item I bought to make these towels were the bar mop towels.  I paid $5.48 for 6 towels at Walmart.  I had the top fabric, interfacing, thread, and buttons in my stash.


   One note I will make about this tutorial is that bar mop dishtowels should not be cut in half because they are shorter than a regular dishtowel.  Cutting the bar mop dishtowels in half make sections that are too short to make a good drying towel (ask me how I know, hehehehe).  Cutting 2" off each towel works much better and gives you just enough length for a nice hanging dishtowel.  So instead of using one towel to make two hanging dishtowels, you would use one bar mop towel for each hanging dishtowel.

   I love having hanging dishtowels in my kitchen and I'm really happy that I tried this tutorial.  I use my hanging dishtowels to dry my hands when they are wet and I like using bar mop towels for this kind of project because they are pretty cheap.

    I did take the pieces of the one towel I cut in half and made two little hanging dishtowels for me, but the terry sections on those two hanging dishtowels are really small, but I couldn't waste those two pieces of towel.

   Just in case you missed the previous post talking about these hanging dishtowels, I used the tutorial at Our Secondhand House blog, link here.

   I no longer hate making buttonholes.  Buttonholes always seemed so complicated and I would try to avoid them, but after making 10 buttonholes on my shower curtain the other day with my new Janome Horizon 7700, I feel like I could make buttonholes all day long.  I won't be avoiding buttonholes anymore.


       I have three more dishtowels left and I'll be using those to make three more hanging dishtowels.

Wednesday, November 11, 2015

Red Wool Pin Cushions

     I do not have any red sewing accessories on the table that I keep my active sewing machine on.  It is time to add some red color to my sewing area.  I made a couple of felted wool pin cushions for myself with some wool yarn I purchased just for this project.  I love making these little wool pin cushions.  They are so much fun to make, so simple and so useful.

     This is a short written tutorial on how I made them.  I use 100% wool yarn.  I bought two skeins of KnitPicks.com's Wool of the Andes worsted yarn a couple of weeks ago.  One skein in red and another in cranberry.  This yarn is lovely to knit with.  I've made a few scarves with it, but it's really great for felting.  The bulky variety of Wool of the Andes is also fun to work with.  I was able to make two pin cushions from each of the skeins I bought.

      I wind the yarn into a flat ball.  I couldn't tell how much yarn I had used each time, so I just guessed when I thought I had used half of the skein for the first ball of each skein.  I thread the end of the yarn into a long steel needle and weave into the center of the ball several time to make a little dimple and then I weave the end in the ball of yarn to secure it.  To keep this all together while I'm felting it, I place the balls in a knee high stocking secured with a knot very close to the ball.  I can fit four or five of these small wool balls into a knee high.  You can also use a sock to the do this, but I prefer to use a knee high because I can see through the stocking and I can see if the wool is felted enough.  I wet the knee high and the wool balls thoroughly in the sink with hot water, you can also put them in with a load of wash.  Soap is supposed to help with the felting process, but I usually just rely on water and the heat from the dryer.  Then I dry them in the dryer with a couple of wet bath towels or a load of wash.  The heat and the friction help the wool to felt.  I usually run them through the dryer several times until I like the way they have felted.  In this project, the red wool felted much better than the cranberry wool.  Interesting.


Thursday, October 29, 2015

Super Cute Quilt Pattern Purchase

  I saw this pattern for this Argyle Runner at Connecting Threads and I had to have it.  It is super cute and I can picture it in lots of different color combinations.


  Here is the link to the pattern page.   There is also an argyle quilt pattern that has thicker sashing strips.  

   I'm putting a new project on my to do list.  I want to make a scrappy quilt top shower curtain from my stash fabrics.  I will quilt the top to a backing without any batting and add buttonholes in the top to hang it from the hooks.  I already have a vinyl liner so I don't have to worry about it getting wet when I shower.  I measured my tub opening and I can make my shower curtain quilt about 72" by 72".  I just have to decide what size to cut my scraps.

   I also found this cool youtube tutorial for a simple quilt with applique squares onto a background fabric so it looks like you pieced it.  It's super cute and it's called The Quick Little Block Quilt.  Here is the link to the tutorial.  Ms. Laura Coia has a lot of youtube sewing tutorials.

Tuesday, August 11, 2015

Neck Pillow For Long Distance Drives

  When I'm not driving, of course.

   I'll be using this around the house as well.  I may even make another for a back up.  I have quite a bit of neck pain and I usually deal with it, but I think this will help me a lot.

    I used this tutorial here.  The link has the .pdf pattern and the sewing instructions.  This project took me about 2 hours from cutting the fabric to the last stitch.  It was fun to make, it fits well, and is super comfortable.  I used cotton fabric from my stash and an almost 12 oz. bag of fiberfill which I bought yesterday.

   Using stash fabric and a $4.00 bag of fiberfill, this would make a nice gift for someone.


Monday, August 10, 2015

My Super Cute Pincushion Ring

     I love this little thing.  I have been wanting to make one for months, but just got around to actually doing it.  I followed the tutorial here.  I made a three changes to the way I made my pin cushion ring.  I used a hammer and nail to make the holes in the cap and then I enlarged them with the tip of old scissors.  I used material instead of ribbon to cover the sides of the cap because I didn't have any pretty ribbon.  I didn't glue the material I just sewed it to the top and bottom.  And I used a hair elastic to make the ring part because I didn't have any thin elastic.  The hair tie worked great.  

   I will be making a couple more of these.  They are super cute.


Thursday, August 6, 2015

Quick Project: Water Bottle Carrier

   This water bottle carrier will come in extra handy when I'm out and about.  I found this tutorial here.  Thank you Pink Chalk Studio.  This holds a 16.9 fl. oz. bottle of water.  That's a pretty standard size around here.


    The tutorial was really easy to follow and from fabric cutting to finish took about 2 1/2 hours.

      I used some pretty Laurel Burch cat fabric I had in my stash and I also had the Insul-Brite already as well.  I used the same fabric for both the lining and the outside to save me time.

     I did change up the strap.  I made my strap from fabric strips because I didn't have any twill tape or pretty ribbon like the blogger used.  To make my strap I cut two wof pieces 2 1/2" wide and sewed them together to make a long piece about 80" long.  I ironed the strip in half lenghthwise, then folded the long edges to the crease in the middle, then I folded it again making it about 3/4" wide.  I ironed it down, then I sewed it 3/8" from the edge.  I trimmed the length to about 58", then attached it just like she attached her ribbon strap.  It's very comfortable.