Pages

Showing posts with label sand. Show all posts

Wednesday, November 11, 2015

Emery Sand Reclamation

   I reclaimed the emery sand from a pin cushion I made a couple of years ago.  The cotton cover on that pin cushion was looking very old with all the pin holes in it.  So I took it apart and saved all the emery that was in it and made a new cover.  The last time I bought emery sand I bought it at this etsy shop, My Sweet Accent, link here.  I see she also sells pin cushions, but I prefer to make my own.  I have also purchased emery sand from Nakpunar on Amazon, as well.

   I've never used the walnut shells or any of the other nut shells that are sold for pin cushion stuffing because I have not heard good things about them.  One person told me that her pins were sticky with some type of residue from the pin cushion she made with the nut shells.  You also have to be careful because lots of people have allergies to nuts.

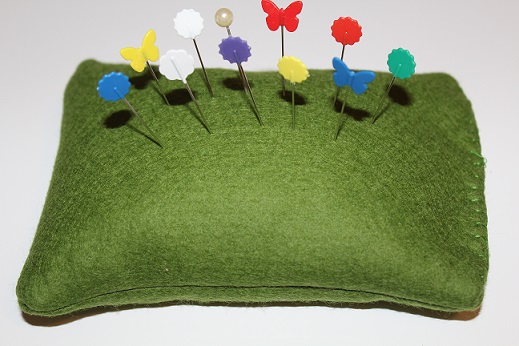
    When I make emery sand pin cushions, the emery is placed in its own little pouch so it's contained and easy to reuse.  I took the emery from my old pin cushion and added some that I had leftover in my stash.  It was originally shipped in a zip loc bag, so I just poured the emery from the old pin cushion in with the leftover to hold it until I was ready for it.  I was able to make a new pin cushion with most of that emery.  I wanted to make two pin cushions, but I didn't have enough, so one will have to do.  I made my pin cushion in a simple rectangle shape.

      First I made a cotton pouch to put the emery in.  The pouch was made from a piece of cotton.  I cut a two pieces of cotton 4" x 6" for the pouch.  I sewed up three side of the pouch using a 1.8 stitch length to make it secure using a 1/4" seam allowance.  After I made the pouch, I filled it with emery, very carefully.  I use a funnel and a spoon with the pouch propped up in a small mixing bowl to catch any loose emery, then I hand sewed the pouch closed using very small stitches.

     I made the cover with some wool felt I had in my stash and I cut it just about a quarter of an inch bigger than the original cotton pouch so the emery pouch would fit .  I sewed up three sides of the cover on the machines with the 1.8 stitch length, using a scant 1/4" seam allowance, (when sewing felt you can use a very tiny seam allowance because the material doesn't fray) turned it right side out, slipped the pouch inside and hand sewed the open end.

   It's done.  A new pin cushion with sharpening emery sand for my straight pins.


Wednesday, March 25, 2015

I'm Working On Yard Art

    This project will probably take me about a week to finish.  Tonight I'm sanding a bowling ball.  I'm preparing to make it into yard art.  This is a project that has been waiting patiently for 7 years.  It's time to get it done.

   Back Story:

   When I bought this house over 7 years ago, I did a lot of research on yard art made from other items.  I found a site where it showed how to make a bedazzled ball from a bowling ball using sand paper, caulk, spray paint, silicon adhesive and glass gems.  It's supposed to resemble a gazing ball.  After I mention this art project to dear daughter, she gives me an old bowling ball for Christmas so I can create this yard art.  That bowling ball has been sitting in my extra bedroom since then.  I bought the glass gems on-line about two years later and they have been waiting for me to use them as well.   I bought the silver spray paint a few weeks ago when I was buying paint for my barn quilt because I knew I wanted to get this project done.  All I needed was the clear silicone adhesive.  I bought the silicone adhesive today, so this project is ready to start.


  So to make this bowling ball into bedazzled yard art I have to sand this ugly bowling ball, fill the finger holes with caulk and let that dry, then spray paint the ball, let that dry, then use the silicone adhesive to glue all these crazy glass gems onto the ball.

   Here's a link to the picture of a purple bedazzled ball someone made and posted on the web.  Purple Bedazzled Gazing Ball

    Bowling ball all sanded.


  See you at the end with more pictures.


Sunday, January 25, 2015

Eight Point Civil War "Buckshot" Pin Cushion Project


    I finished it.  I filled my pin cushion with emery.  Almost 2 cups of it.  The pattern is here.  When I decided to use emery to fill it I knew I would have to make little pouches for the emery to put inside the main pieces of the pin cushion.  So I cut my white fabric squares 4 1/4" (just a 1/4" smaller than the main squares).  They worked perfectly.  The only downside to using emery is that the emery settles in the bottom of the pin cushion and the top 1/3" of each piece is kind of empty.   I was surprised at how long it took me to finish this project, but I love it, so it was worth it.

  Here is a picture of all the emery pieces.


Here are the blue pieces filled with the emery pouches.  The blue fabric is a civil war reproduction fabric I bought on line.


All assembled with a yo yo and button top.


View from above with all the octopus arms.


Thursday, January 15, 2015

Time To Buy A Bathmat

     I'm going to buy a bathmat from Walmart today.  I will not be finishing the crochet bathmat I planned to make with the the 1" strips of fabric I sewed together to make fabric yarn.  I did a test crochet last night with the ball of yarn I made the other night and I hate it.  I just wanted to let you know that I will not be working on this project anymore and you won't see a picture of the little bit I crocheted last night.  It is completely U G L Y.   I wasted about a week on this sewing/crochet fail and I'm moving on to the items listed below.


1.  Recover the cardinal pillow I made last year with red plaid fabric I bought a couple of weeks ago.

2.  Cut the squares for my Civil War Buckshot pincushion  and order the emery sand.

3.  Make the 4 pillow cases with the yardage of Tanya Whelan fabric I purchased last year.

4.  Iron the muslin and trace the pattern for the hand embroidery, Never Underestimate A Woman
     With A Sewing Machine.   Then pick the colors of floss for the embroidery.

5.  Organize the box holding more projects, fabrics and supplies.

6.  Start the pink fluffy granny square afghan for my bedroom.


Wednesday, December 17, 2014

Pins, Pins, Pins, and Of Course, Pincushions.

     I love, love, love pincushions and pins.  One of the best things about sewing are all the fun notions I get to have.  Pincushions and pins are so simple and I am one of the sewists that can't sew without them.  I also love that they can be super decorative.  I buy them, I make them, I can't get enough of my pins and pincushions.

   When I make a pincushion I try to fill it with emery sand (not always possible) because it's so good for sharpening my pins.  I buy emery sand on Amazon or etsy.com so it's super easy to get and one pound of emery sand goes a long way.  You only need a little emery pincushions to help sharpen those pins.


       These teacup pincushions (I used the idea from a blog called MrsMMakes, link here) are filled with polyfil because it was the best material to get the nice plump pin cushion top on the cup.  I did cover them with wool (another good material to use for pins).  The pink cup has wool felt I bought in squares from an etsy seller.  The blue pincushion and the green pincushion are covered with felted wool I knit myself.  To make the blue and green covers I just knit a quick square of stockinette stitch from my wool yarn stash, felted it, filled it with polyfil, sewed it up and glued it into the cup.  The teacup is then glued to the saucer.  This is a super quick and fun project and they would also make a great gift for a fellow sewist.  The hardest thing about making these pincushions was finding a not too expensive pretty teacup and saucer to use.  I always go to ebay or etsy for my teacups and I try to buy them out of season like early in the year before Mother's Day and well before Christmas because the prices go up for those holidays.


       I have no idea what is inside these tomato pincushions I bought, I think it is sawdust, but I don't think my sewing room would be complete without a tomato pin cushion, or two or three.  I found the following information on wikipedia regarding these cuties:  "According to folklore, placing a tomato on the mantel of a new house guaranteed prosperity and repelled evil spirits. If tomatoes were out of season, families improvised by using a round ball of red fabric filled with sand or sawdust. The good luck symbol also served a practical purpose—a place to store pins.  Typically, the tomato is filled with wool roving to prevent rust, and the strawberry is filled with an abrasive to clean and sharpen the pins."


     I made the little wool pincushions with yarn I had in my knitting stash.  I posted how I made them here. 


      I made this big crazy, wonky pink pincushion with wool felt that I filled with emery, the best of both worlds.  It's really heavy and great for using at the machine because it's low profile and it doesn't get in the way of my sewing.


   I bought this felted wool pincushion because it's so pretty.


   I have a few more pincushion projects that I want to make.  There is a completely cute pincushion made using a 3" embroidery hoop, the tutorial is here.  And I know I really, really, really need a very cute ring pincushion to have for my hand stitching sessions, and that tutorial is here.