Pages

Friday, December 8, 2017

Pleated Christmas Tree - Finished.

  The sewing is done on the Christmas Tree.  I just have to put it in a frame.  I love this.  I just ordered some fun green fabrics to make more of these over the next year.  I also ordered a pretty gray with small pin dots that I think will look like a snow covered tree at night.  Fun.  Included in that order was some white fabric for the borders because I am completely out of white fabric.  Weird.

    Here is my finished pleated Christmas Tree. 


Thursday, December 7, 2017

Pleated Christmas Tree Project and More

    I found this pleated Christmas tree tutorial a few years ago and I made one that I gave away to my daughter.   Here is a link to the tutorial:  pleated tree skirt tutorial.  I've been wanting to make one for  myself and I'm doing it now.  This is easy to make and you can have fun with colors for the tree and the tree skirt.  I stayed with Christmas colors for this one, but I will definitely be experimenting with colors for the next one I make.

    I will add the tree skirt on this one and it will be ready to frame.


      I've been watching Youtube videos on how to make easy and cheap Christmas decorations.  I love the snowflakes made with clothes pins.  I bought very small clothes pins from an etsy seller to make a few of these to add to my decorations.  I need to buy some silver spray paint and silver glitter to make them sparkle.  Here is a link to a Youtube video: Clothes Pin Snowflakes.

     I also like to the decorations I've seen made with the mason jar lid band.  I saw a lady tie a bunch of homespun strips around the band and it turned out extra cute.   Here's a link to her tutorial, she makes four different ornaments in this one.  Homespun Christmas Ornaments Youtube tutorial.  And yes, I have some mason jar lid bands for this project as well. 

    I also found a paper star tutorial on Youtube.  Here's a link:  Paper Stars.  I haven't done a lot of paper crafts, but this one looks doable.  I'm going to give it a try in the next few weeks.  I'll let you know how I get on.

No progress to report on my Grandmother's Flower Garden Quilt top.  I'm still stuck on the third row.


Friday, November 17, 2017

More Kitchen Accessories

    I took some time out this week to make some hanging dish towels.  I bought the brown towel to make hanging towels for my hostess on Thanksgiving.  The chicken towels will be mine.  I found the chicken towel in my stash and I love the colors in it, so I had to make some hanging towels for me. 


    These lovely potholders were made on my Harrisville 7" loom with Harrisville cotton loops for my daughter.  She told me that she loves these potholders because they fit her smaller hands better than the bigger ones I make with big squares of cotton and batting.  I made some of these potholders a few years ago for her and since she loves them so much I thought it was time I made her a few more.  I will definitely be teaching her how to make these for herself sometime in the future,   Each one only takes about an hour and fifteen minutes to make.  They are easy and fun to do.  I love picking the colors and putting crazy colors together.


    You guessed it, no progress on my Grandmother's Flower Garden quilt top.  I'm still working on row three.  I've been having too much fun finding other things to make. 

Monday, November 6, 2017

Halloween May Be Over But You Can Still Make Pumpkins

               I'm still celebrating fall with pumpkins.  This may be my favorite pumpkin.  While I was researching how to make fabric pumpkins I found a video tutorial on how to make a pom pom pumpkin with tulle.   This pumpkin was was easier and cheaper to make than the fabric pumpkin and it turned out extra cute.  Here is the link to the youtube video:  tulle pom pom pumpkin tutorial.

                Here is a picture of my effort. 


                While I'm taking time out to make little projects, I'm still working on my grandmother's flower garden quilt top.  I have all the flowers for the third row made and I'm starting to add them to the bottom of the second row.  It's slow going, but it's coming along.  I promise to post a picture as soon as I have the third row finished.

Sunday, October 29, 2017

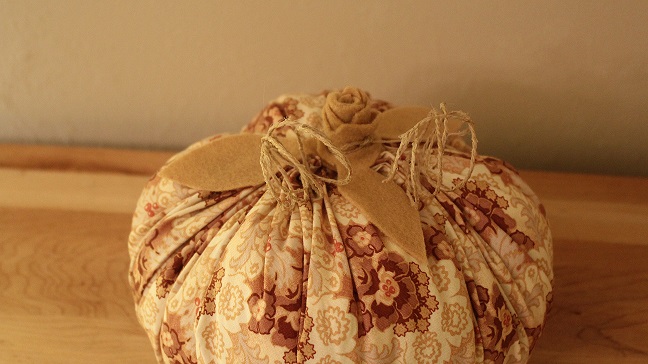
Making A Fabric Pumpkin

   I got a wild hair a couple of weeks ago to make fabric pumpkins.  I found several videos on Youtube.   There were quite a few videos and some of them were easier then others.  I made mine with just a little bit of hand sewing. 

   I made my pumpkin by cutting a 19" inch circle of fabric.  I did a running stitch 1/2" from the edge with embroidery thread (using all six strands) to gather up the top, stuffed it with fiberfill and closed up the top leaving a little opening to put my stem in it.  I made the stem by cutting a 2 1/2" strip of acrylic felt.  I cut one long edge of the strip making it rough, rolled it up and stuck it in the pumpkin.  You can hot glue the stem in the pumpkin, but I didn't need to.  I made the leaves with the same felt.  I cut a hole in a square of felt and slipped the hole over the stem and cut the leaves in the felt square.   The tendrils are twine treated with fabric stiffener. 

   This was a fun easy project and it would be so cute with some fun Halloween fabric or plain orange.  I will be making more of these to decorate next year.


Wednesday, October 18, 2017

The Best Gift Bag Tutorial


     I was wondering how to wrap my daughter's little birthday presents the other night and I realized I could make something really cute with my fabric.

     A few years ago I found this tutorial for a gift bag that is so easy to make.  The directions are great and even if you have never made a bag before, I'm sure you can make this one.

      The little bag that is made from the tutorial is wonderful for small gifts but the best part about this pattern is that you can make the bag any size you want and it turns out great.  I know, because I just did it.  The bag I made the other night is extra scrappy and not very pretty, so I won't be showing a picture here, but you can use coordinated fabrics and make a beautiful bag any size you want.

      I will show you this little bag I made a couple of years ago using this tutorial.  I use this as a purse sometimes.  I even added some batting to the straps to pad them a little bit.  If I lay this bag flat is measures 14" wide by 10" deep. 


      The trick to making the bag any size is to make the lining the same size as the outside of the bag.  So if you made the outside of your bag 14" x 18" then cut a piece of fabric 14" x 18" for the lining and follow the directions.  It works great. 

     You can also adjust the straps on the bag.  You can make them as wide and as long or short as you want. 

    If you are making the bag bigger, you will want to make your boxed corners a little deeper.  When I made my scrappy bag the other night, I sewed and cut my boxed corners at 2". 

    You can also change up how you place your fabric.  Just because they have a solid bottom and scrappy sides doesn't mean that's the way you have to make yours.  I made my scrappy bag with a scrappy bottom and solid sides.  You can make the entire outside from one piece of fabric as well.  It's really easy and I like to say if I can do it, anyone can.